

Fuel, trips and expenses
This page covers the day-to-day fleet records: refueling and charging, fuel cards and their statements, trips, the waybill, other expenses and a vehicle’s cost of ownership.
The Expenses page
Section titled “The Expenses page”In the main menu on the left, open Fleet → Expenses. The page has four tabs:
- Fuel and charging — every refueling and every charging of an electric vehicle;
- Expenses — everything else a vehicle costs: parking, tolls, car washes, insurance, repairs and more;
- Fines — the fines log, described in Incidents and fines;
- Fuel cards — the cards the company pays for fuel with. Only people who manage the fleet see this tab.
UNIO24 remembers the tab you left the page on and opens it the next time you come from the menu.
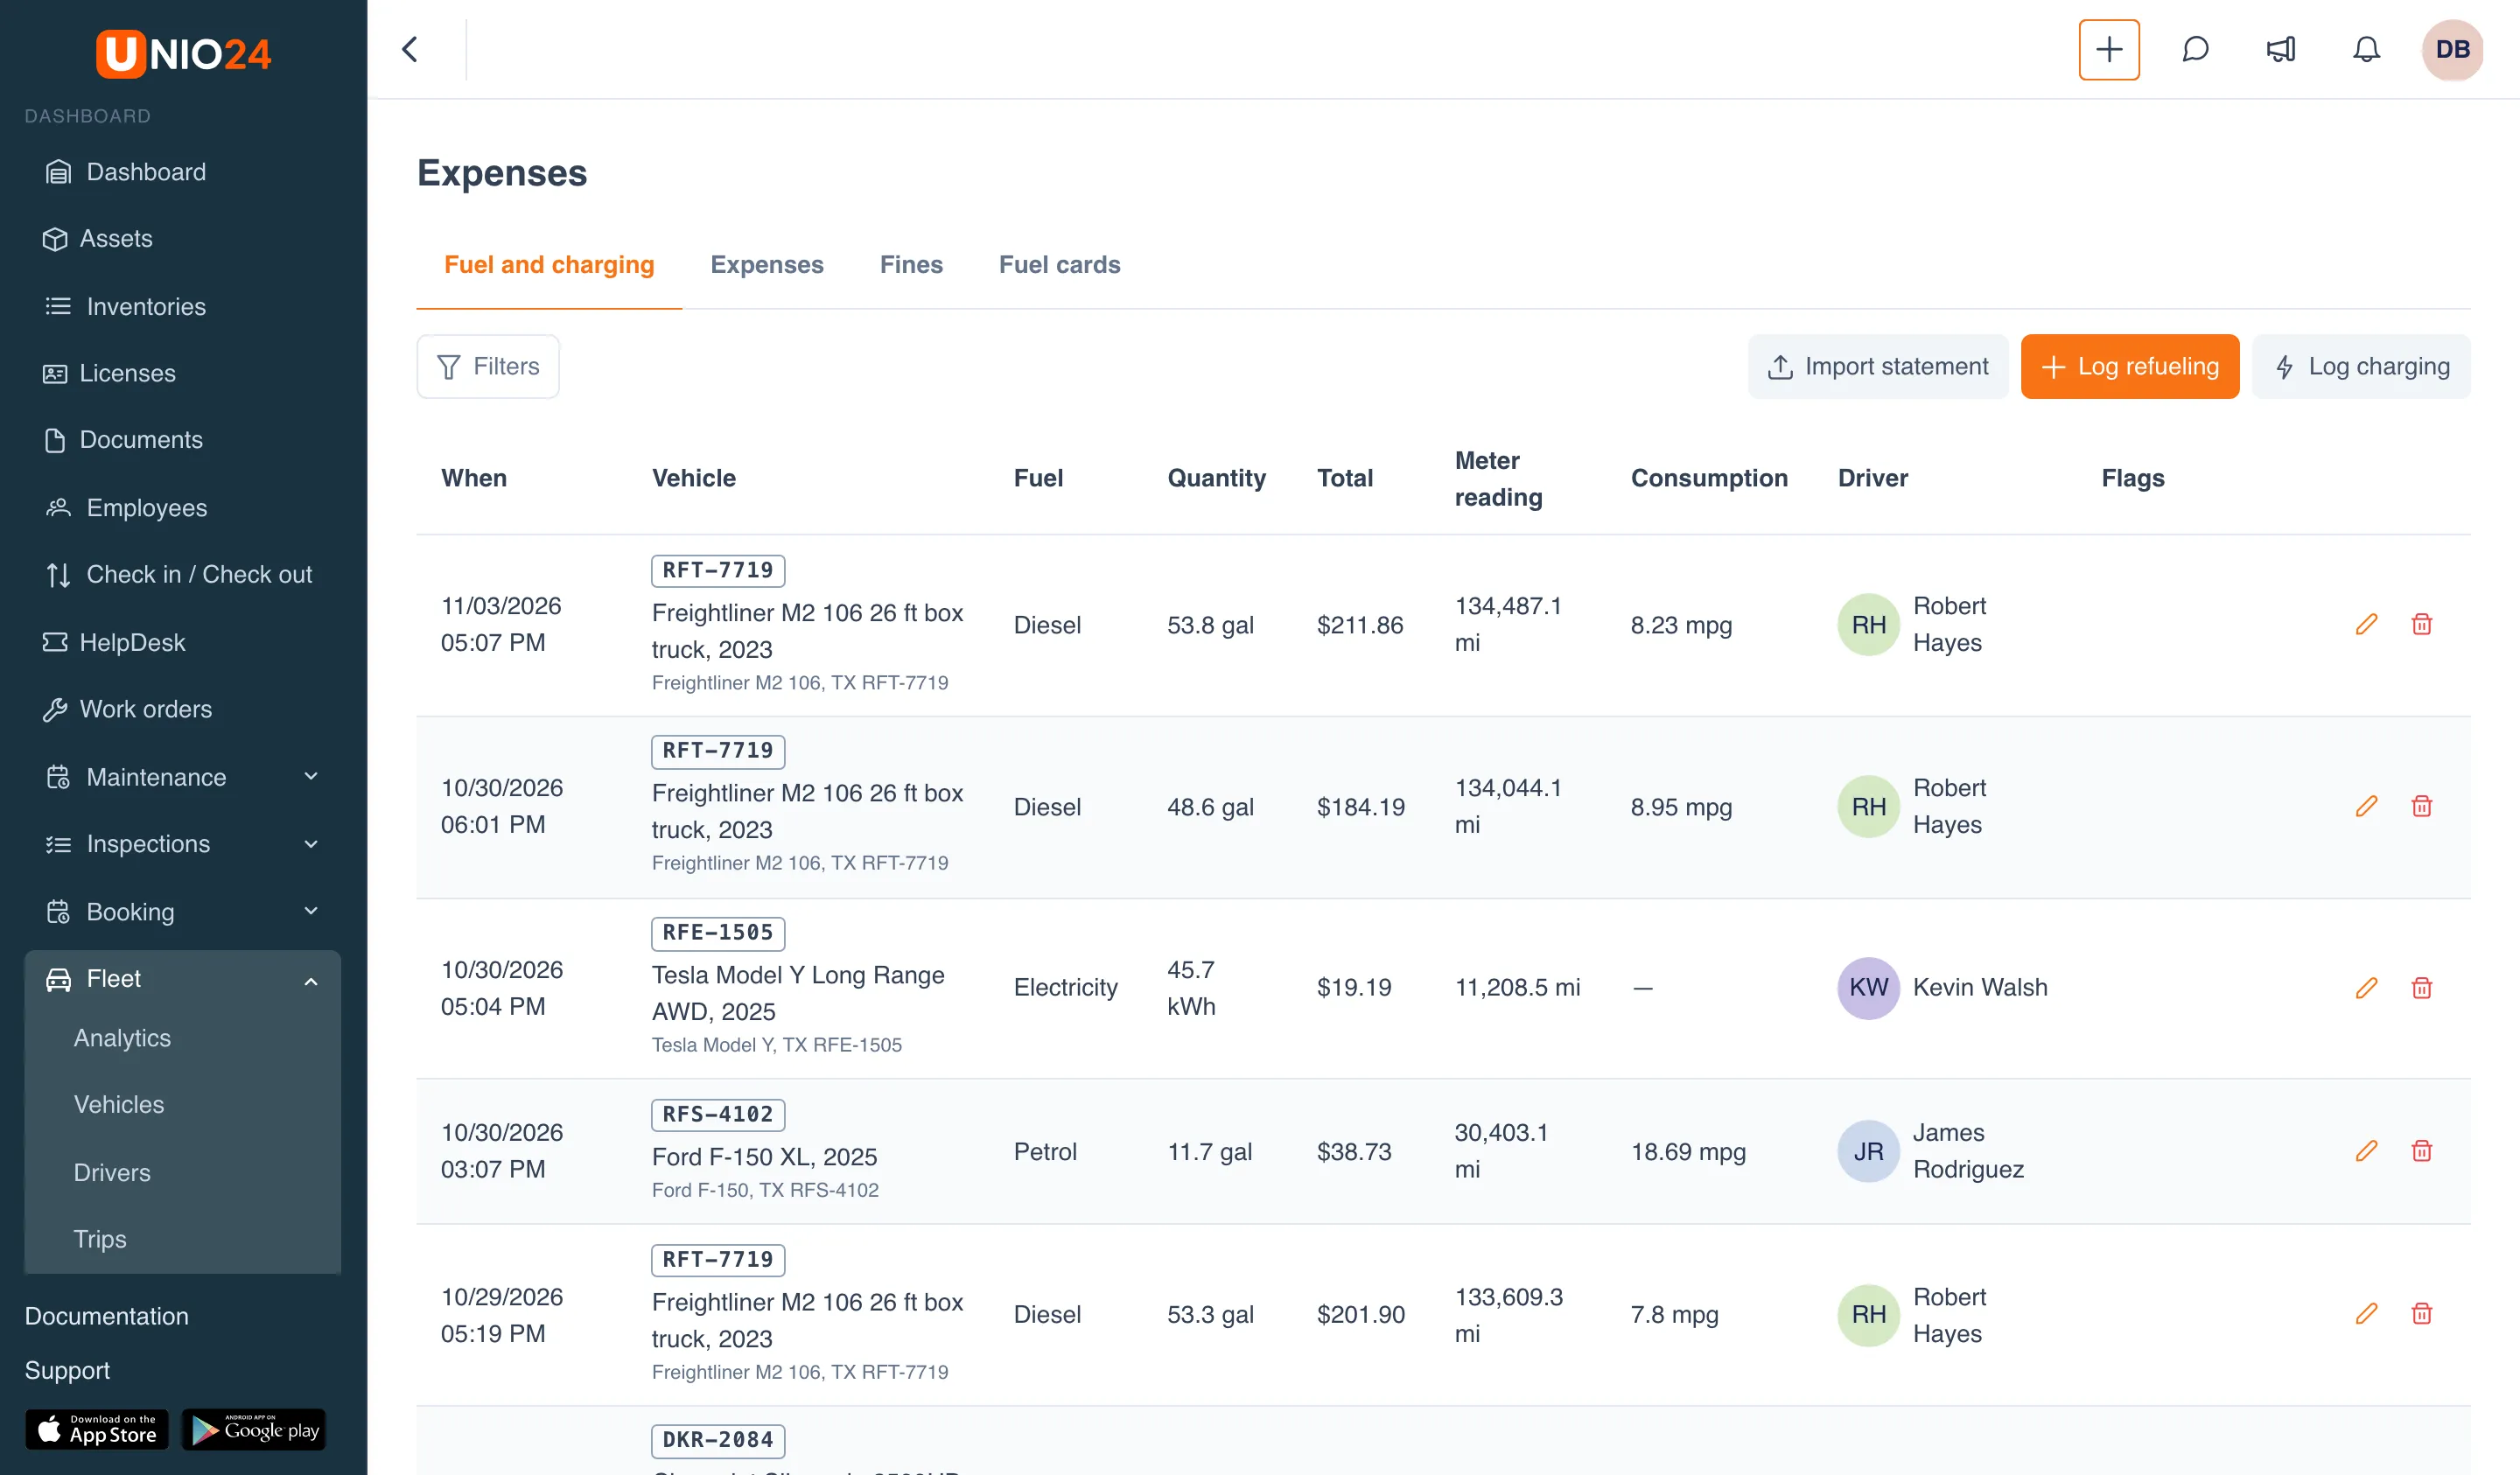
The same records for a single vehicle are on its card: Fleet → Vehicles → the vehicle, tabs Fuel, Trips, Expenses, Fines and Costs.
Log refueling
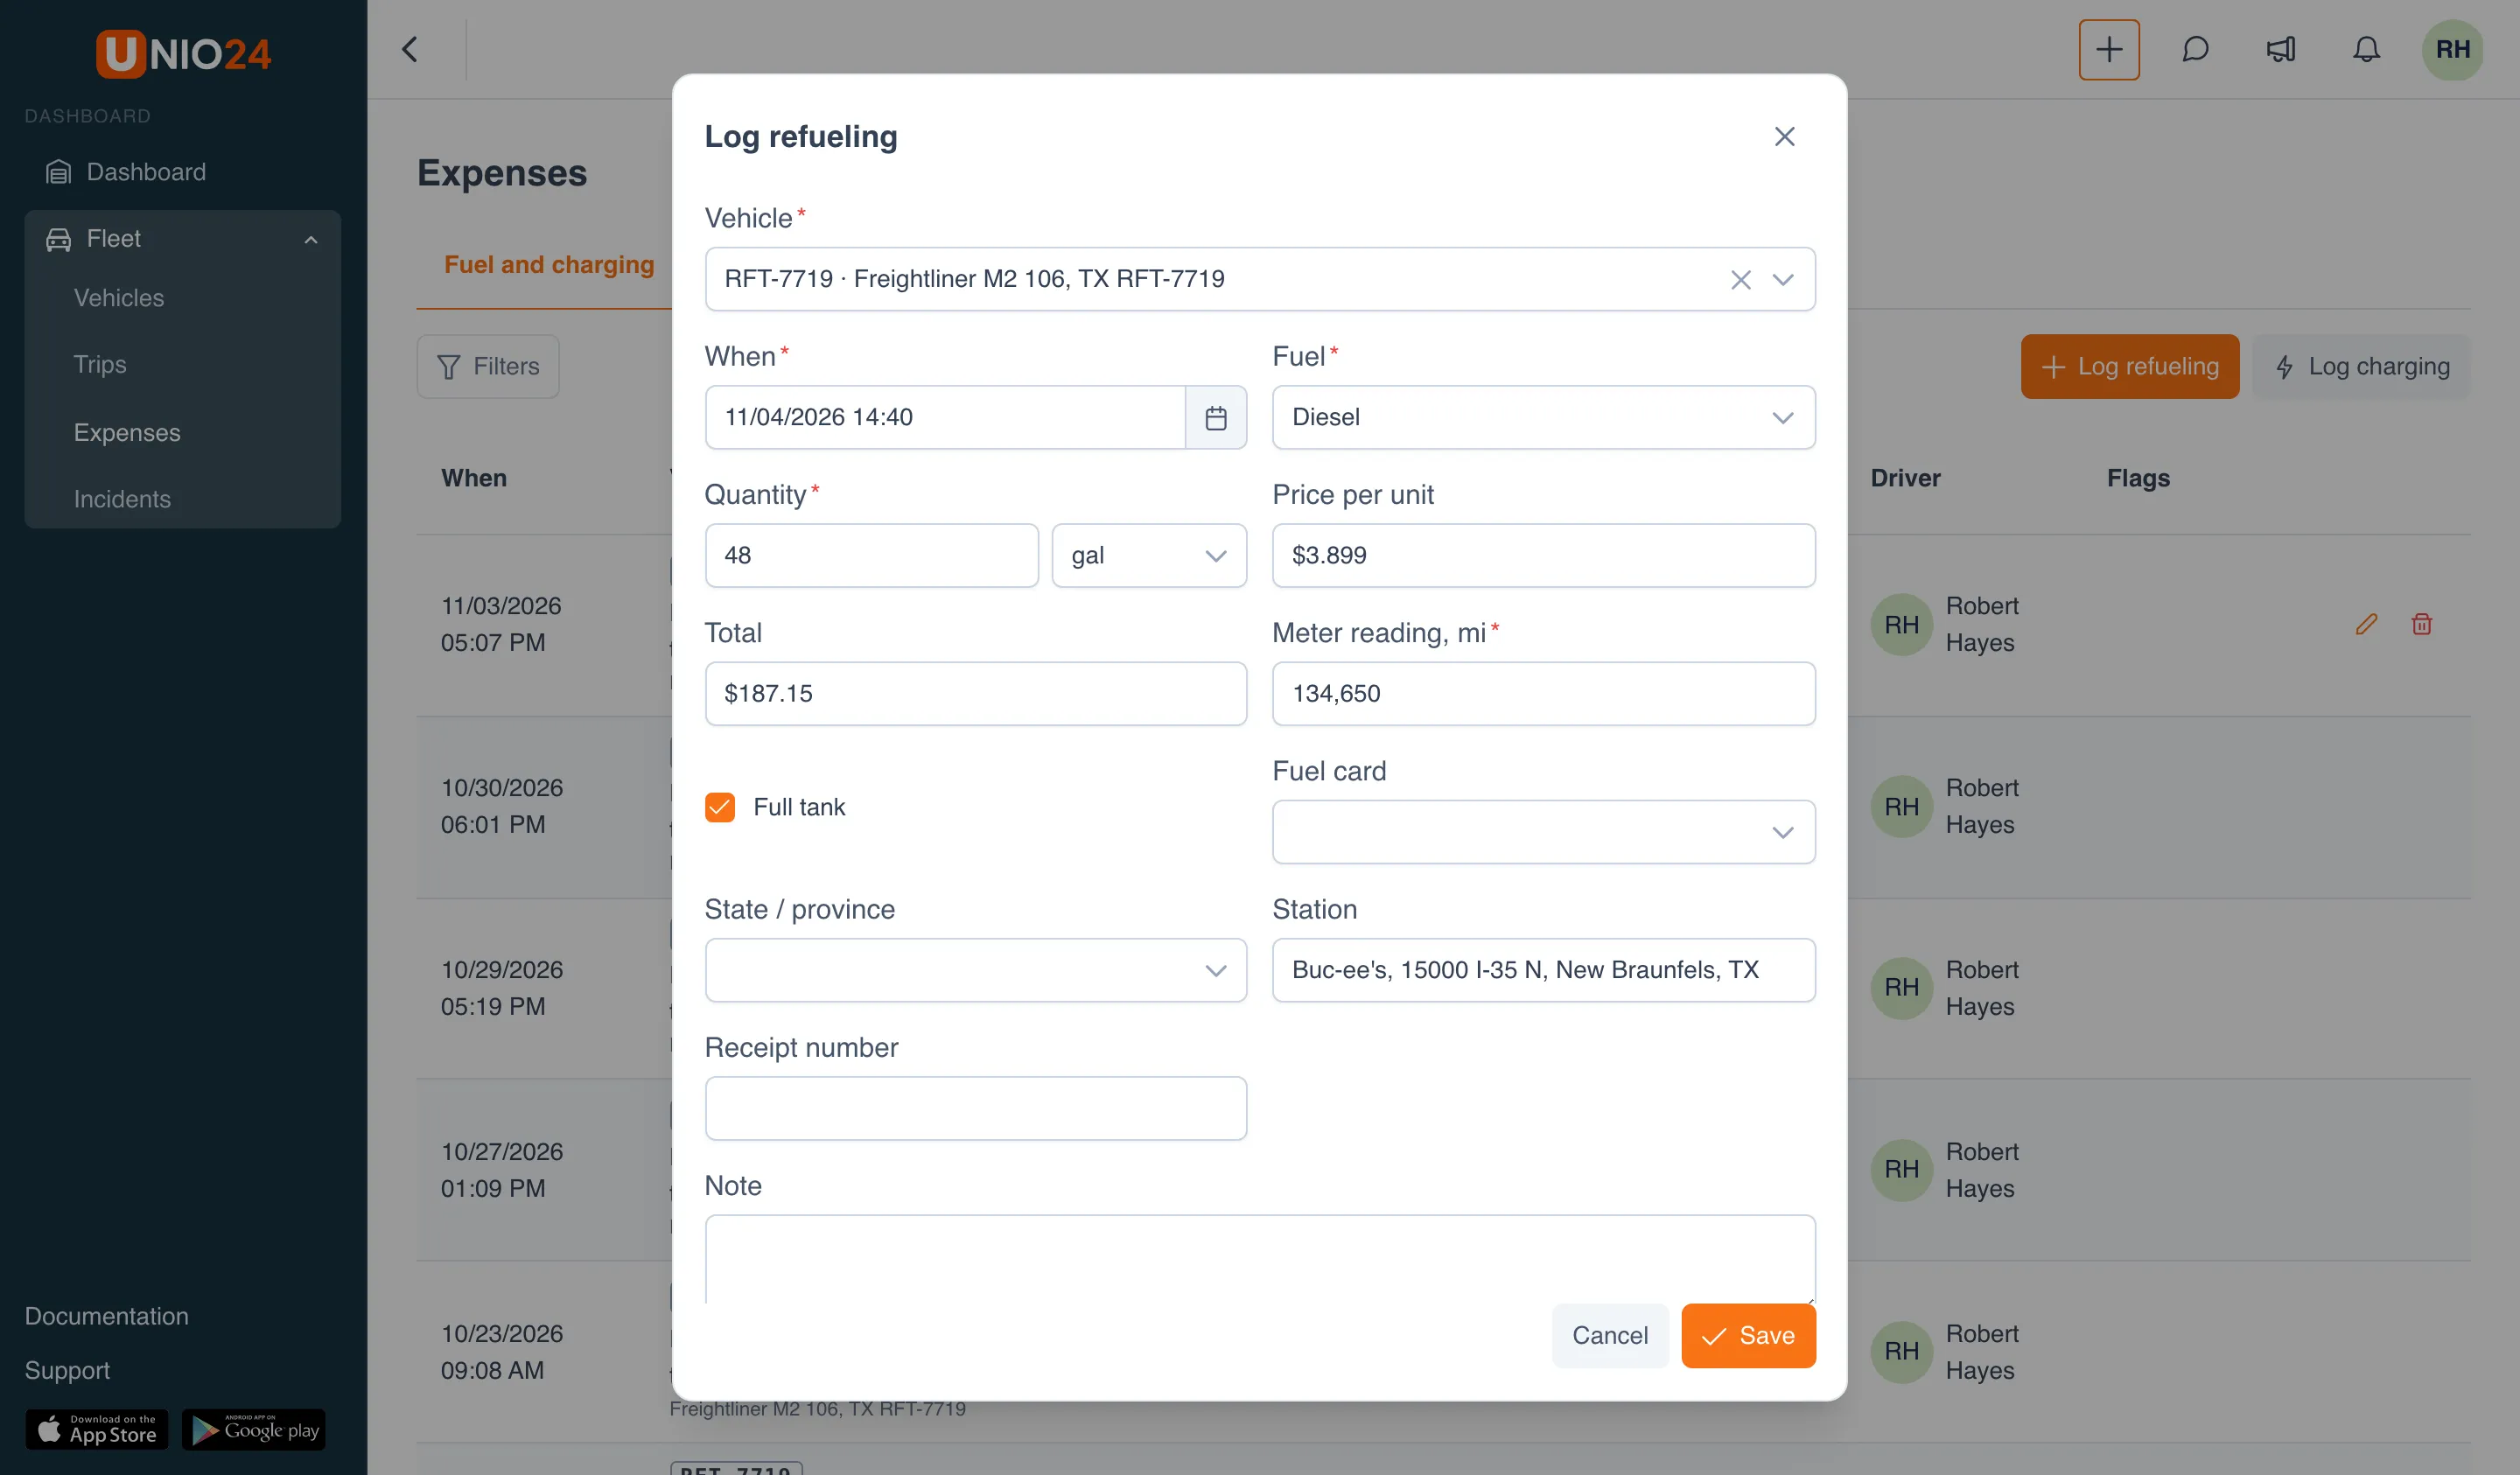
Section titled “Log refueling”- Open Fleet → Expenses, the Fuel and charging tab, and click Log refueling. On a vehicle card, use the Fuel tab → Log refueling: the vehicle is already selected.
- Choose the Vehicle.
- Check When — it defaults to the current time. A time in the future isn’t accepted.
- In Driver, leave Whoever had the vehicle at that time — UNIO24 finds the driver from a trip, a booking or a check-out. If someone else was driving, choose them from the list.
- Choose the Fuel and enter the Quantity. The unit next to it is filled in for you — gallons in a US company; you can switch it if the receipt shows liters.
- Enter the Price per unit or the Total — the other field is calculated.
- Enter the Meter reading — what the odometer showed at the pump (for equipment, the hour meter). For AdBlue you can leave the reading empty.
- Keep Full tank checked if you filled the tank. Clear it for a partial top-up.
- If needed, choose the Fuel card and the State / province where you bought the fuel, and fill in Station, Receipt number and Note. The state is used by the IFTA report; the field appears for companies in the United States and Canada.
- Click Save.
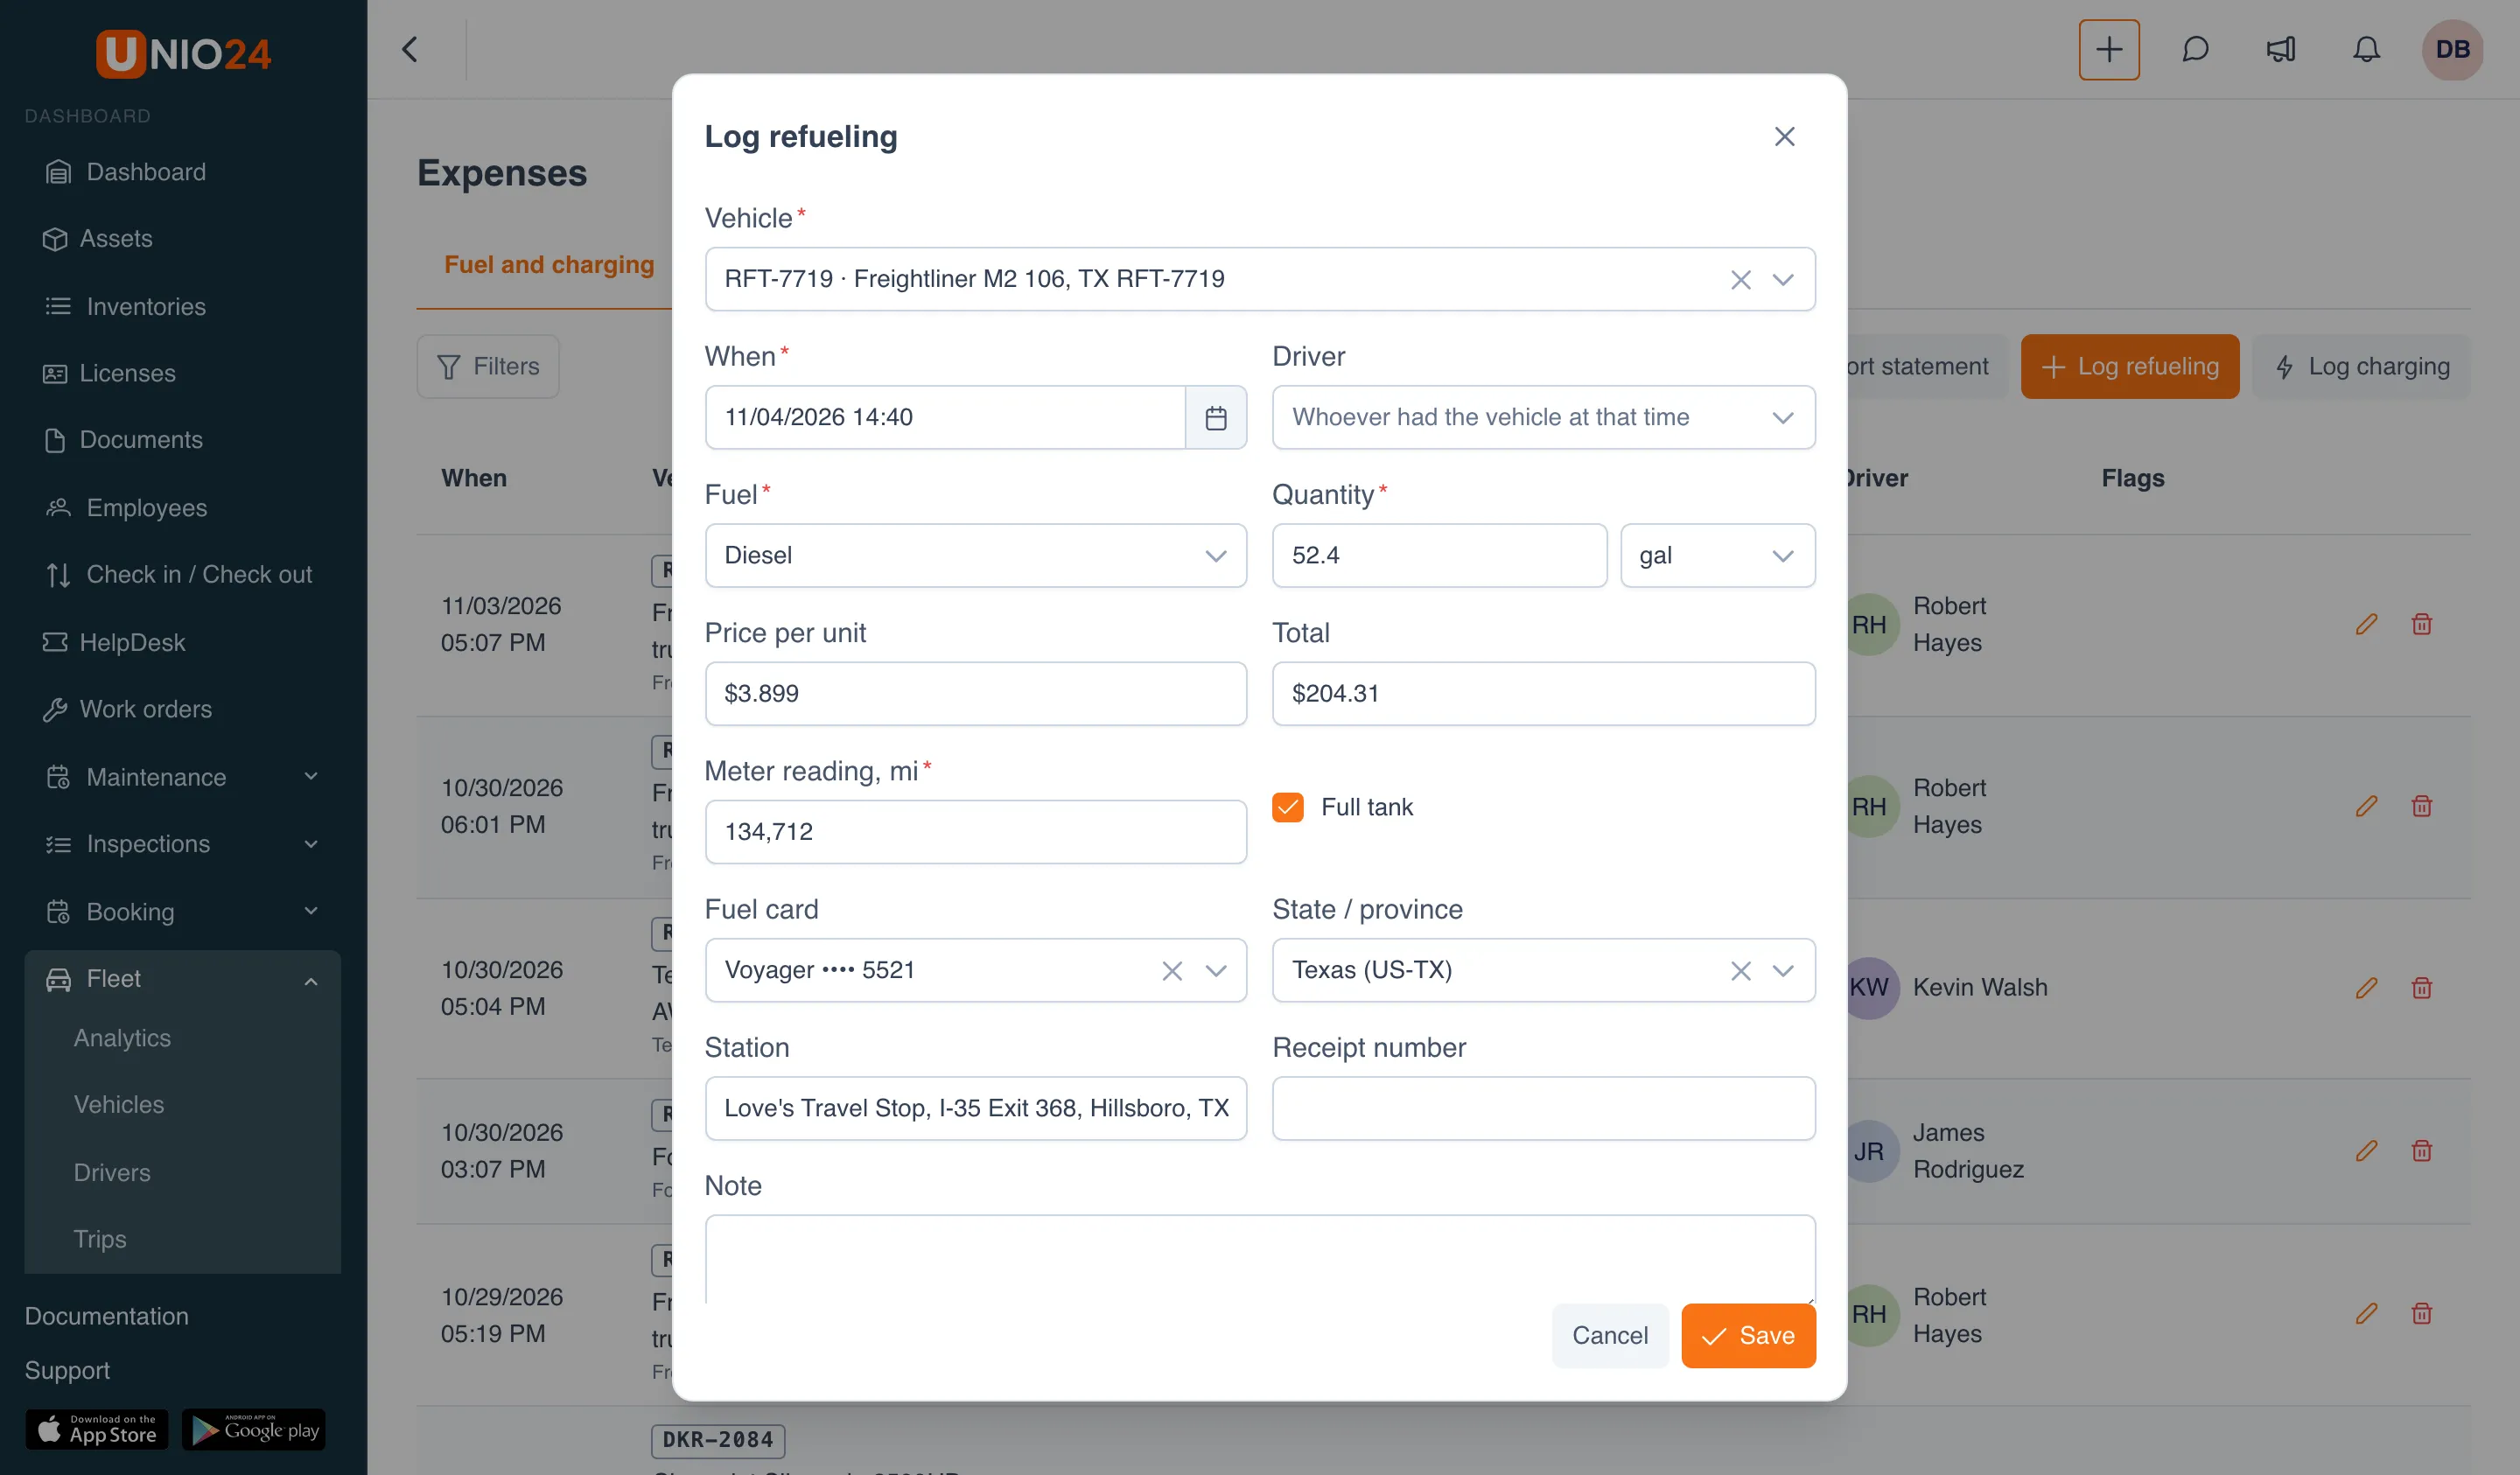
The meter reading must fit between the vehicle’s neighboring readings. If it is lower than the previous one or higher than the next one, a hint under the field says “The reading must lie between the neighboring ones:” and shows both values with their dates. The most recent reading is also saved to the vehicle’s meter; a refueling entered after the fact keeps its reading only on the record itself.
Receipts are attached to a saved refueling: click Edit in its row and upload the files in the Receipts section.
If you choose an electric vehicle, the dialog says “This is an electric vehicle — it is charged, not refueled.” and offers to switch to logging a charge.
Log charging
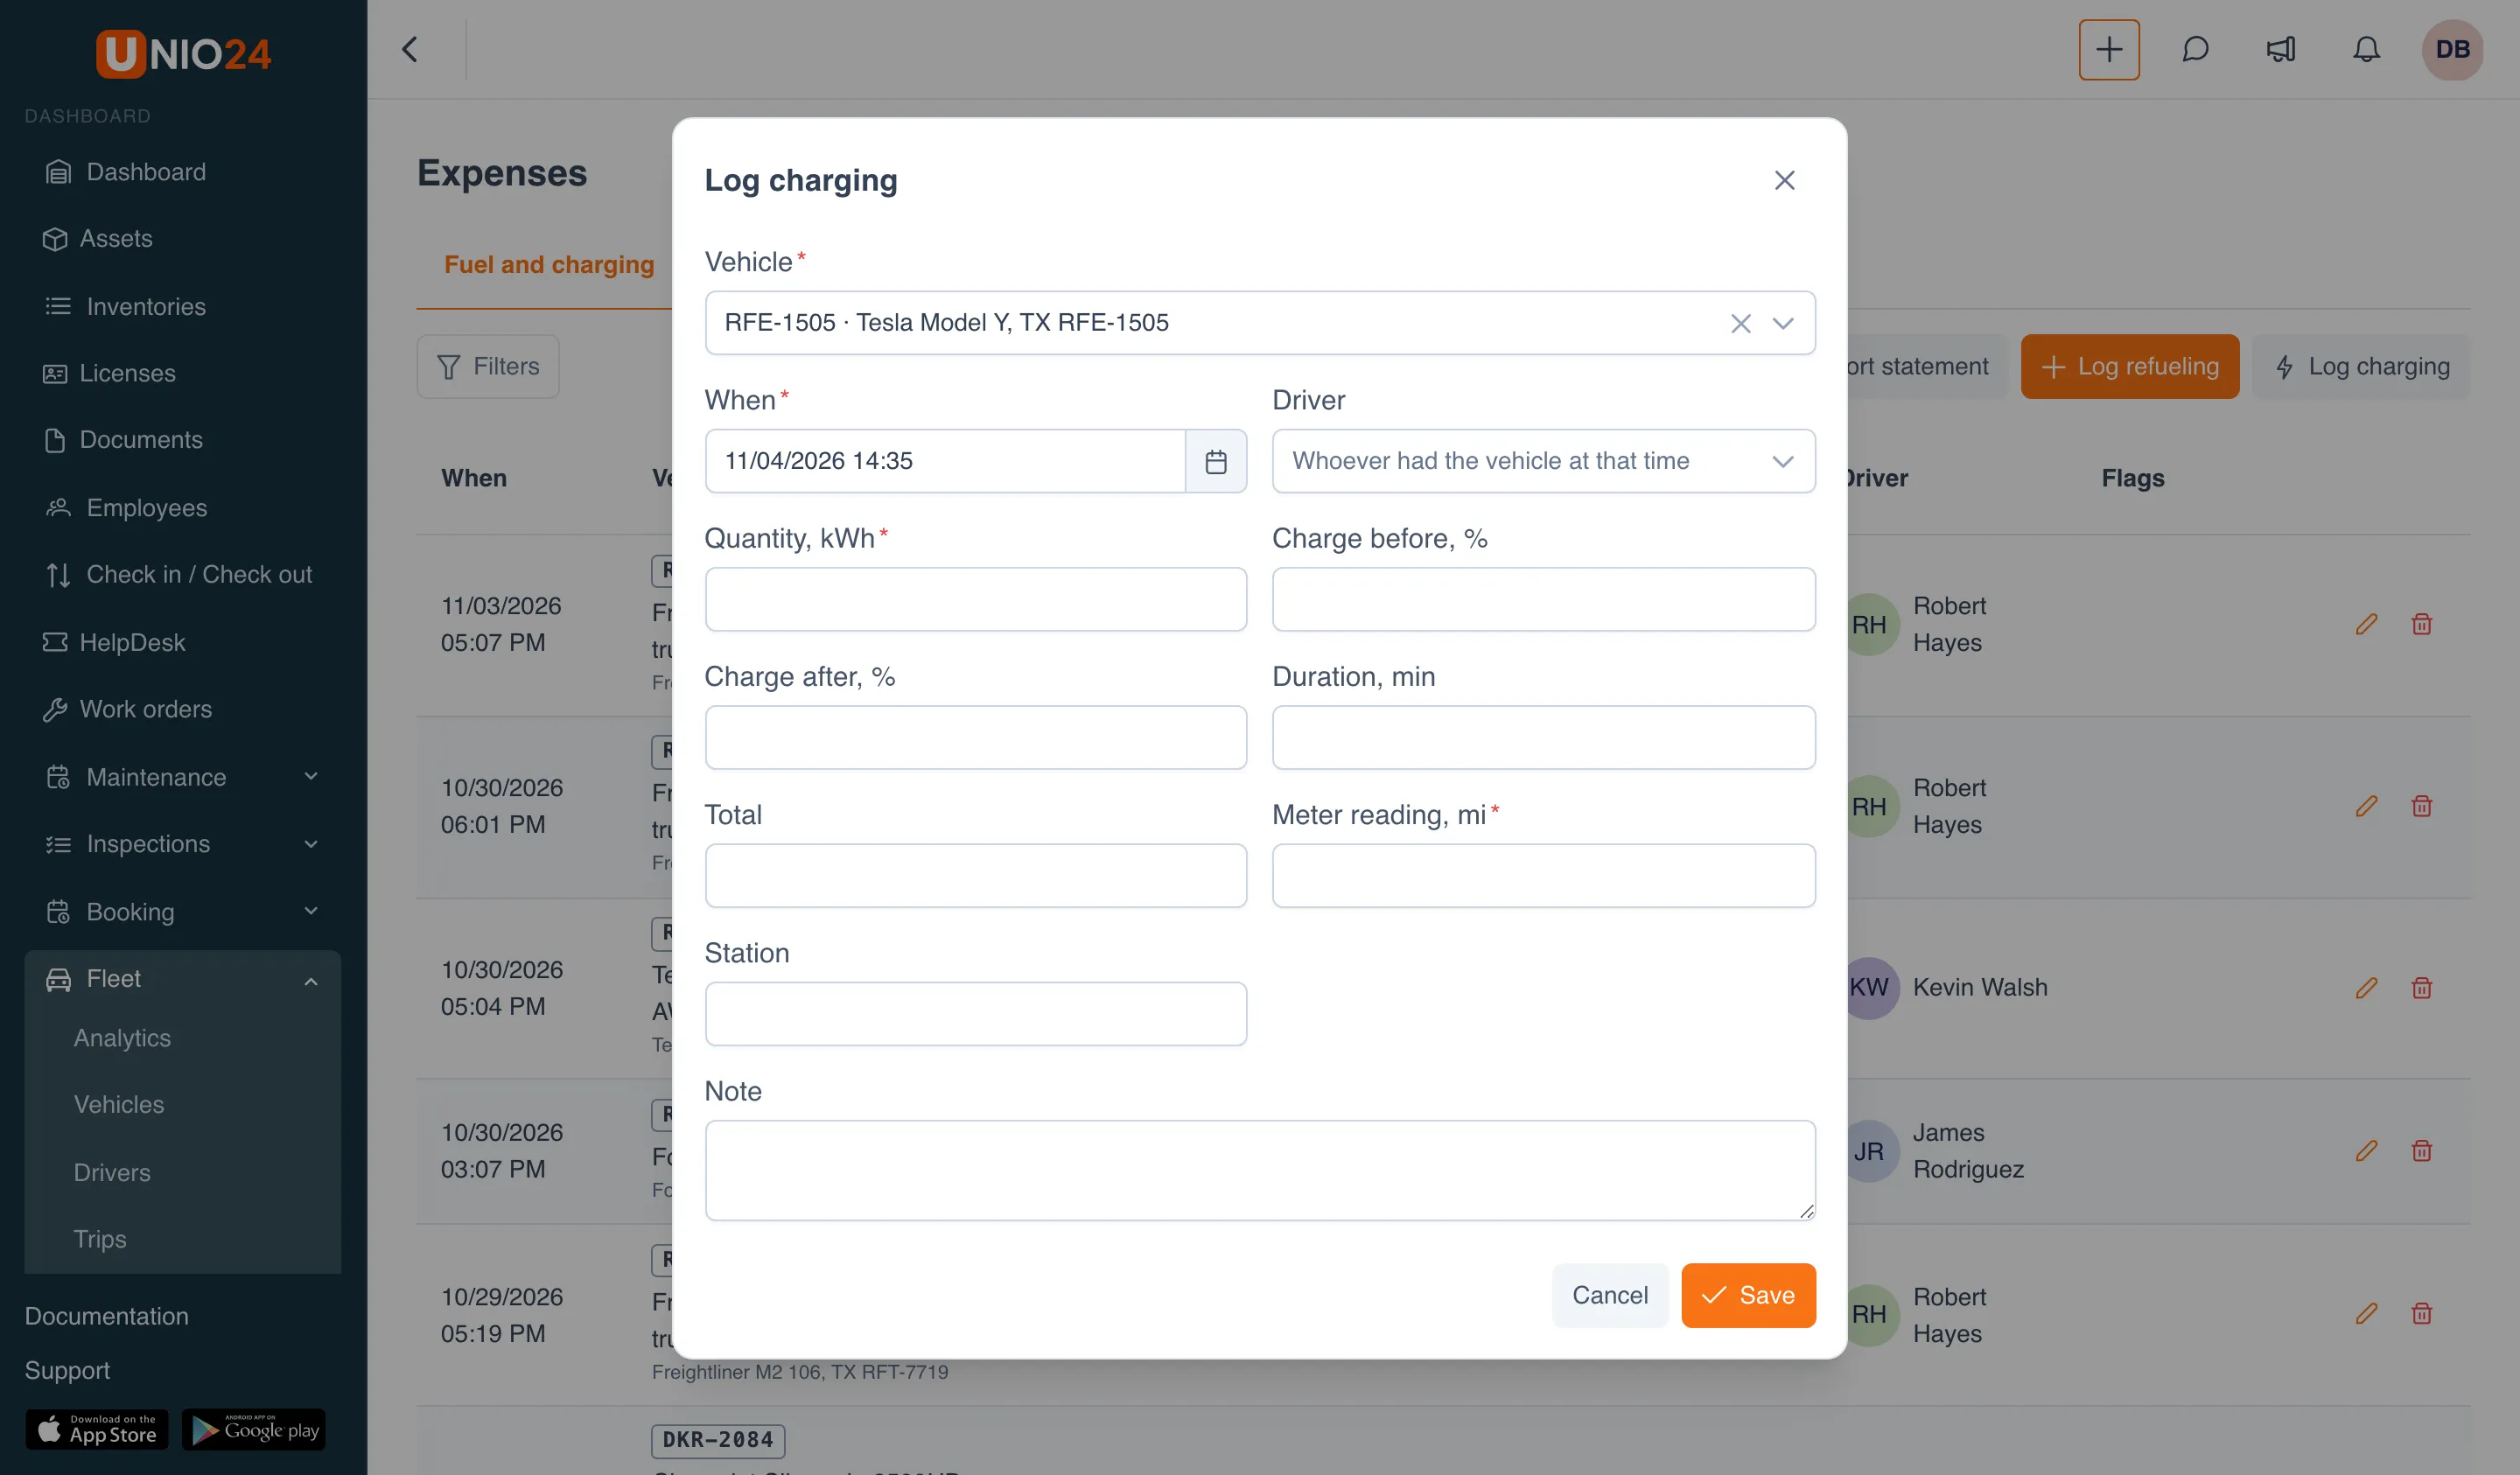
Section titled “Log charging”- On the Fuel and charging tab, click Log charging.
- Choose the Vehicle, and check When and Driver.
- Enter Quantity, kWh — how much energy the vehicle took.
- If needed, fill in Charge before, %, Charge after, %, Duration, min, Total, Station and Note.
- Enter the Meter reading, mi.
- Click Save.
How consumption is calculated
Section titled “How consumption is calculated”The Consumption column is calculated between full tanks: UNIO24 takes the distance from the previous full tank to this one and all the fuel added in between, partial top-ups included. That’s why the first refueling, a partial top-up and a refueling with no full tank before it have no consumption — the column shows a dash.
- In a US company, consumption is shown in mpg for vehicles, in mi/kWh for electric vehicles and in gal/h for equipment with an hour meter.
- For an electric vehicle, a full charge — Charge after 100% — is the boundary. If there are no full charges at all, consumption is calculated from one charge to the next.
- When you edit, delete or add a record after the fact, the consumption of the neighboring records is recalculated automatically.
Flags and the “Flagged only” filter
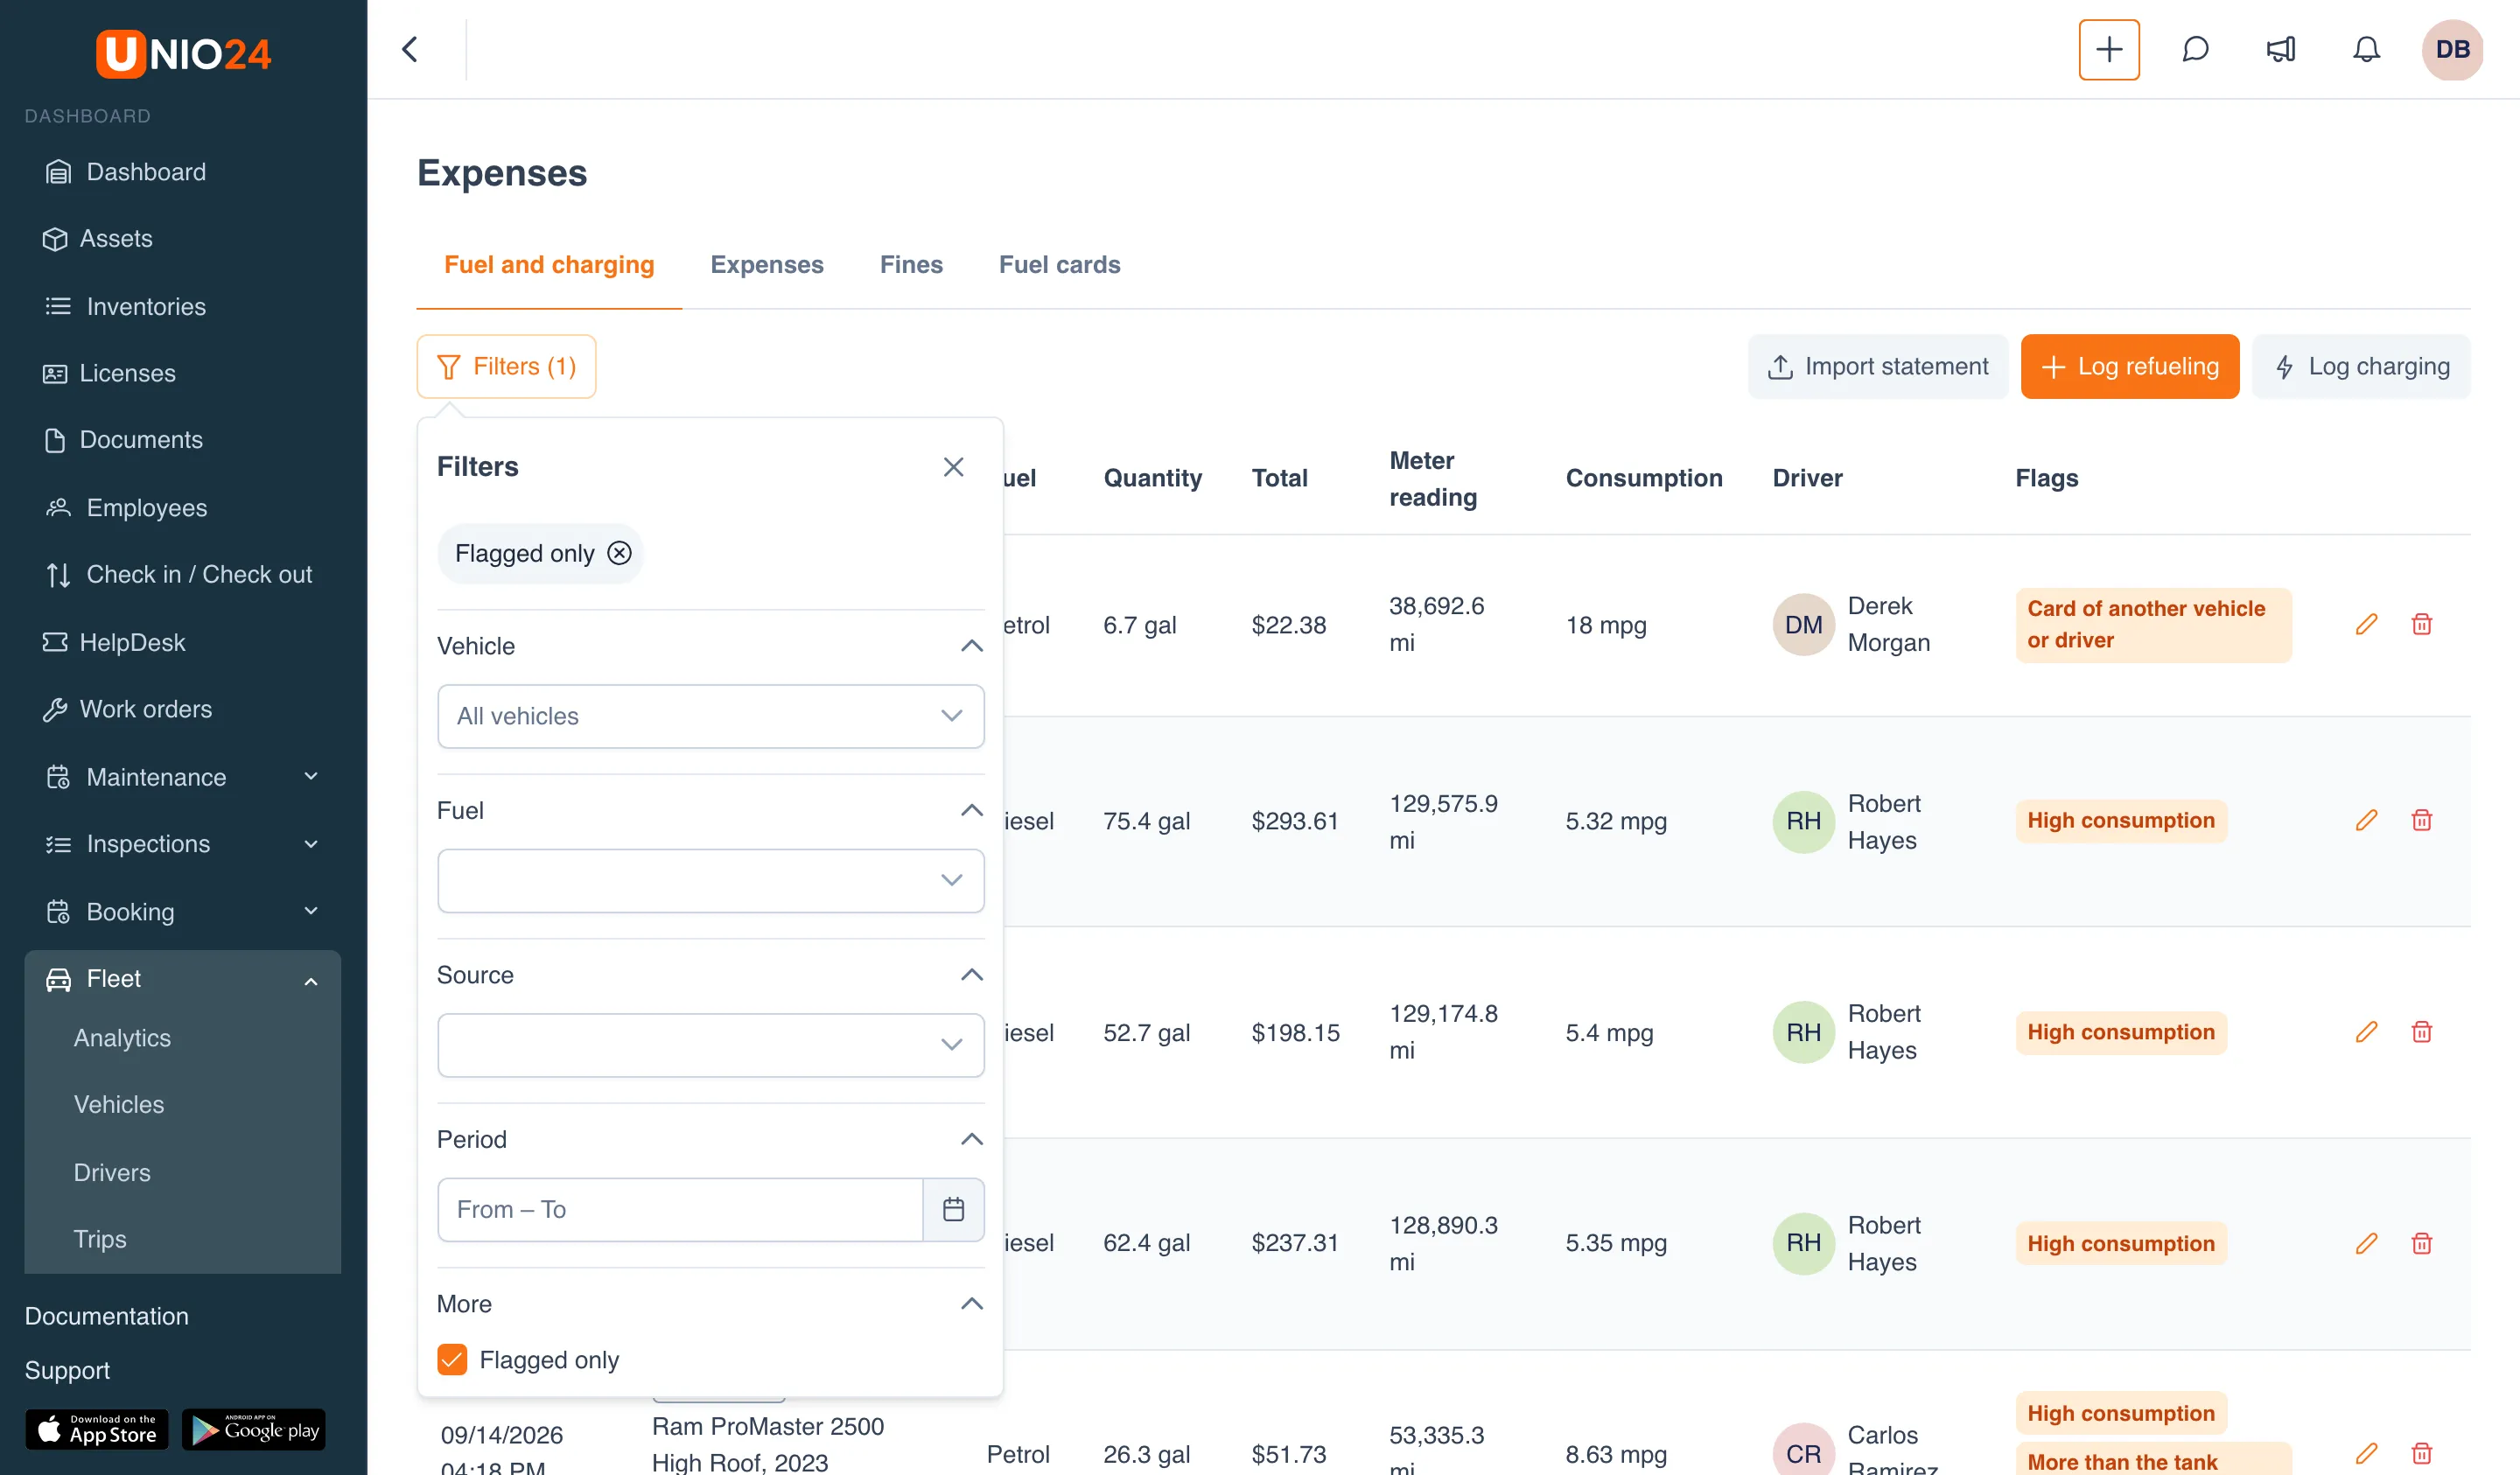
Section titled “Flags and the “Flagged only” filter”UNIO24 checks every refueling and flags unusual records. A flag is a reason to take a closer look, not an error: the record is saved as is. For example:
- More than the tank holds — more fuel than the tank can take (the tank capacity is in the vehicle data);
- High consumption — consumption noticeably worse than the vehicle’s nominal consumption;
- Card of another vehicle or driver — paid with a card assigned to another vehicle or driver;
- Possible duplicate — the same refueling of the same vehicle was entered twice within half an hour.
The full list of flags and what triggers each one is in the Fleet reference.
To list only flagged records:
- On the Fuel and charging tab, click Filters.
- In the More section, check Flagged only.
- Close the panel. The button shows how many filters are on — Filters (1).
In the same panel you can choose the Vehicle, Fuel, Source (manual or import) and Period.
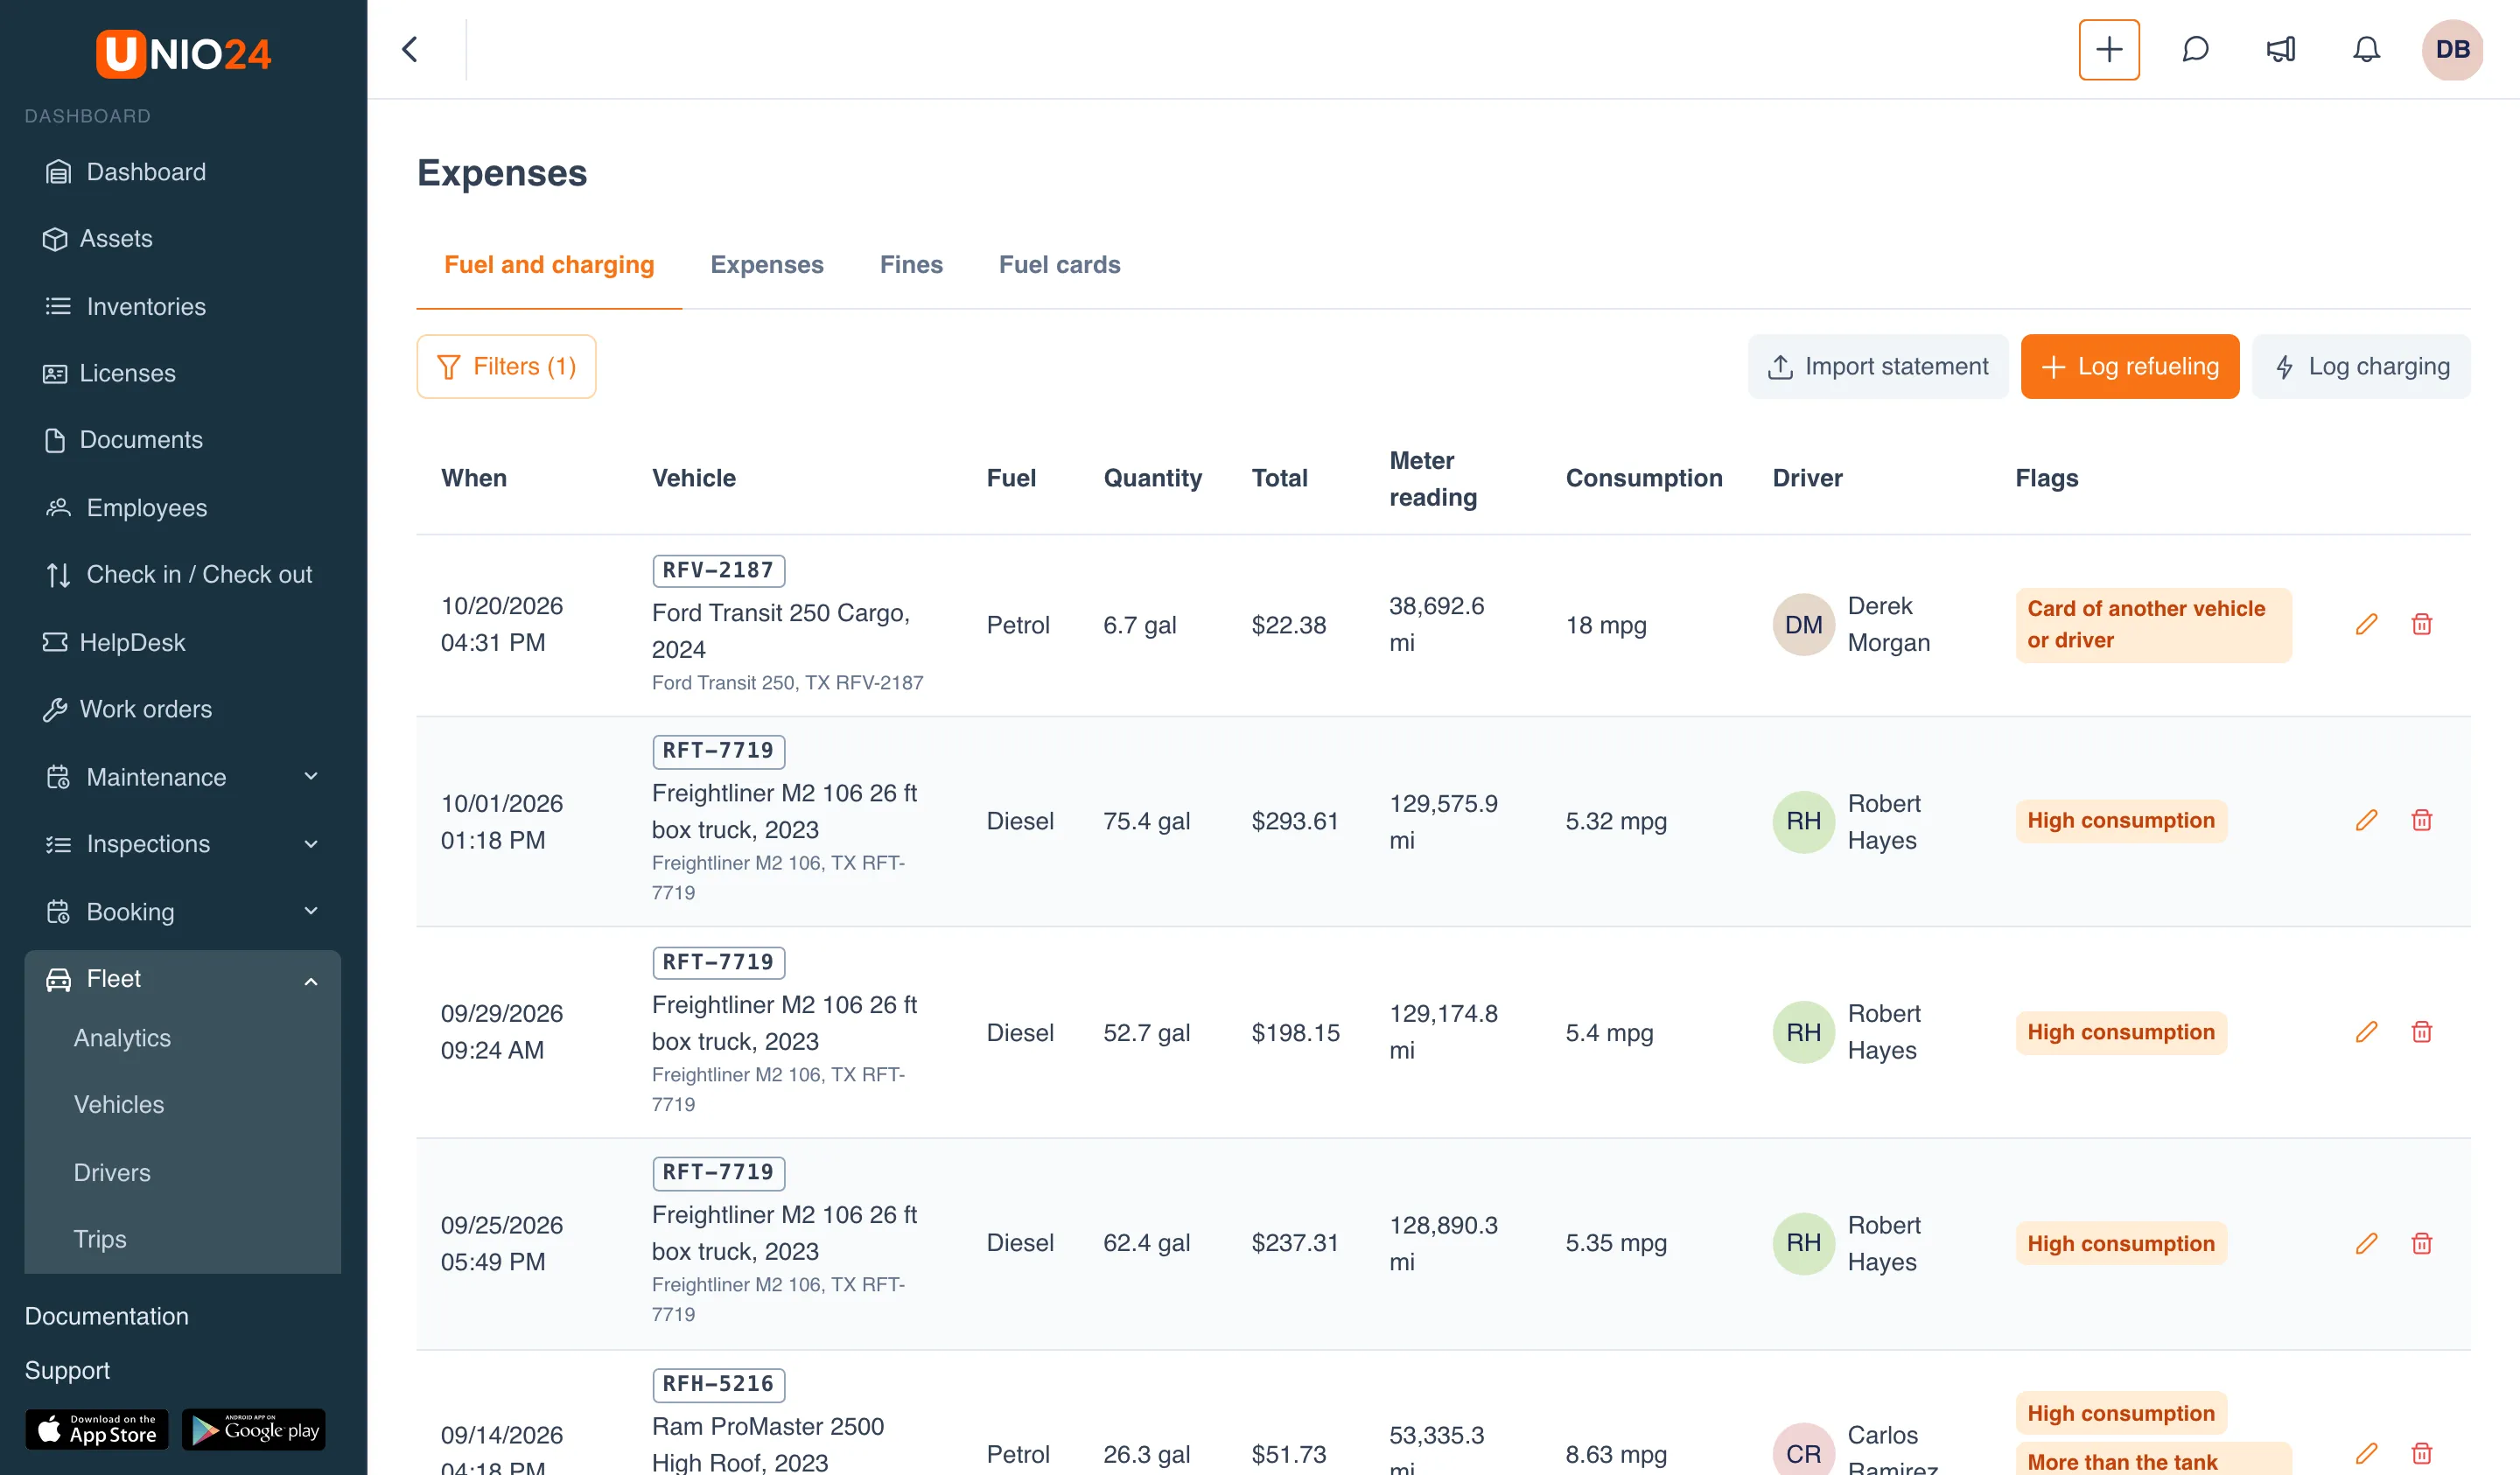
When a record entered by hand gets a new flag, the people in charge of the fleet get a notification; for an imported statement, there is one notification per file.
Edit or delete a refueling
Section titled “Edit or delete a refueling”In the refueling’s row, click Edit or Delete. Before deleting, UNIO24 asks for confirmation: “Delete this record? Consumption will be recalculated.” A reading that is already saved to the vehicle’s meter can no longer be changed on the record — the field says “This reading is already in the vehicle meter and can no longer be changed here”. A wrong reading is fixed by the person in charge of the fleet with Correct odometer on the vehicle card — see Vehicles and drivers.
What drivers log themselves
Section titled “What drivers log themselves”A driver with rights to fleet records works only with their own vehicle — the one they have right now:
- logs refueling and charging on the Expenses page — the vehicle list offers only their vehicle, and the dialog has no Driver field;
- starts and closes their trips on the Trips page;
- can edit their own record within 24 hours after creating it.
A driver sees only their own records in the logs; they don’t have the Fuel cards tab or the Import statement button.
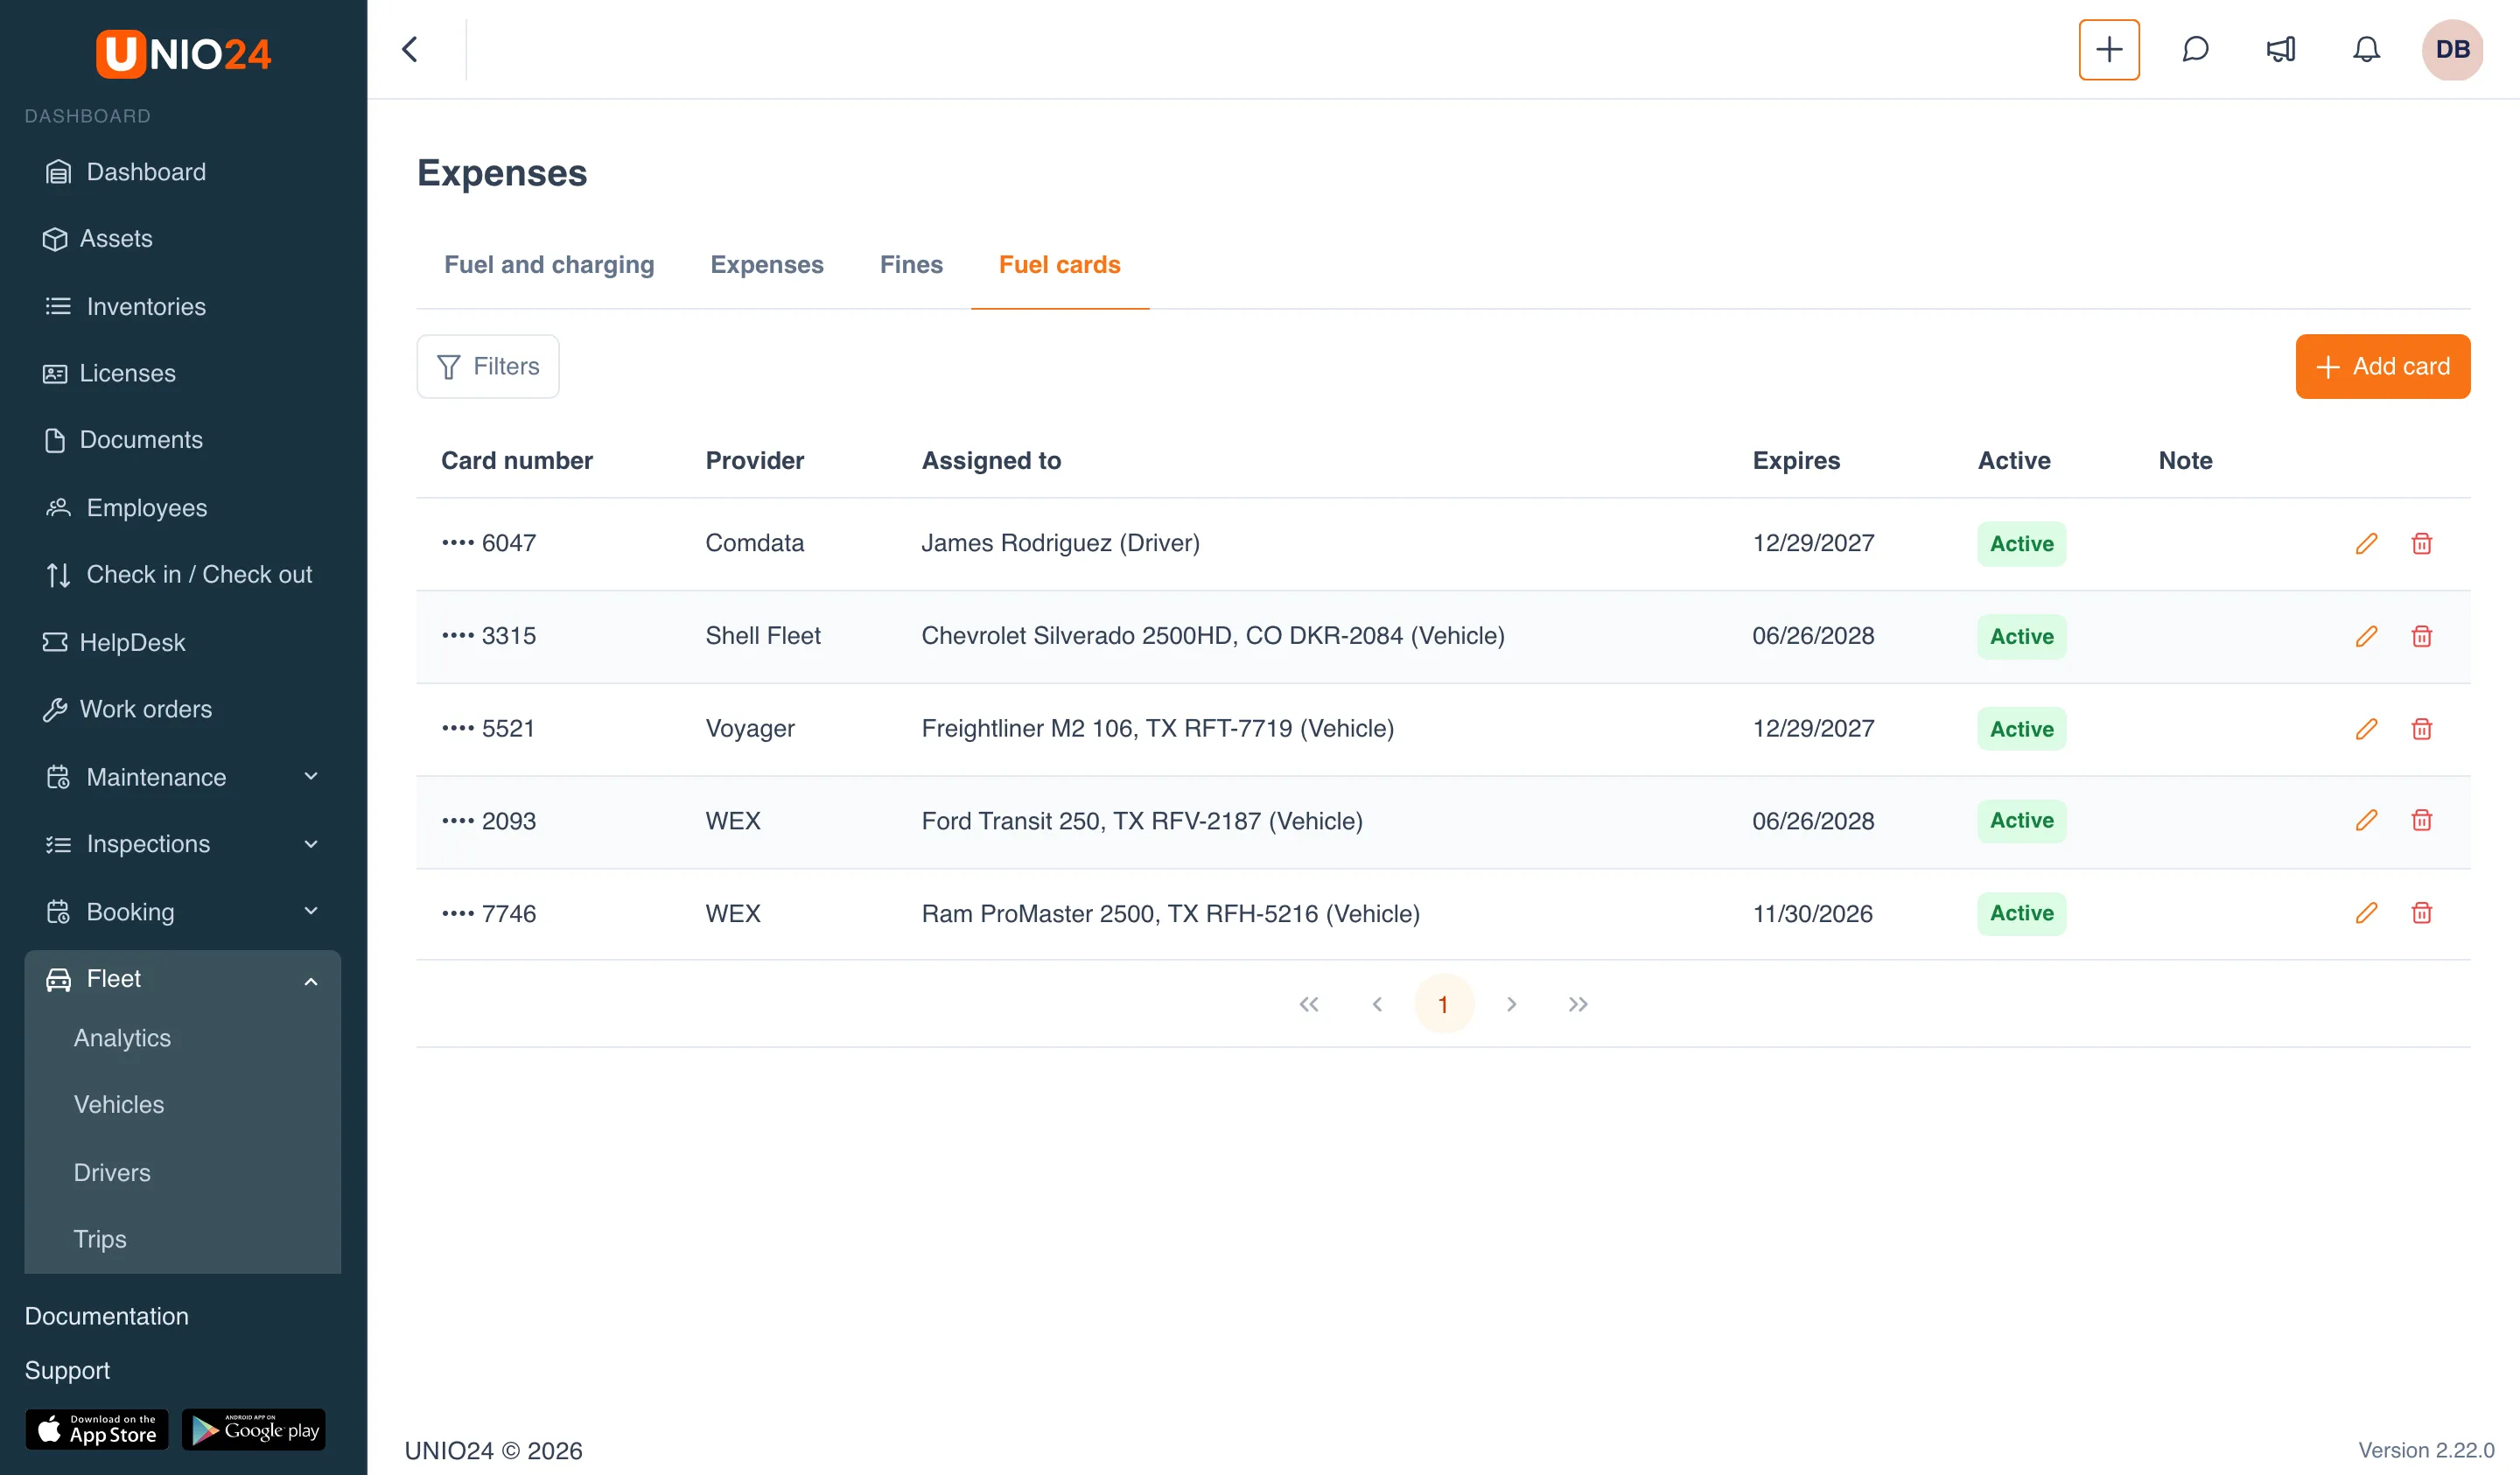
Fuel cards
Section titled “Fuel cards”UNIO24 stores only the last four digits of a card number. Statement import finds the vehicle by its card, and a refueling paid with a card assigned to another vehicle or driver gets flagged.
Add a card
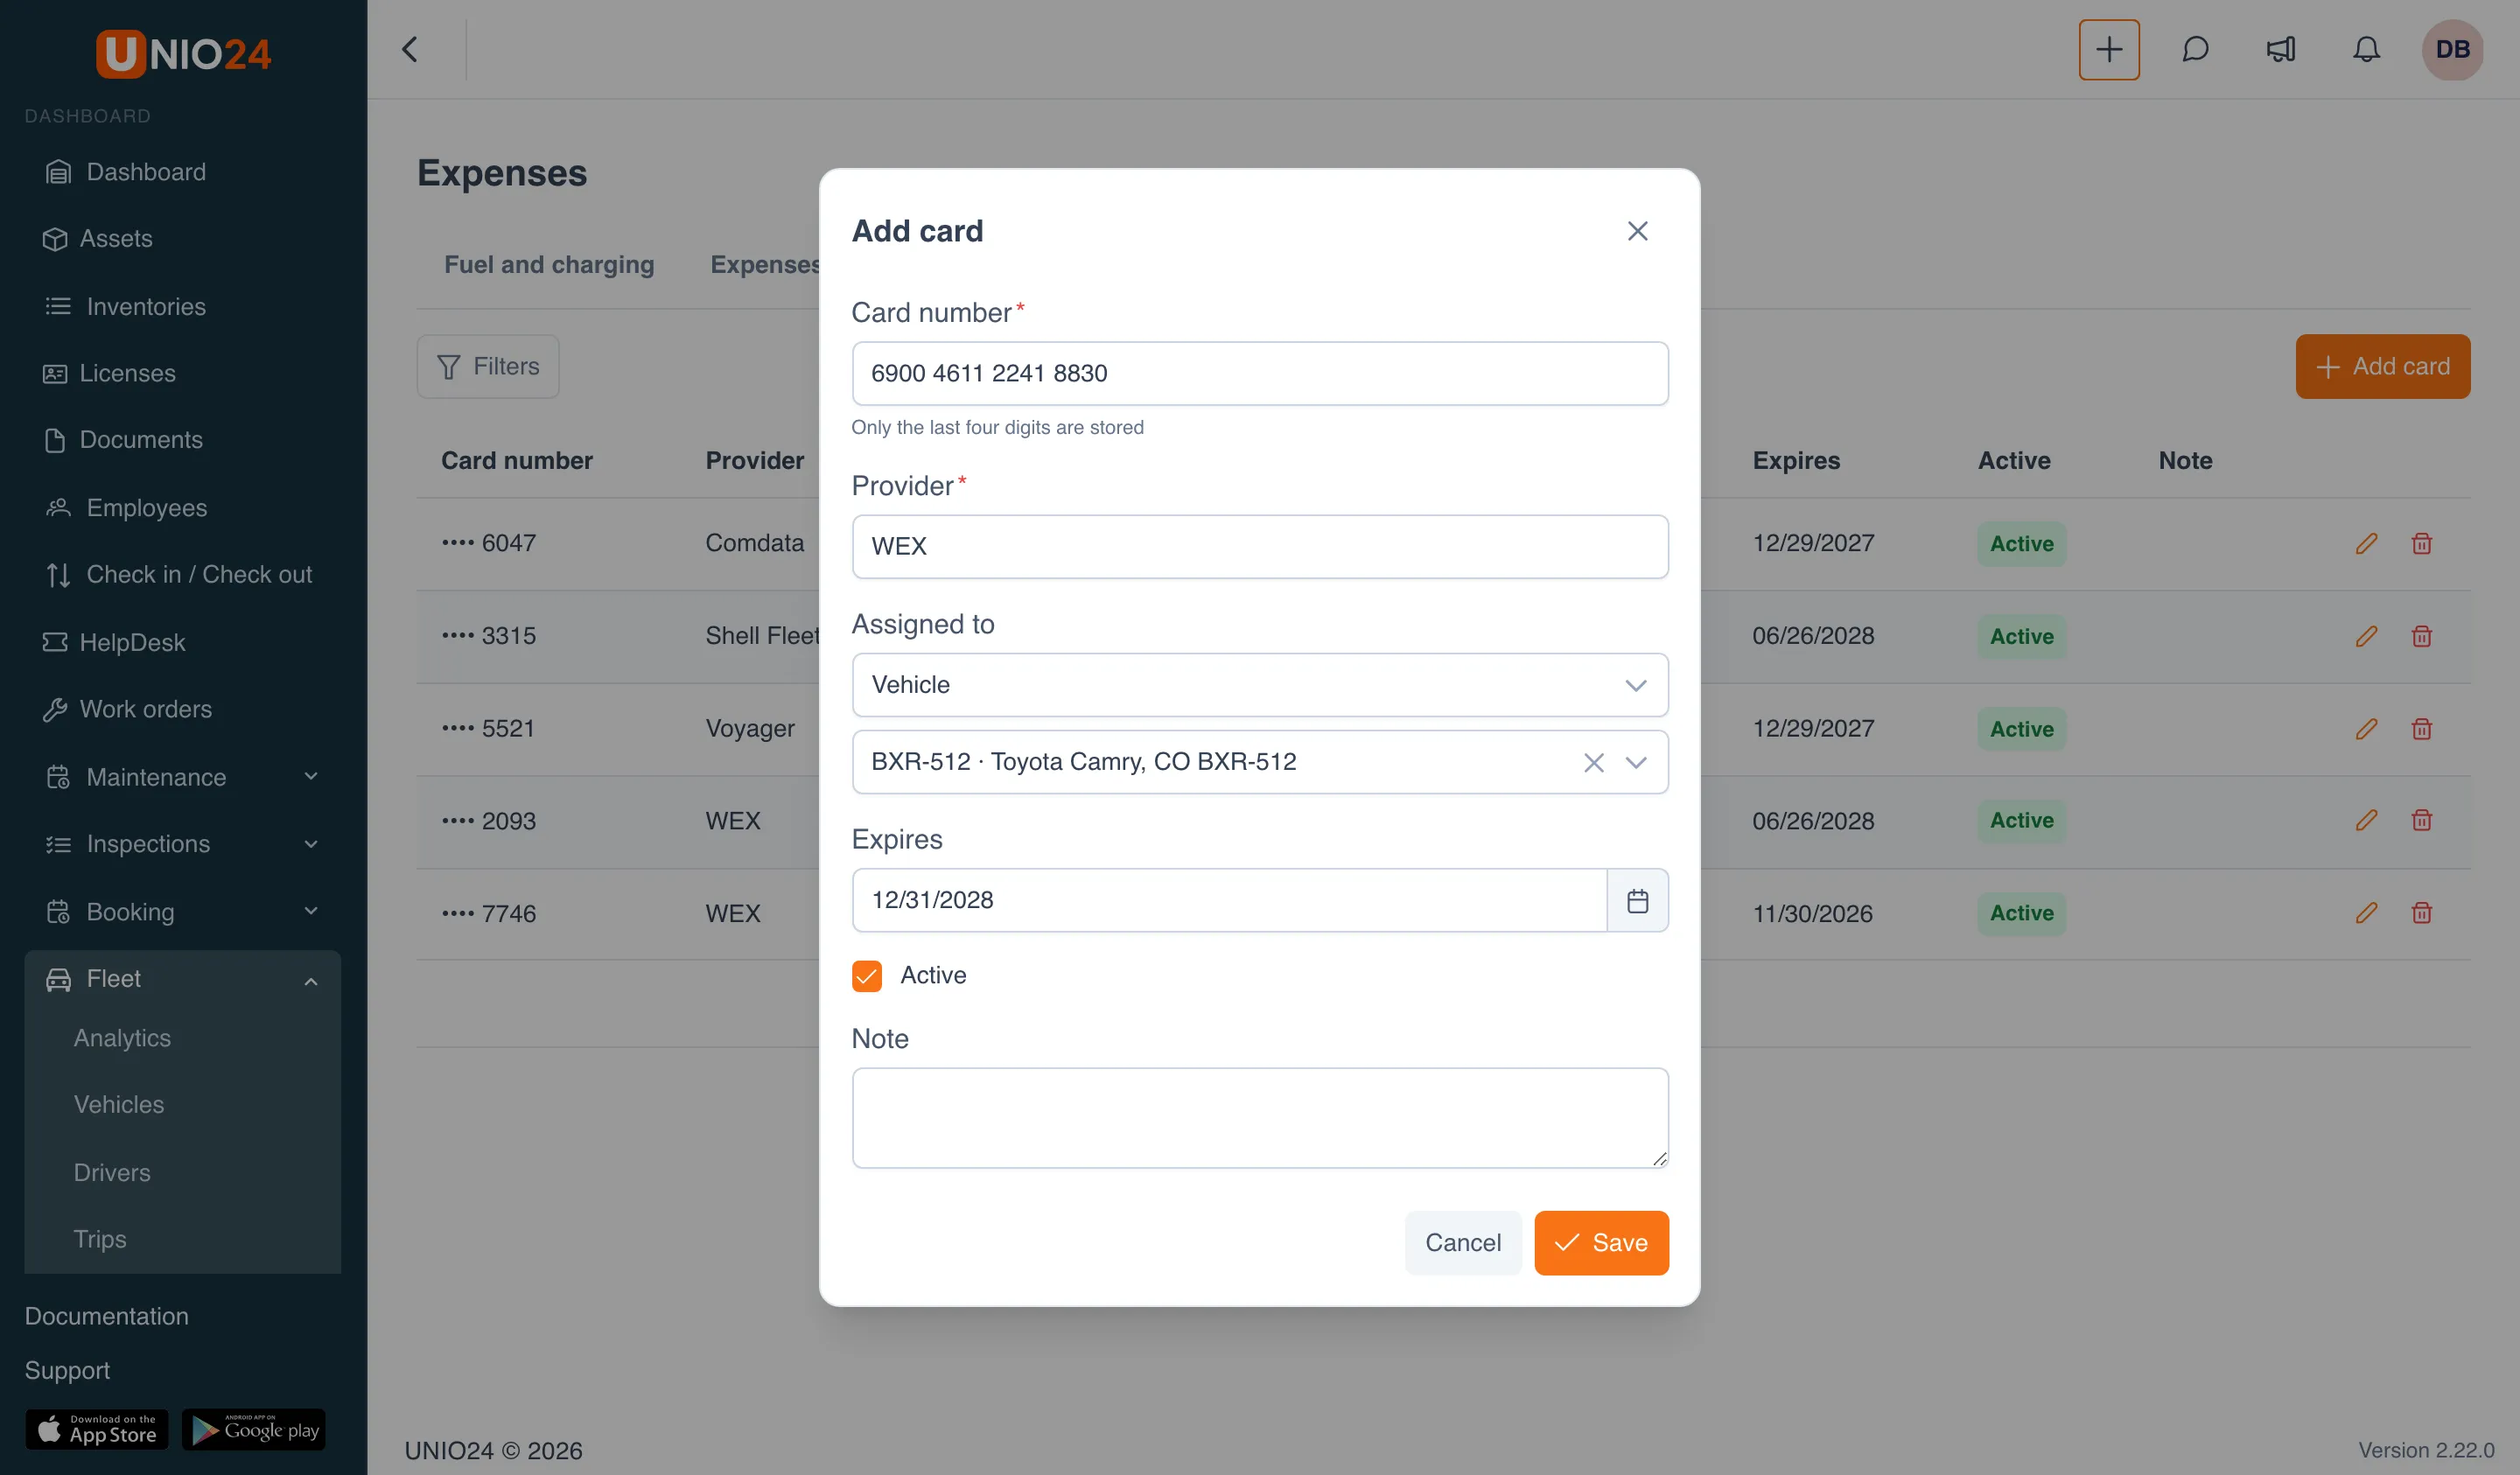
Section titled “Add a card”- Open Fleet → Expenses, the Fuel cards tab, and click Add card.
- Enter the full Card number — only the last four digits are saved.
- Enter the Provider, for example “WEX”.
- In Assigned to, choose:
- Not assigned — a shared card;
- Vehicle — and choose the vehicle below;
- Driver — and choose the driver below.
- Enter the Expires date — the list shows it.
- Keep Active checked. Clear it for a card nobody uses anymore: it won’t be offered when refueling is logged.
- Click Save.
To change or delete a card, use Edit and Delete in its row. The Active / Inactive filter is in the Filters panel.
Upload a fuel card statement
Section titled “Upload a fuel card statement”You can upload your fuel card provider’s statement as a file instead of typing every transaction.
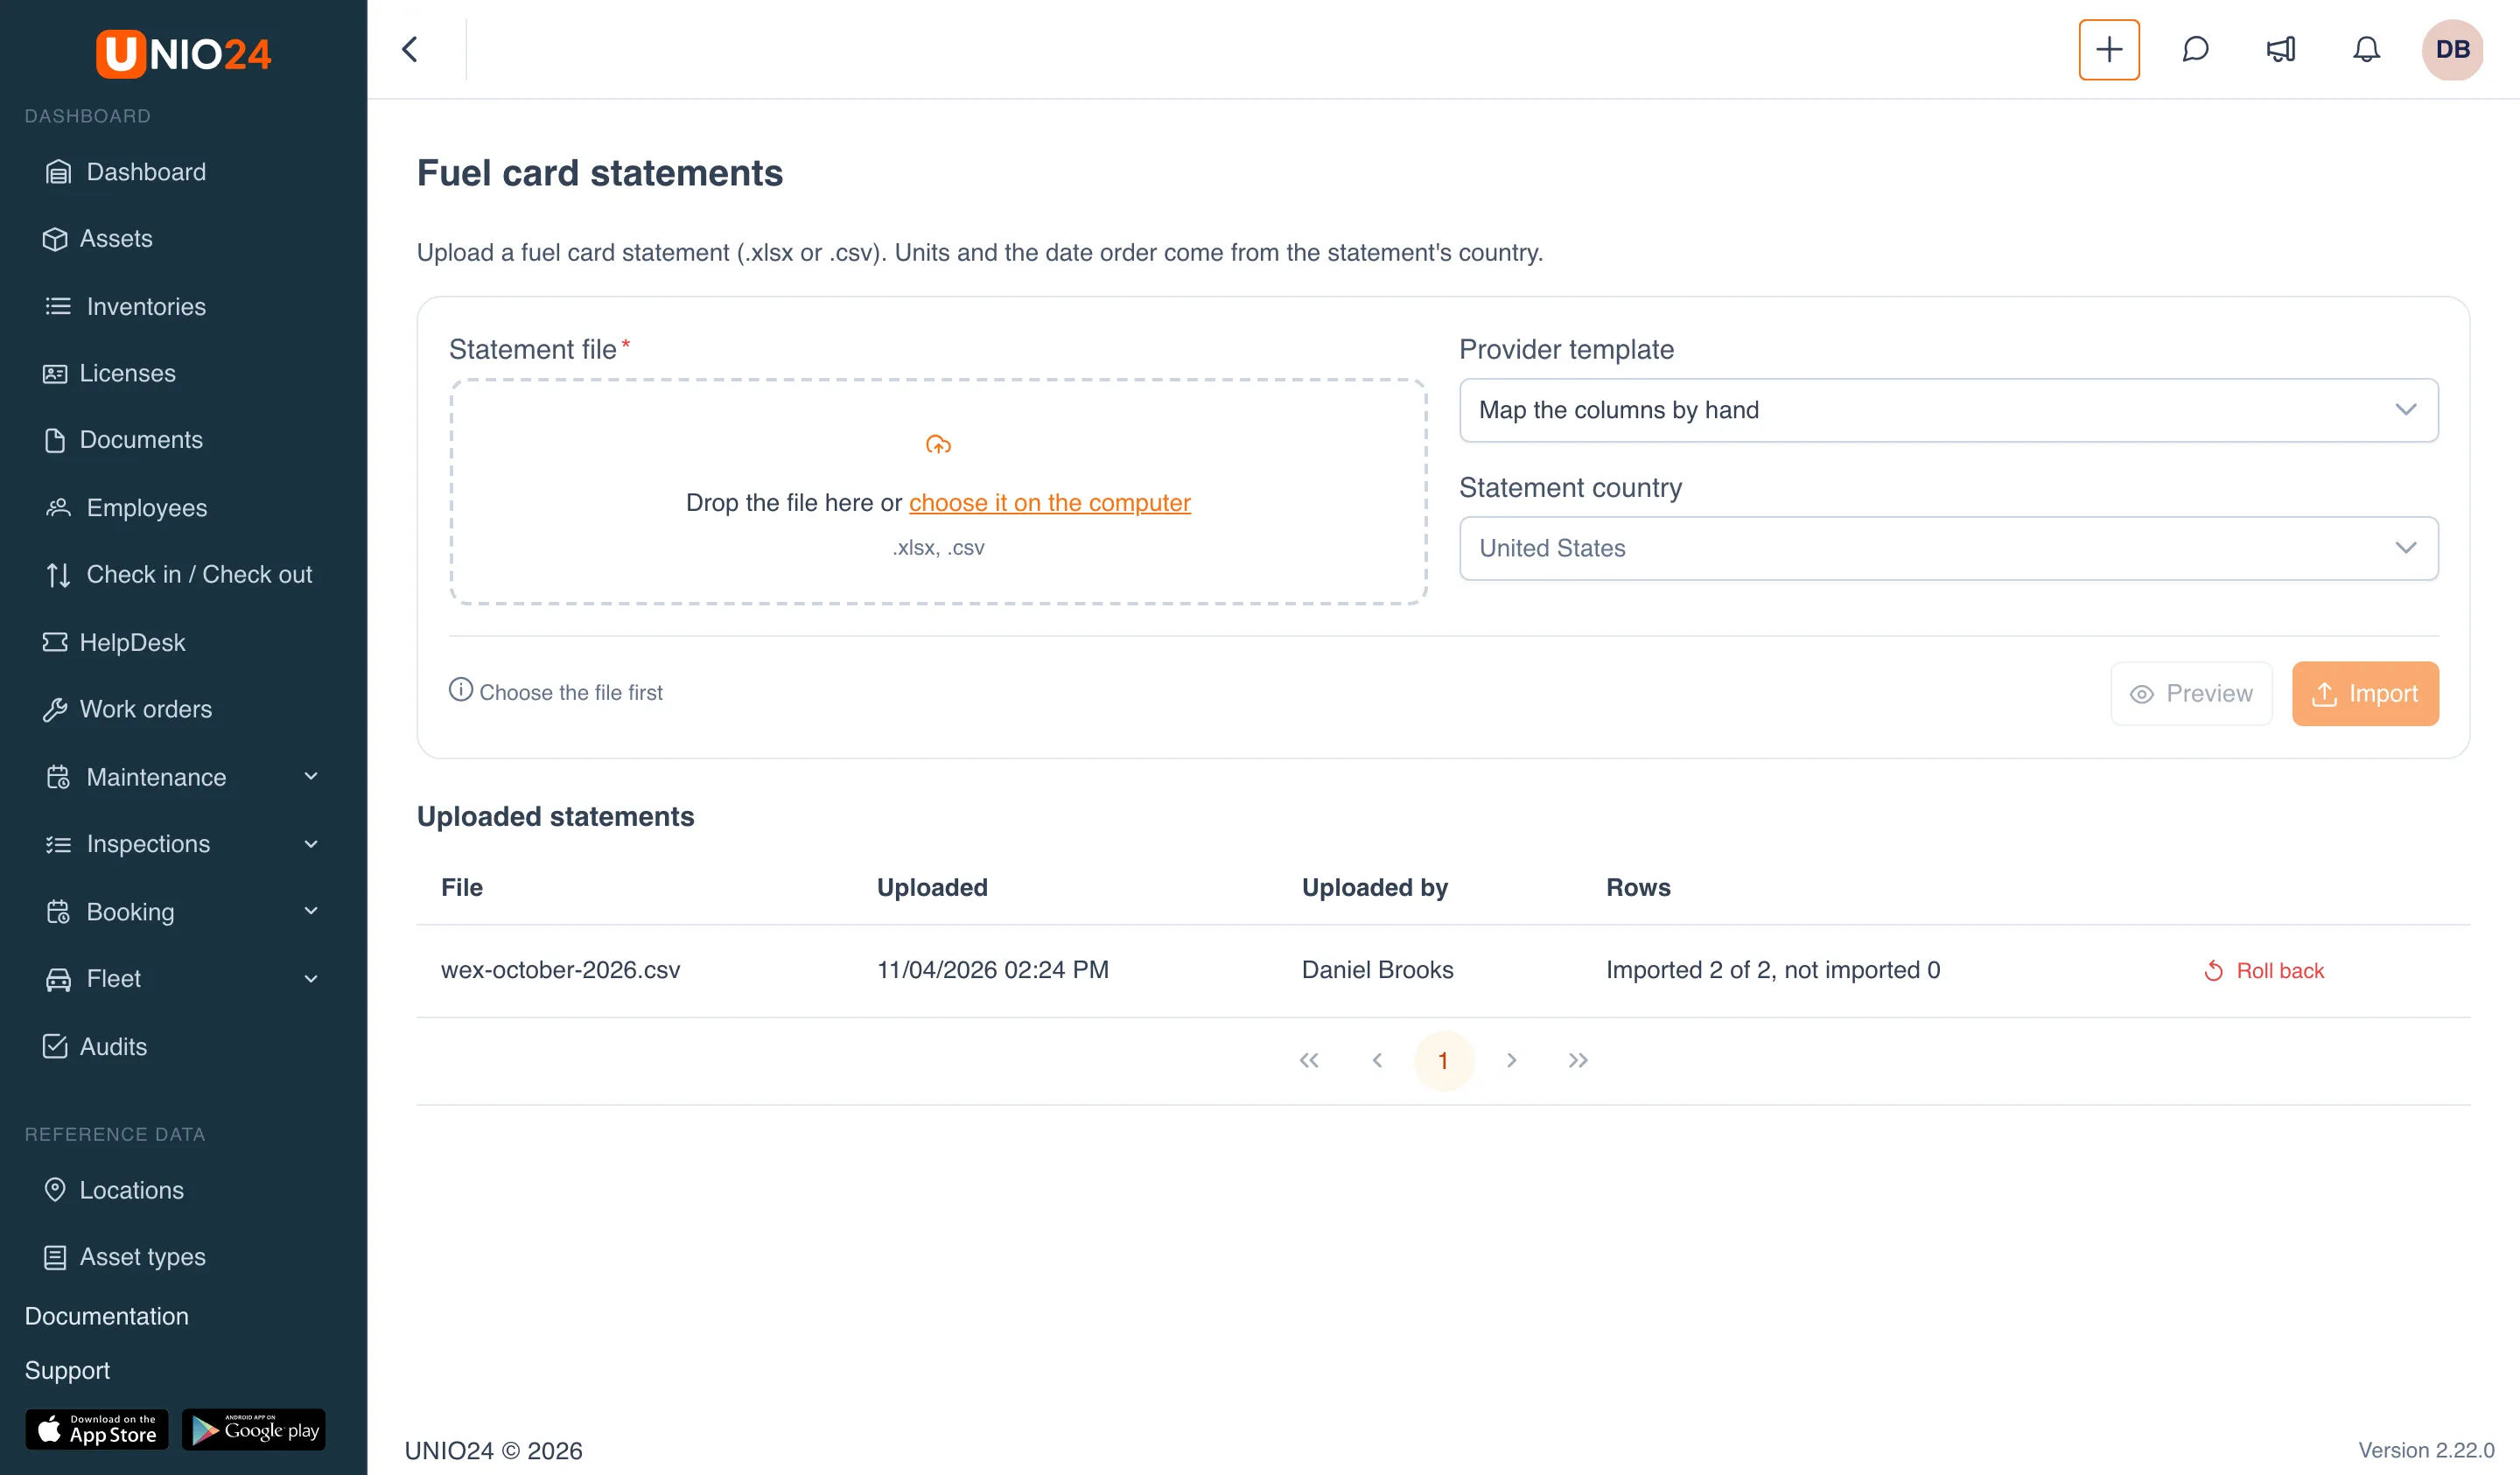
- On the Fuel and charging tab, click Import statement. The Fuel card statements page opens.
- Drag the file into Statement file or click choose it on the computer. .xlsx and .csv files are accepted.
- In Provider template, choose your provider’s template if there is one — for the United States, WEX (United States) and Fuelman (United States). If there’s no template for your provider, keep Map the columns by hand.
- Check the Statement country — it sets the units and the order of day and month in dates. It defaults to the company’s country.
- Click Preview.
Map the columns
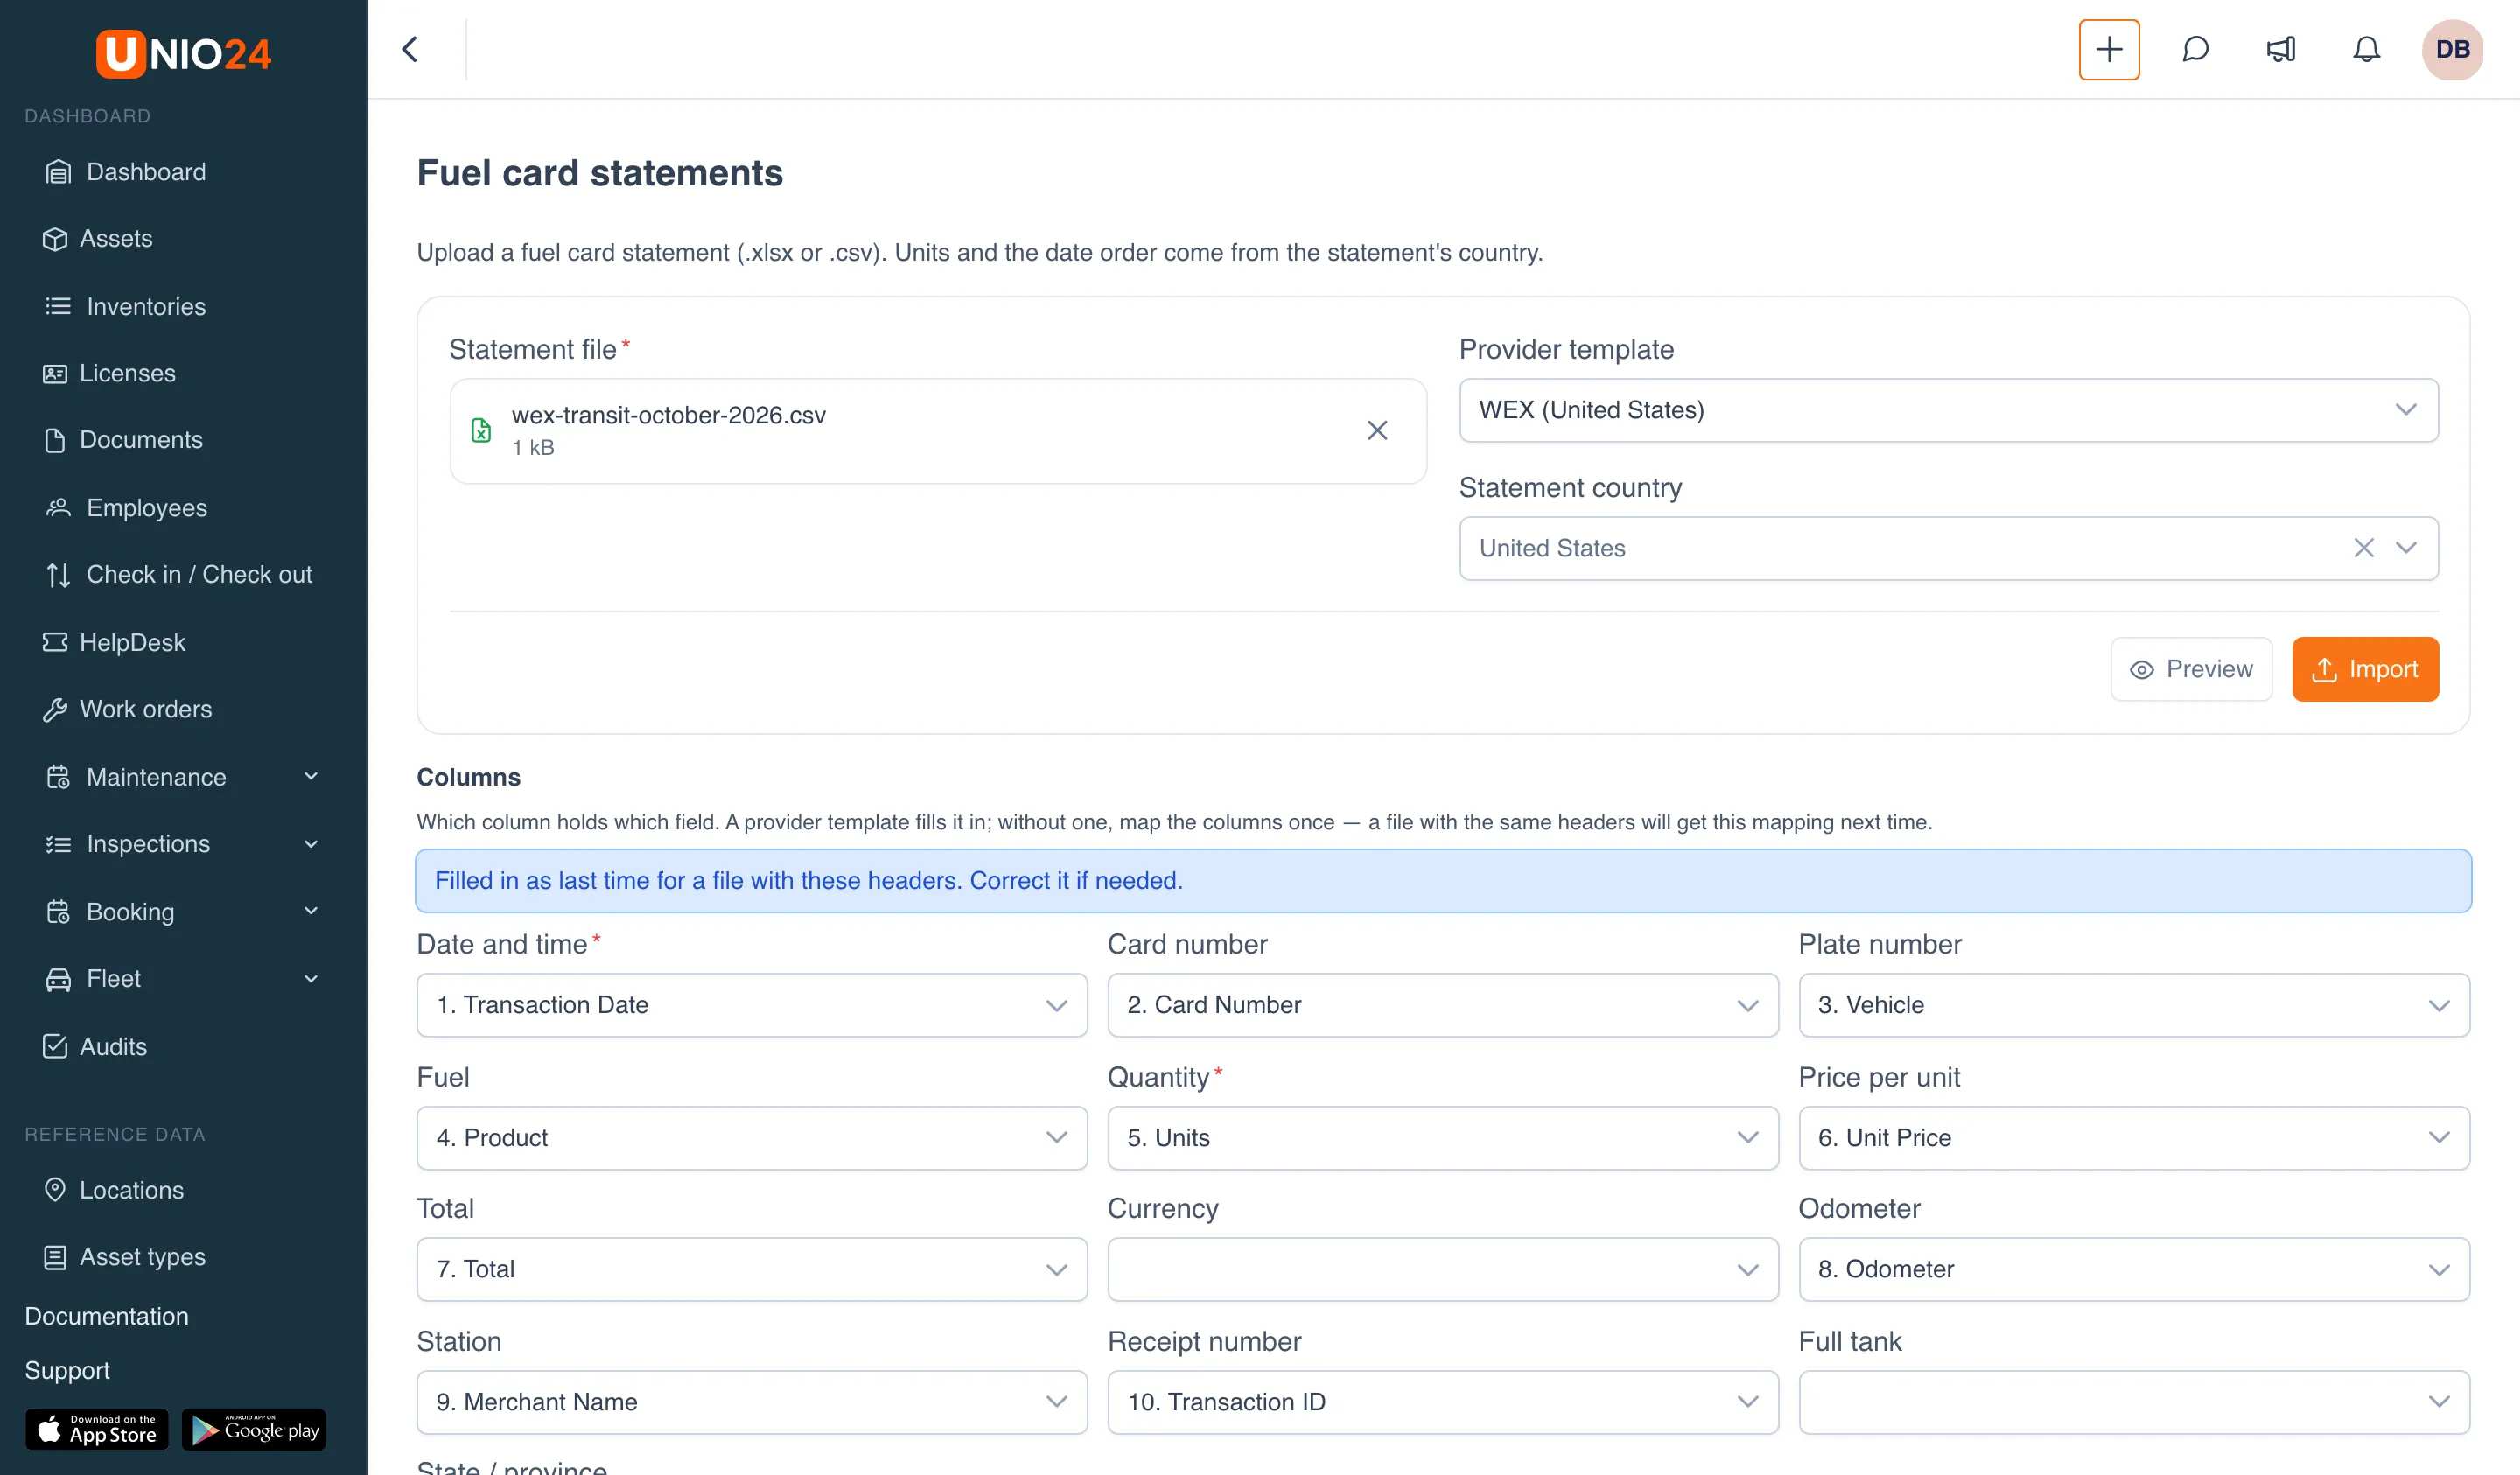
Section titled “Map the columns”The Columns section shows which column of the file holds which field: for each field, choose a column from the list (columns are labeled with their number and header), or — not in the file — if there is no such column. A provider template fills the section in for you.
- Date and time and Quantity are required, plus Card number or Plate number to find the vehicle.
- You map the columns once: the next file with the same headers gets the same mapping, and the message “Filled in as last time for a file with these headers. Correct it if needed.” appears above the columns.
- If the file has no Full tank column, every row counts as a fill-up to a full tank.
- A State / province column (for example, Merchant State in a WEX statement) goes to the refueling’s state for the IFTA report.
- After you change the columns, a hint reminds you “The columns changed — run the preview again” — click Preview again.
Check the rows and refuelings already entered by hand
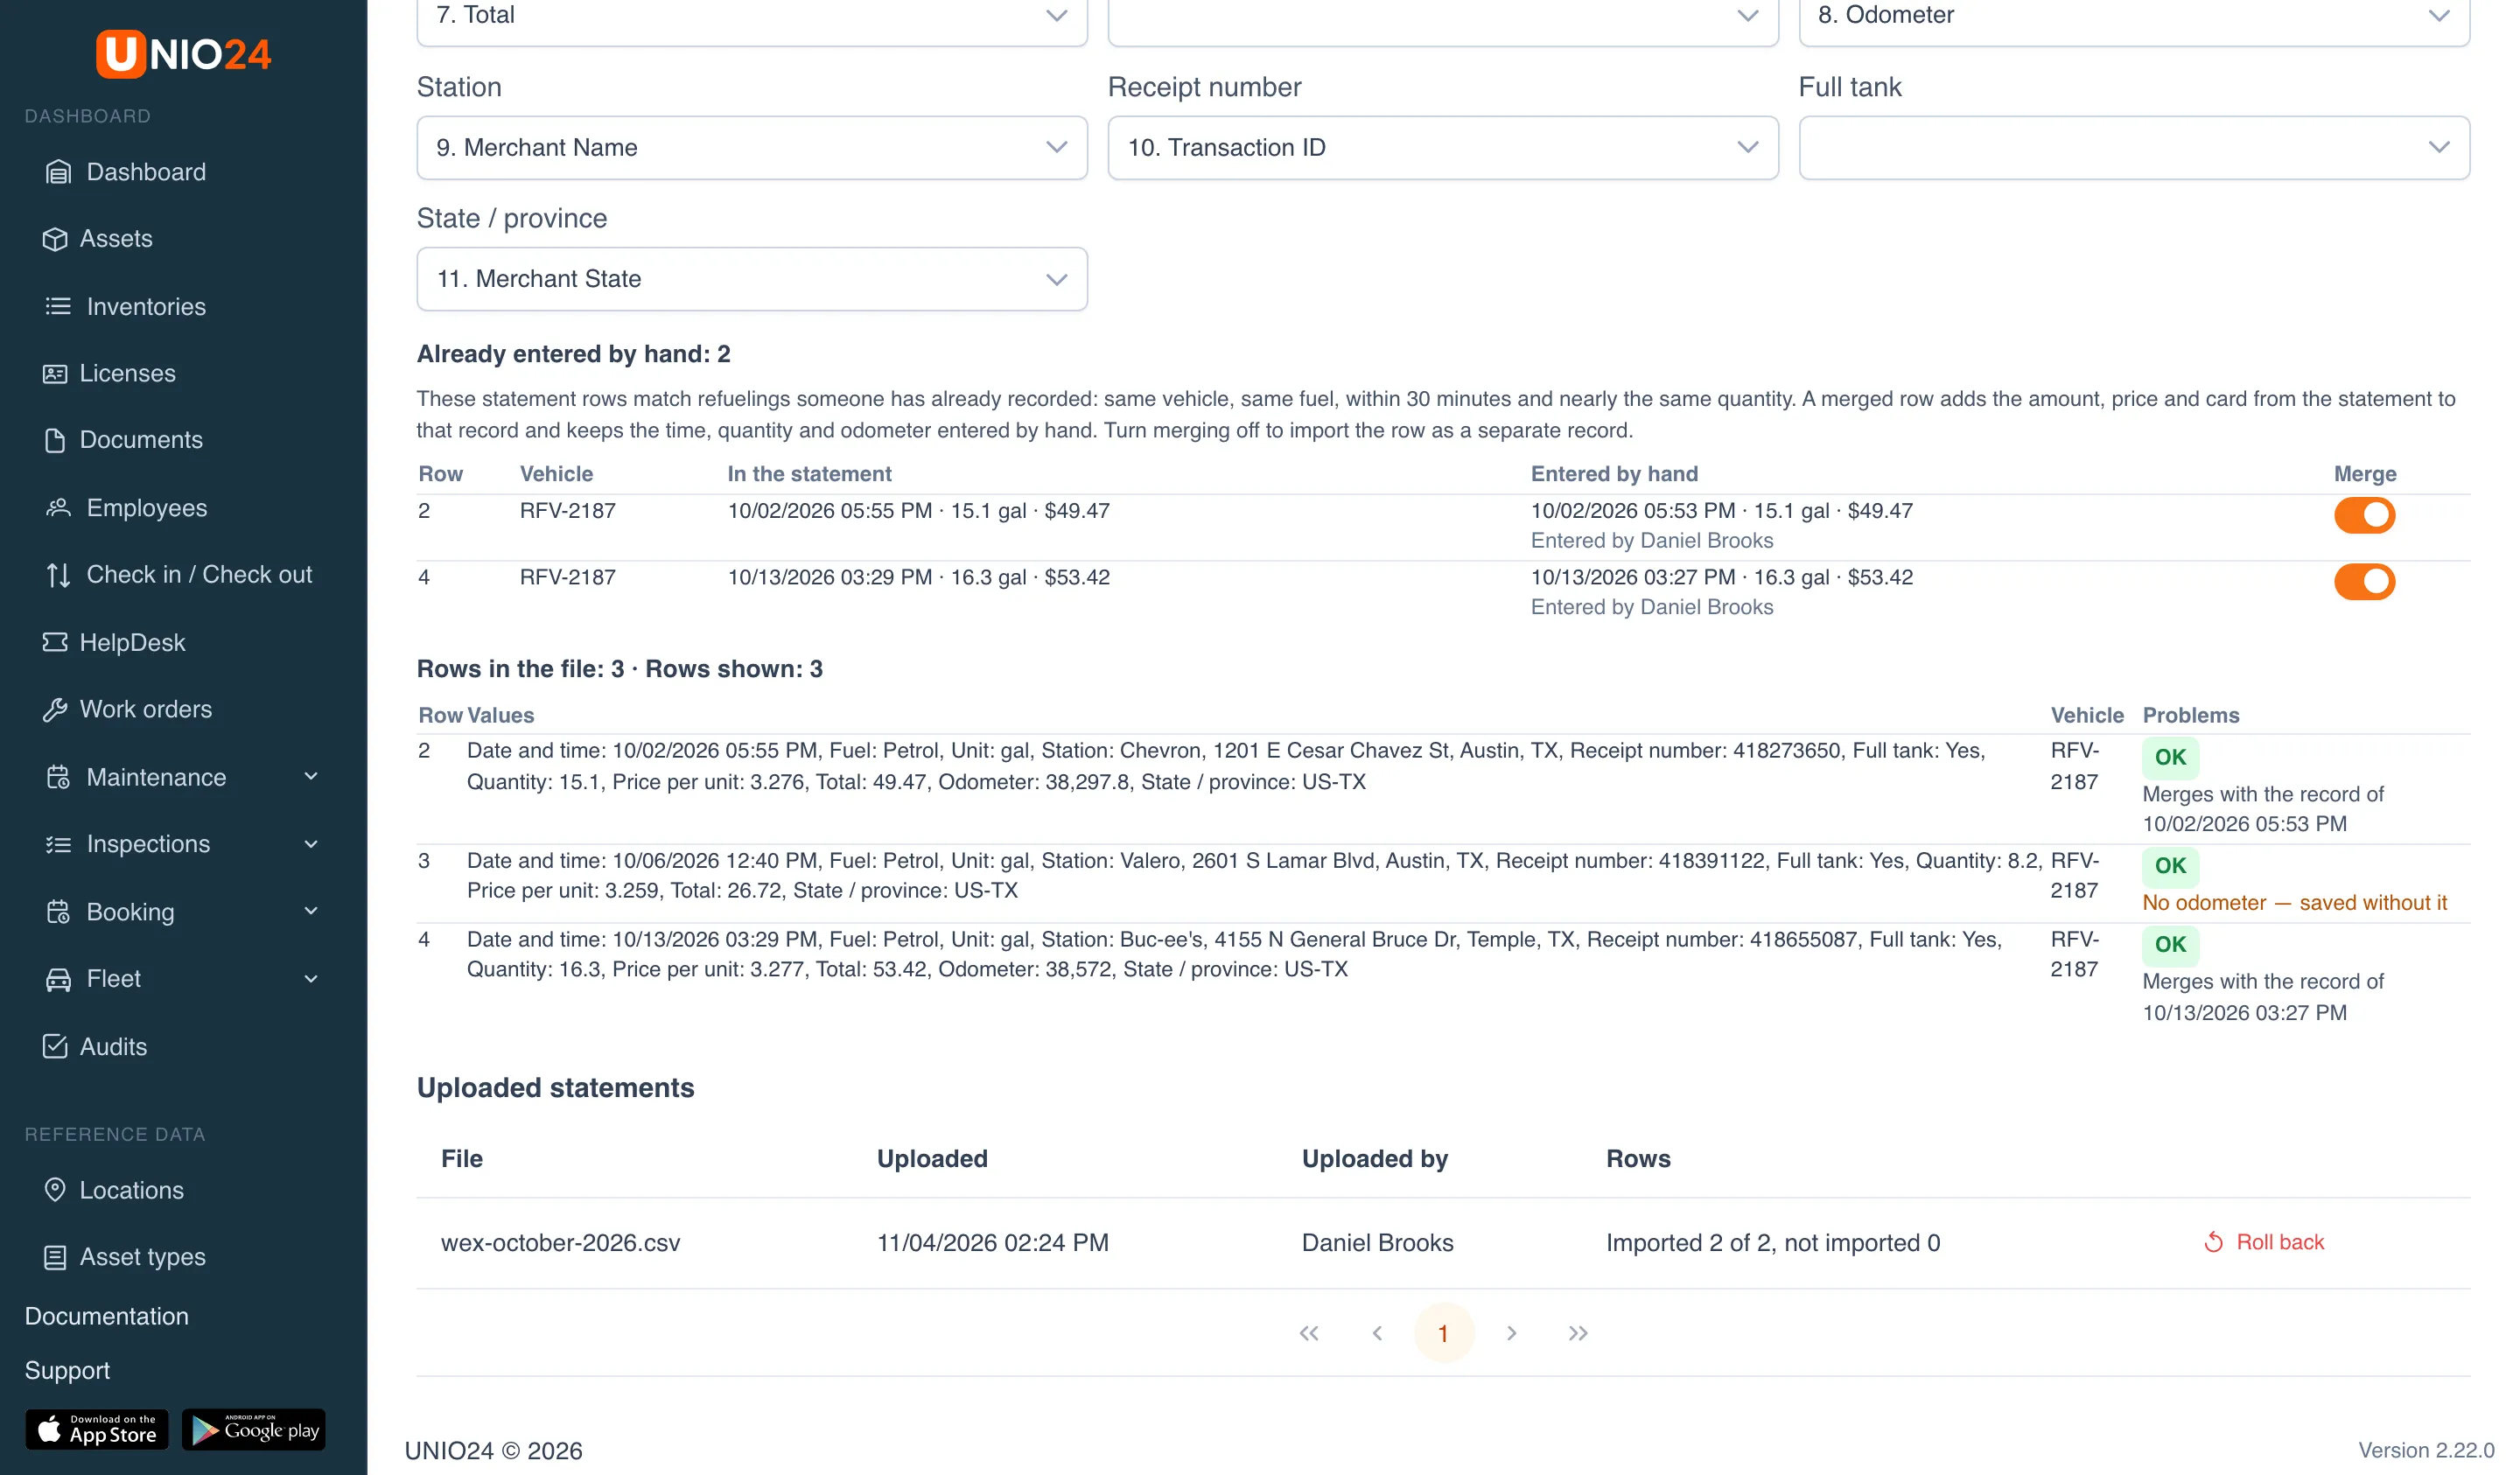
Section titled “Check the rows and refuelings already entered by hand”The preview shows the first rows of the file the way they will be imported: the values, the vehicle found and the Problems column. OK — the row will be imported; a red error — the row won’t be imported; an orange warning — the row will be imported without one field (for example, “No odometer — saved without it”).
If a driver has already entered this refueling, the statement row doesn’t create a second record. Such rows are listed in the Already entered by hand table: same vehicle, same fuel, no more than 30 minutes apart and nearly the same quantity. The Merge switch is on by default — the statement row adds the amount, price and card to the record entered by hand, and the time, quantity and odometer stay as entered. Turn the switch off to import the row as a separate record.
Import
Section titled “Import”Click Import. UNIO24 shows the result: “Imported … of …, not imported …” and, if there were any, the lists Rows that were not imported (with the row number and the reason) and Saved without a field. You can fix the failed rows in the file and upload them as a separate file.
Imported records get the source Import. An odometer reading from a statement stays on the record only and doesn’t change the vehicle’s meter.
Uploaded statements and rollback
Section titled “Uploaded statements and rollback”The Uploaded statements table at the bottom of the page shows who uploaded each file, when, and how many rows were imported. To undo an upload, click Roll back in its row and confirm. All records of that statement are deleted, merged records get their previous values back, and consumption is recalculated.
If records of the statement have been edited since the upload, it can’t be rolled back: UNIO24 lists those records.
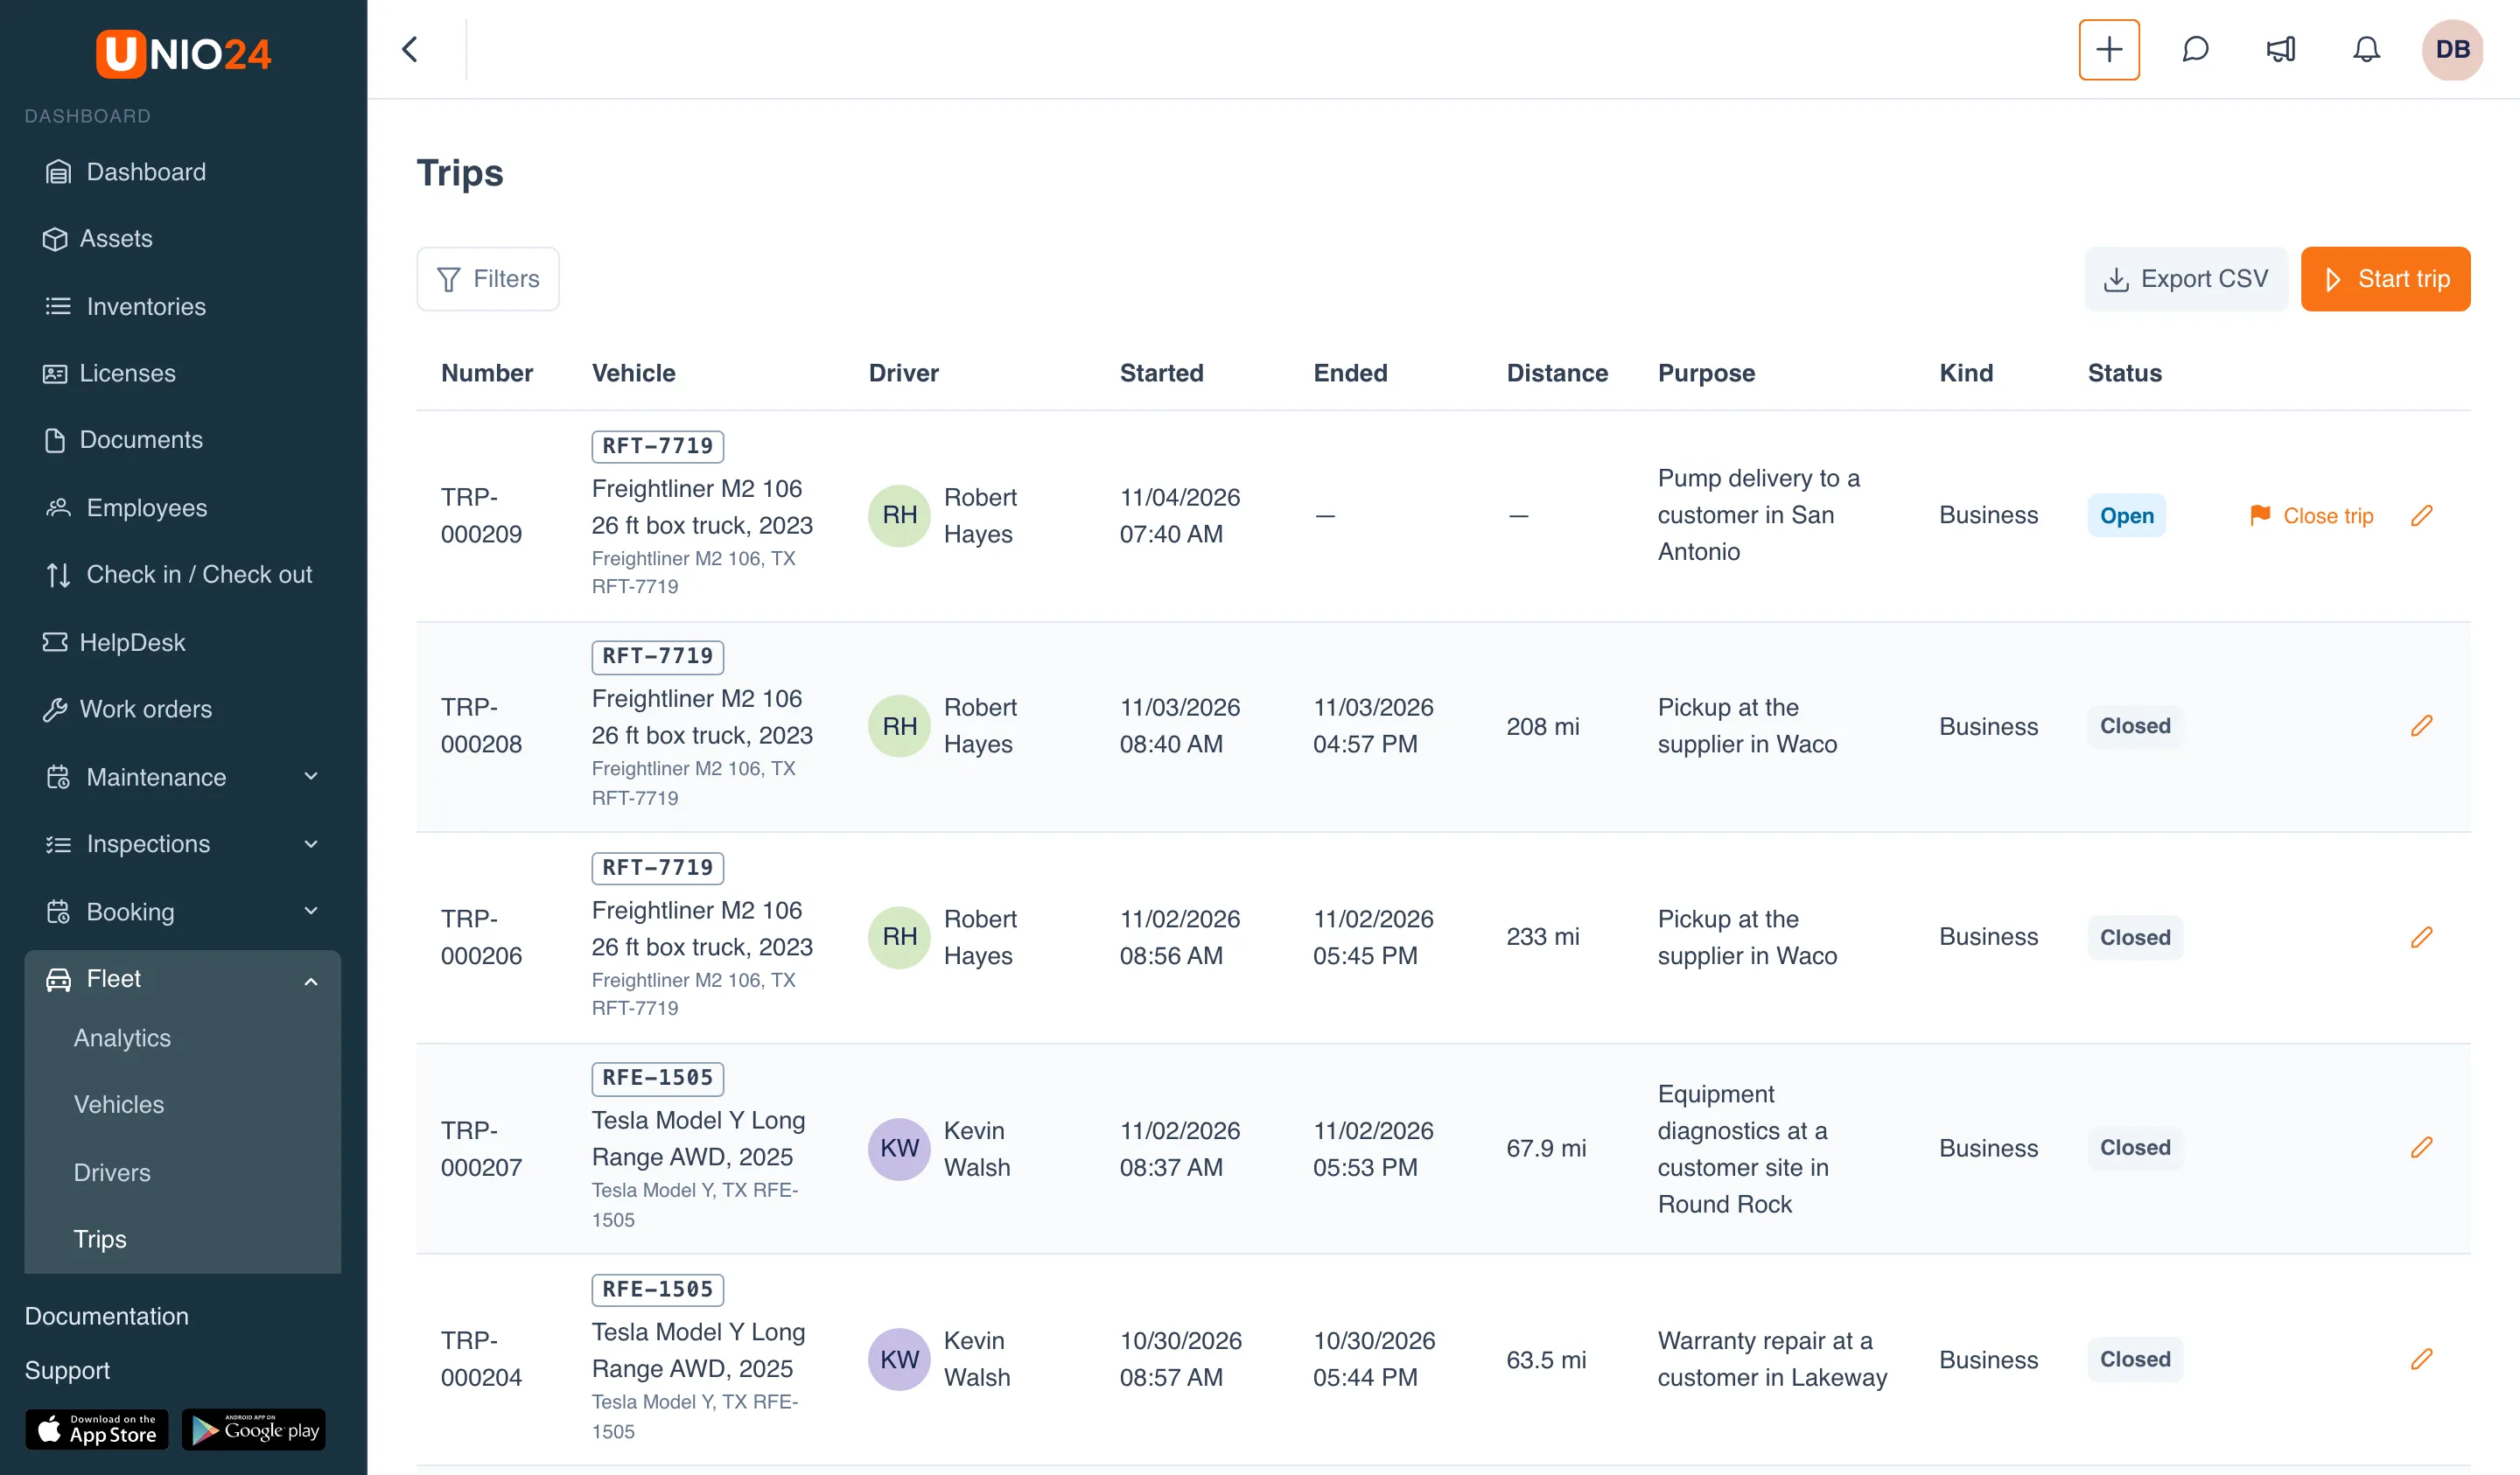
A trip records who drove which vehicle, when, where and why, with the meter readings at the start and the end — the distance is calculated from them. Trips are the most accurate source of who was driving: refueling, expenses and fines take the driver from them, and the waybill is built from them.
Open Fleet → Trips.
Start a trip
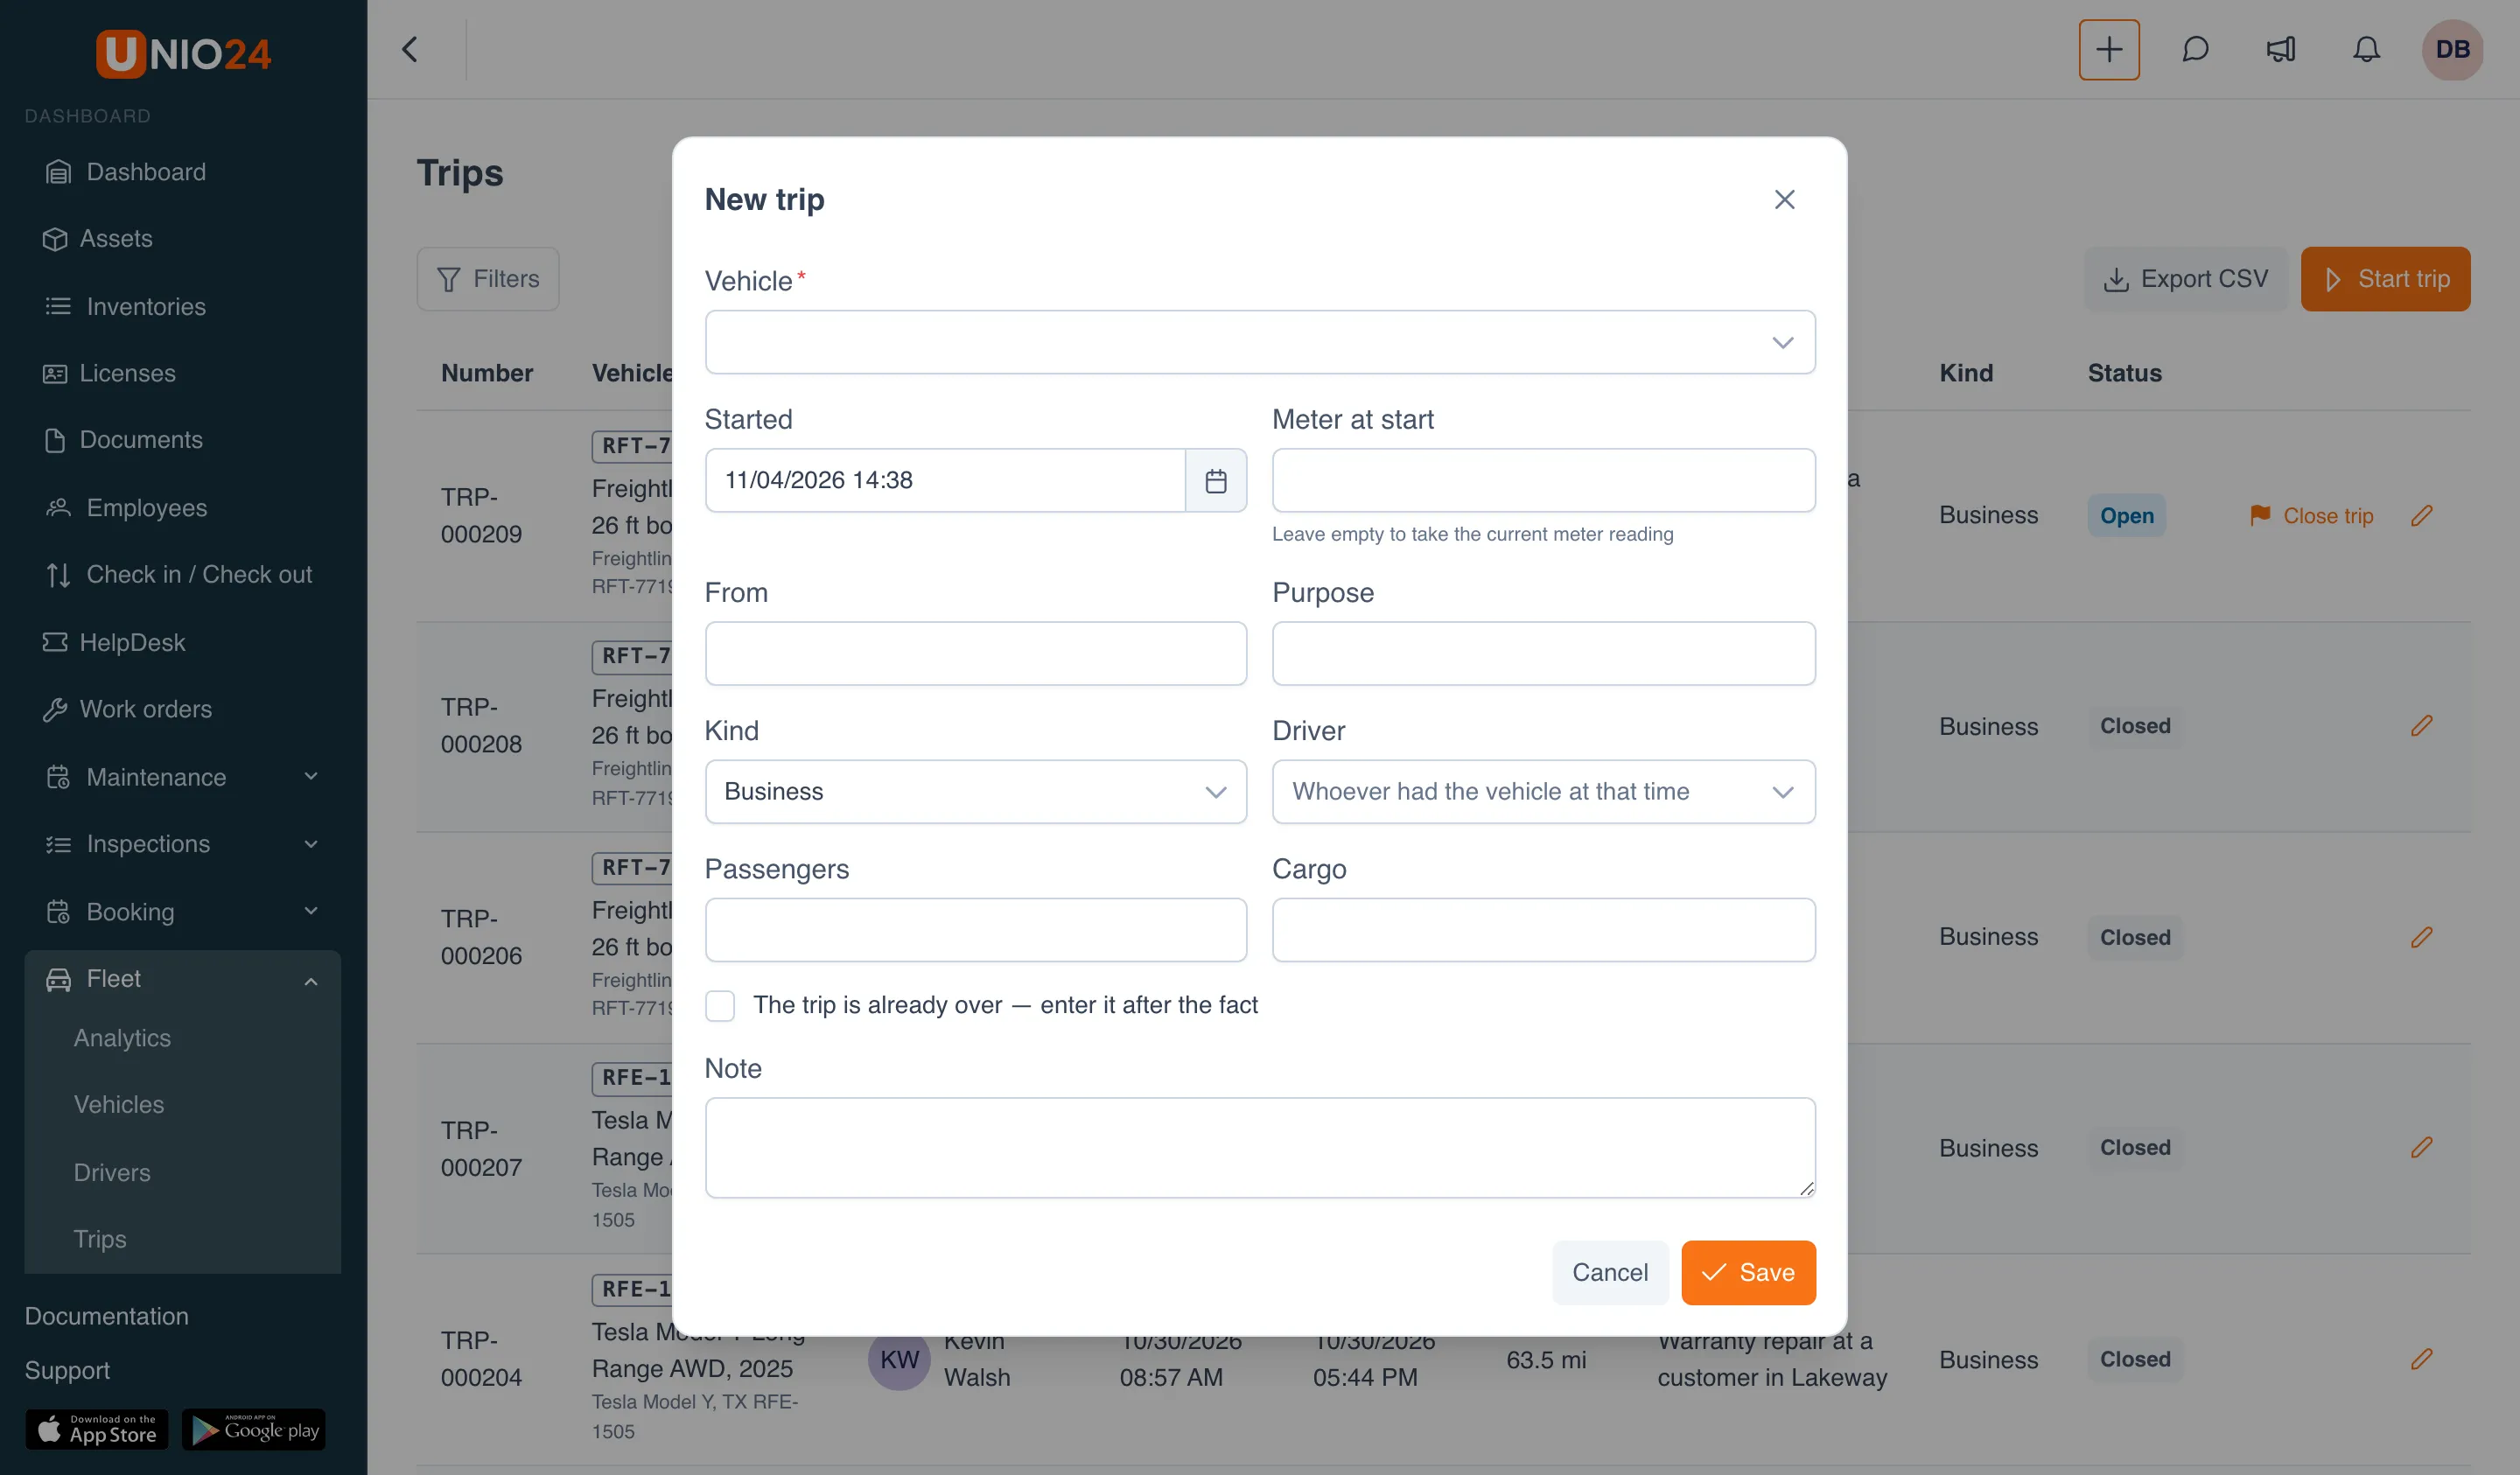
Section titled “Start a trip”- On the Trips page, click Start trip. On a vehicle card, use the Trips tab → Start trip.
- Choose the Vehicle. A vehicle can have only one open trip, so vehicles with an open trip aren’t in the list.
- Check Started.
- You can leave Meter at start empty — the current meter reading is used.
- Fill in From, Purpose, Kind (Business, Private or Commute), and if needed Passengers and Cargo.
- In Driver, leave Whoever had the vehicle at that time or choose the driver.
- Click Save.
If the vehicle is out of service or the driver isn’t allowed to drive it, UNIO24 warns you in the Before you drive block but still opens the trip: a trip is a record of what happened, not a permission to drive.
To enter a trip that is already over, check The trip is already over — enter it after the fact and fill in Ended, Meter at end and To. If you entered the meter at start, the meter at end is required.
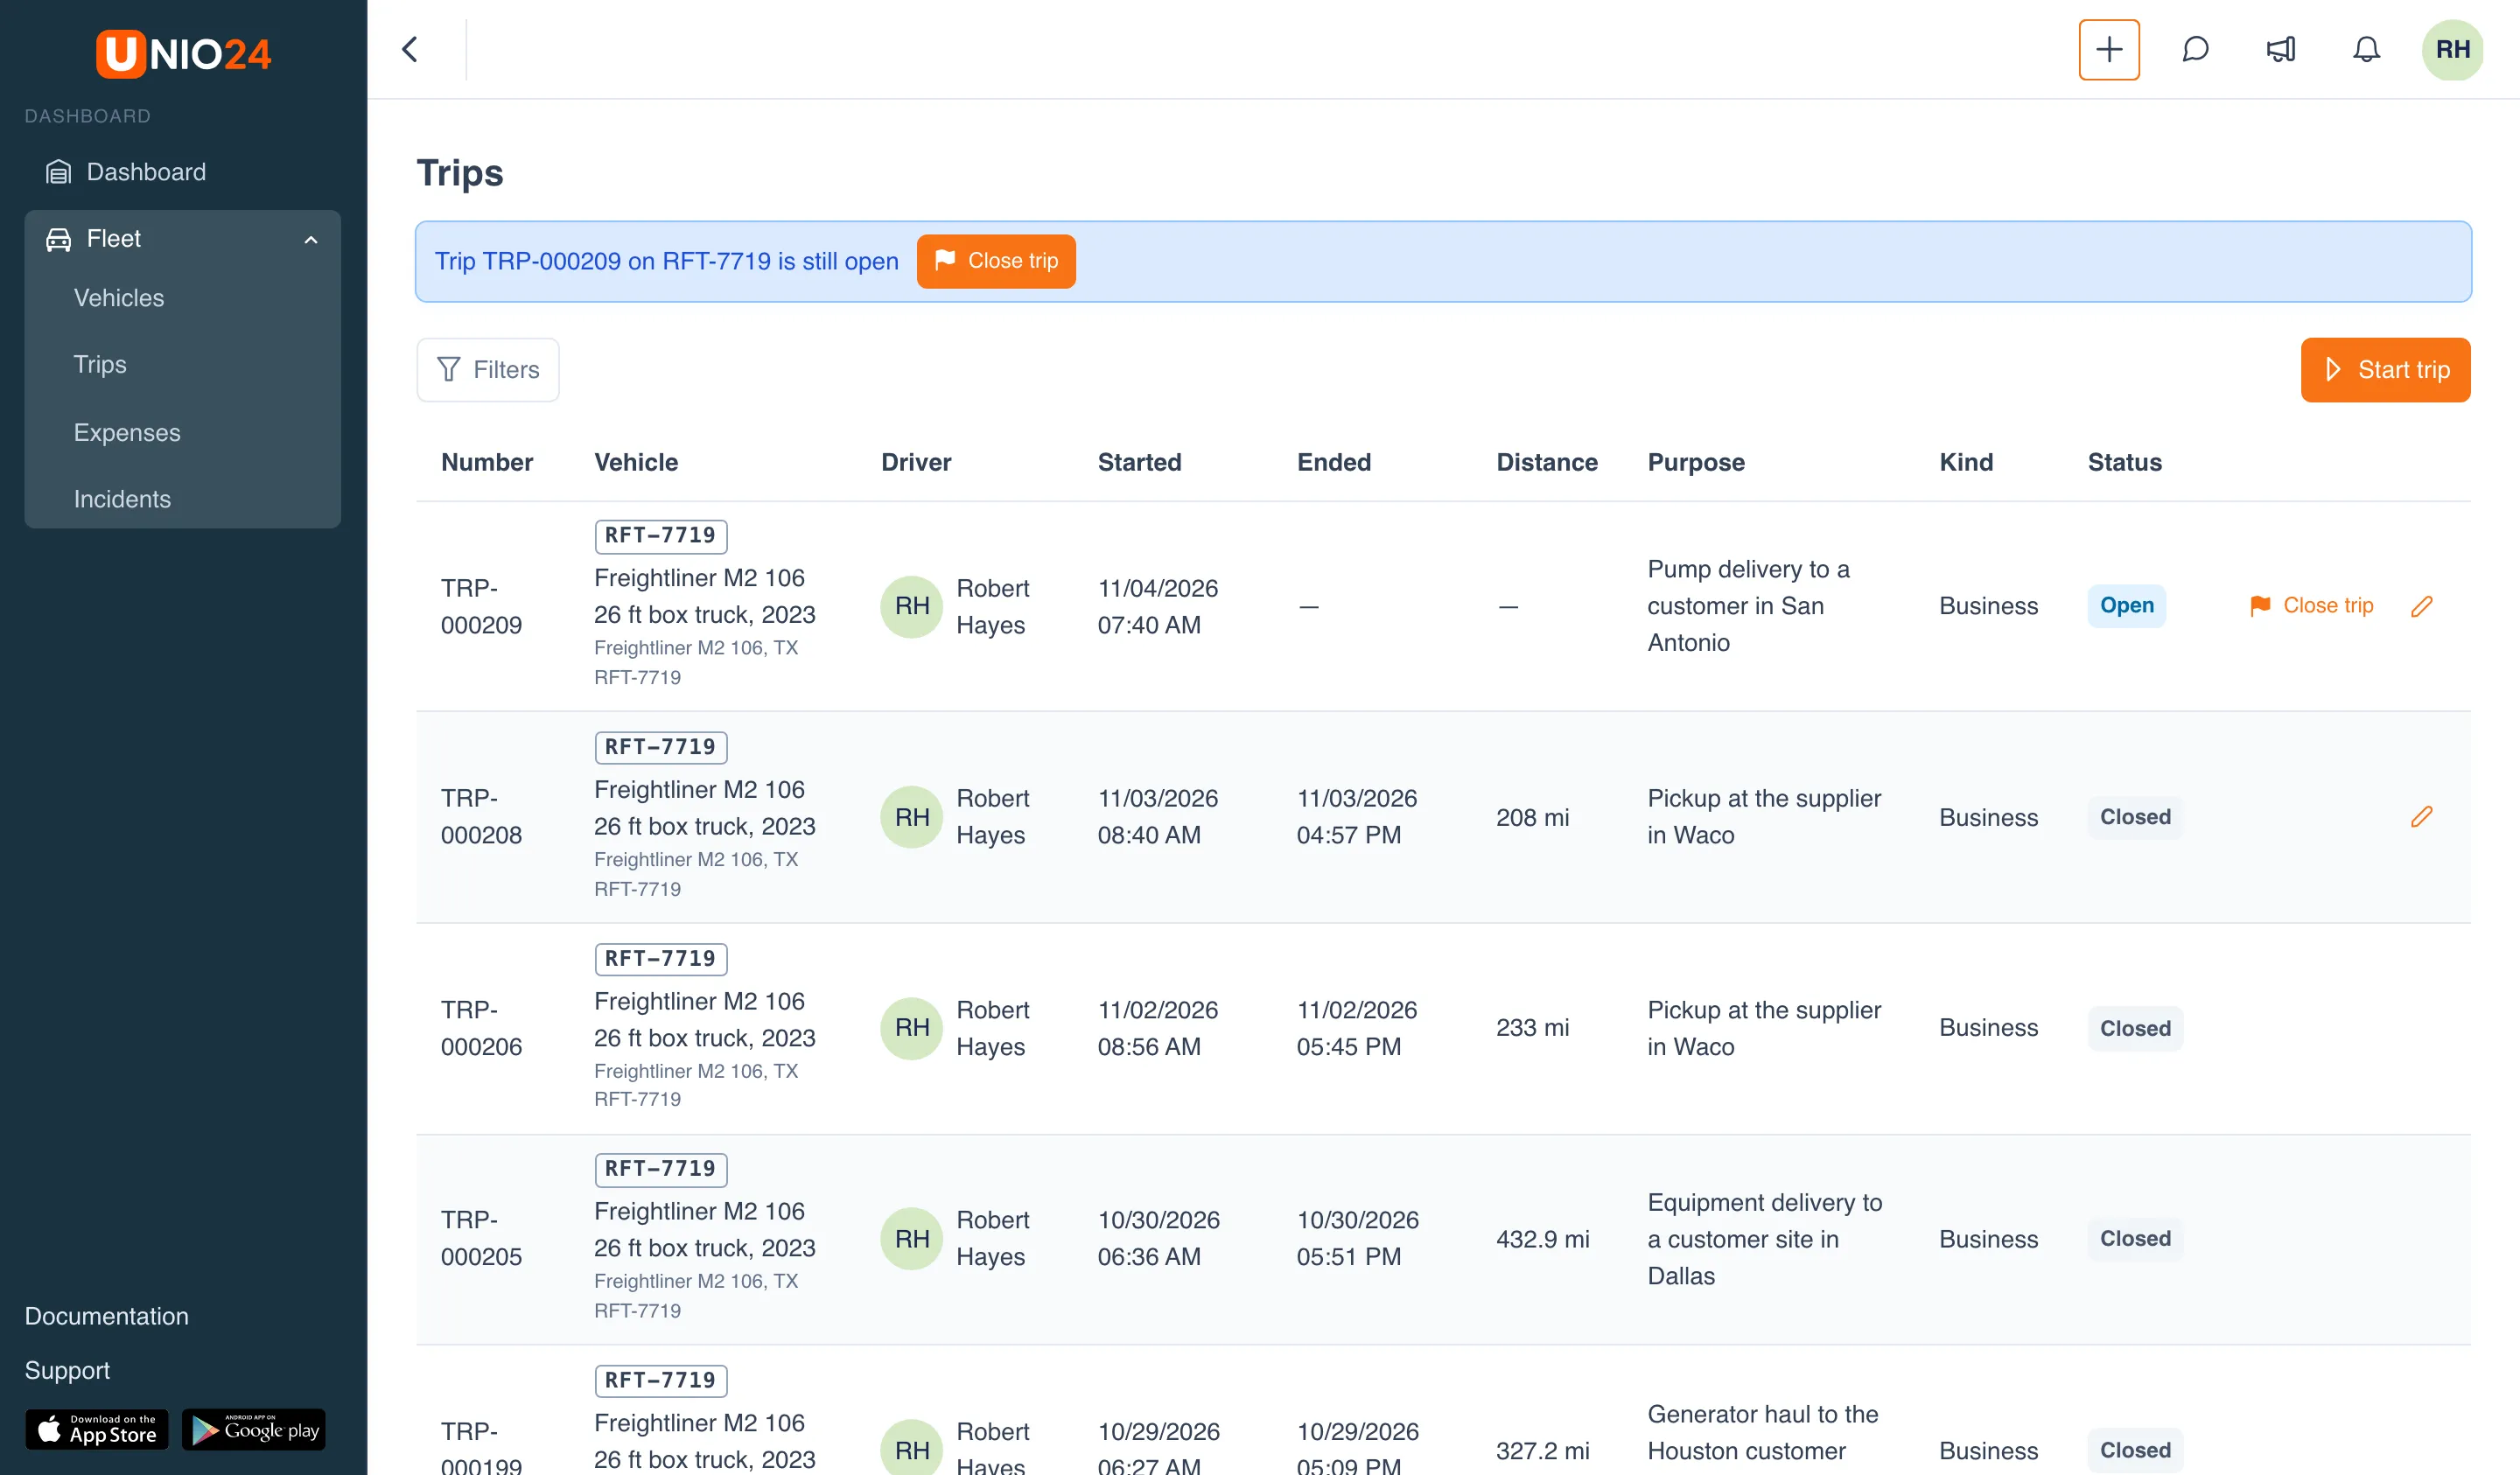
While a trip is open, the driver sees a banner above the trip list — “Trip … on … is still open” — with a Close trip button.
Close a trip
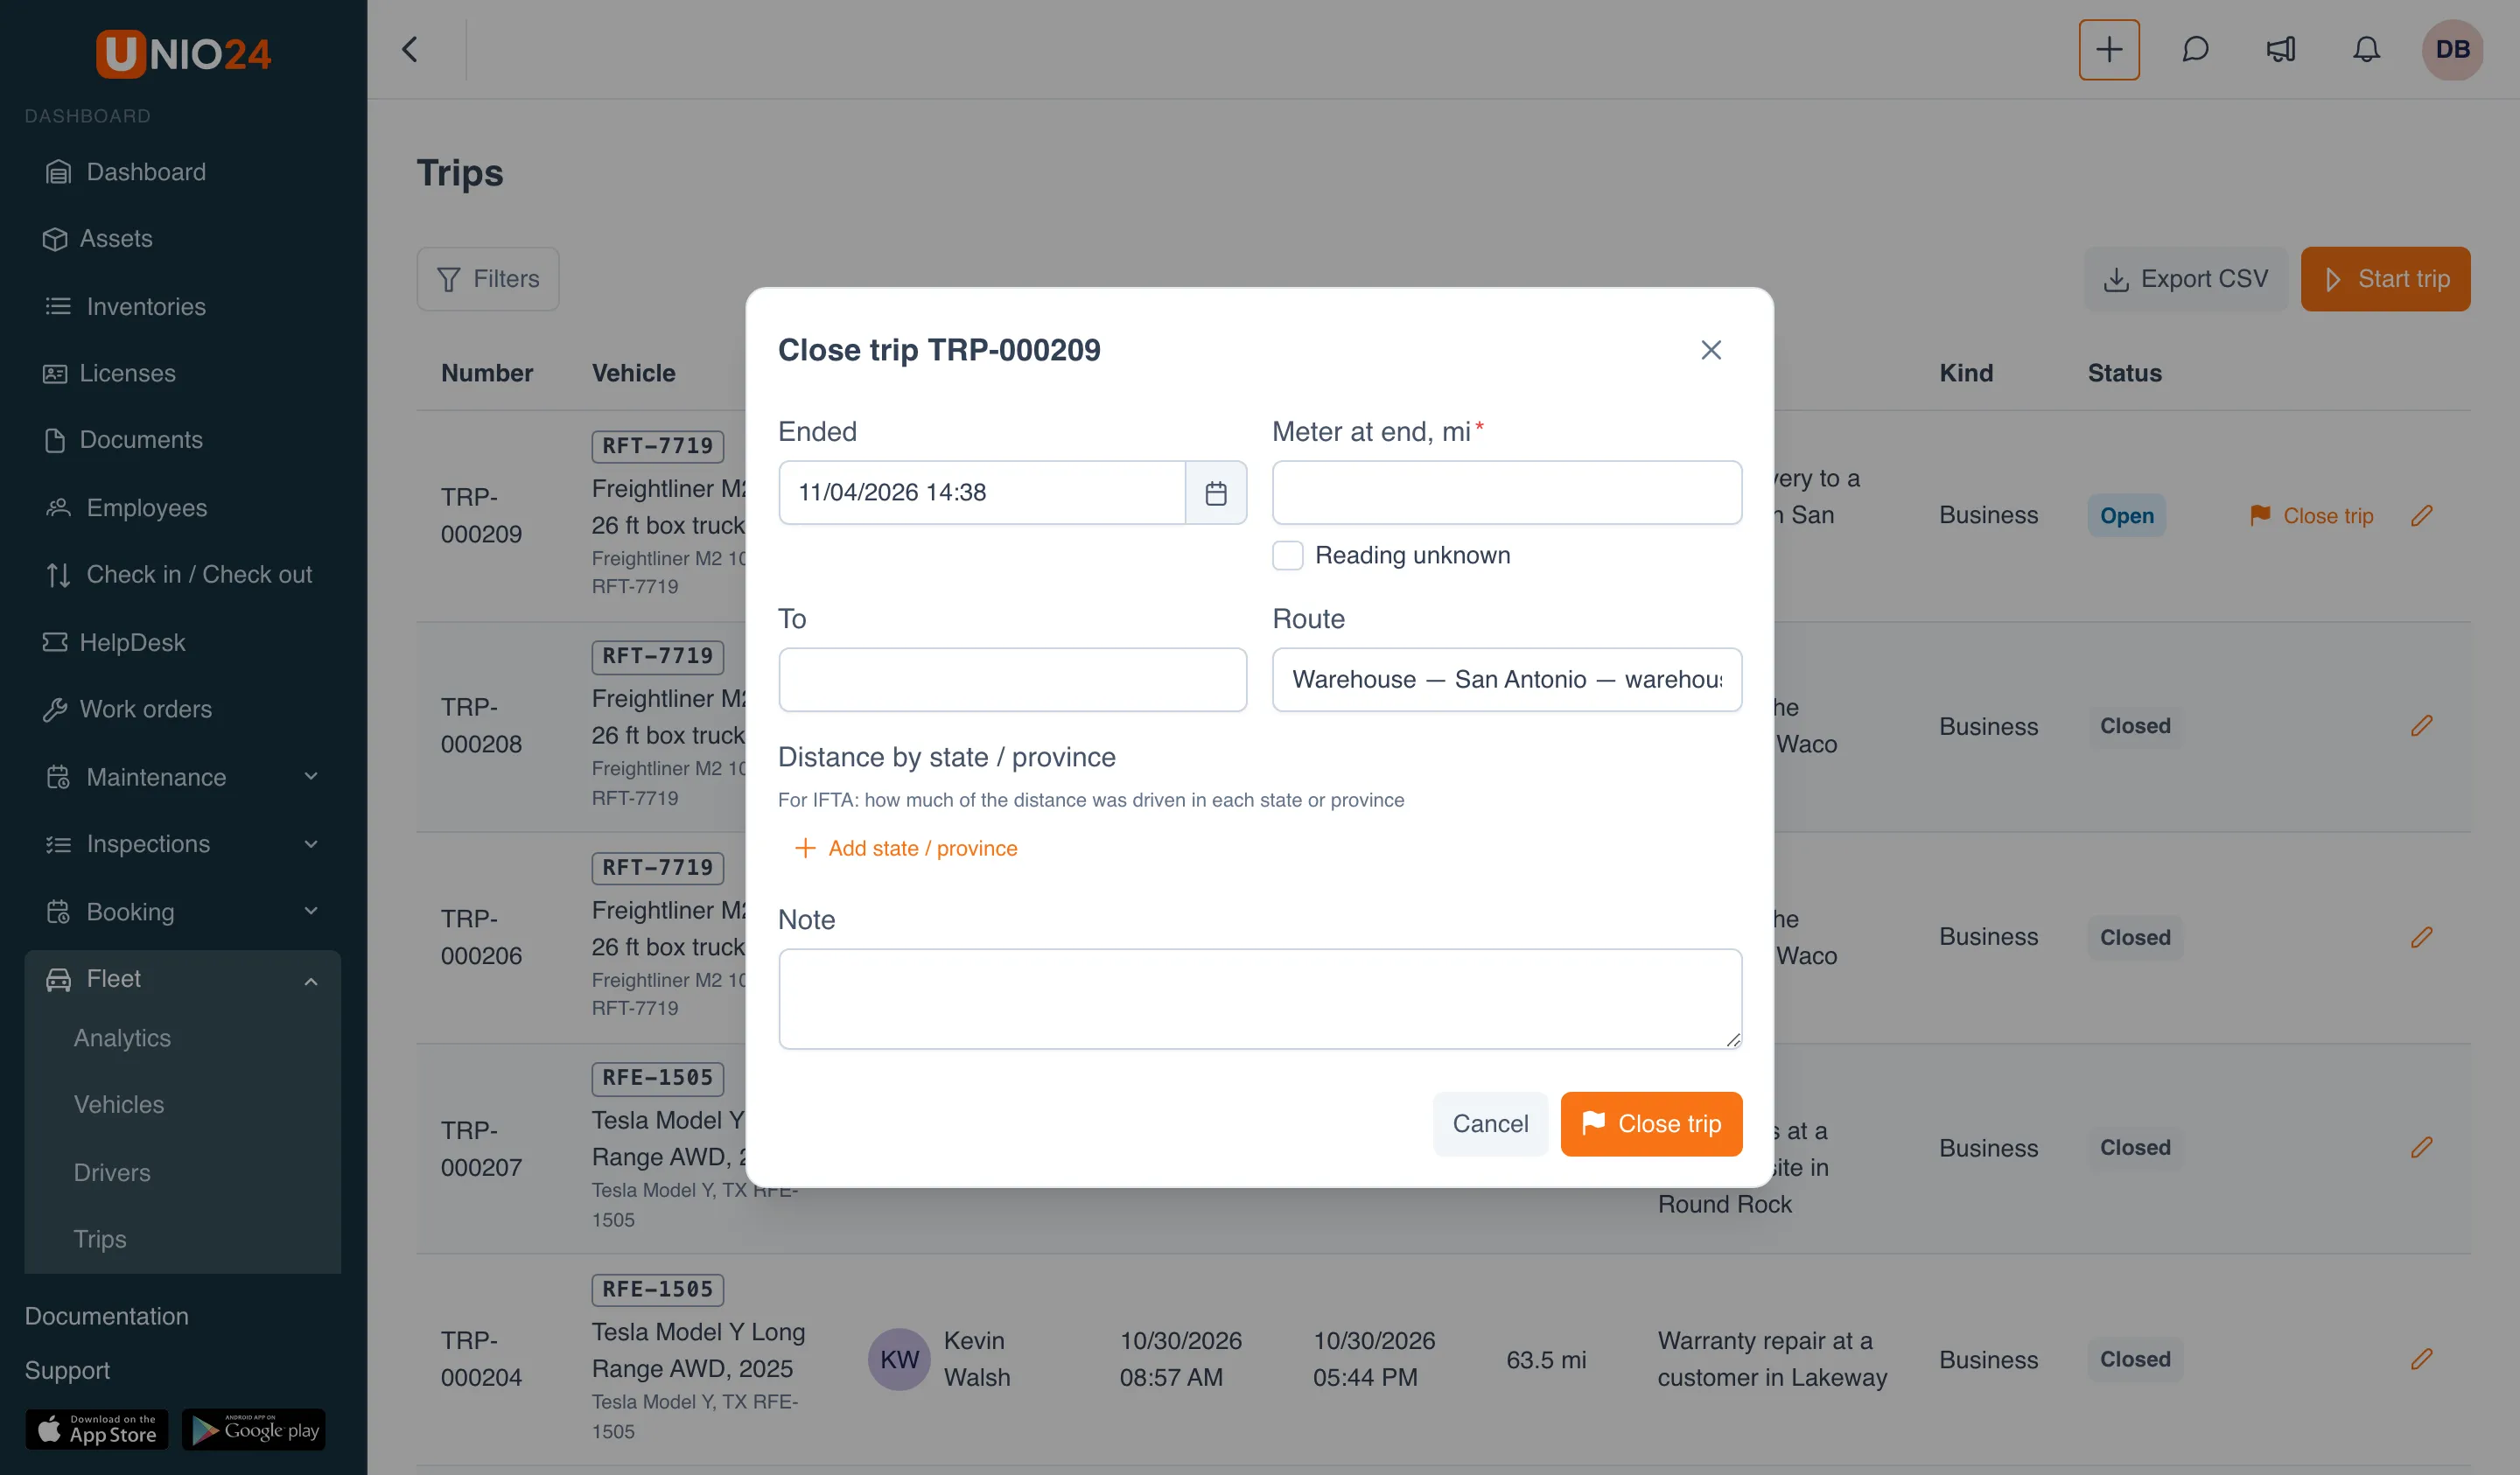
Section titled “Close a trip”- Click Close trip — on the banner, in the trip’s row, or in the Open trip column of the vehicle list.
- Check Ended.
- Enter Meter at end — the trip distance is calculated. If you can’t get the reading, check Reading unknown: the trip closes without a distance.
- If needed, fill in To, Route and Note. In a US company, also split the distance by state — see Distance by state or province below.
- Click Close trip.
Distance by state or province
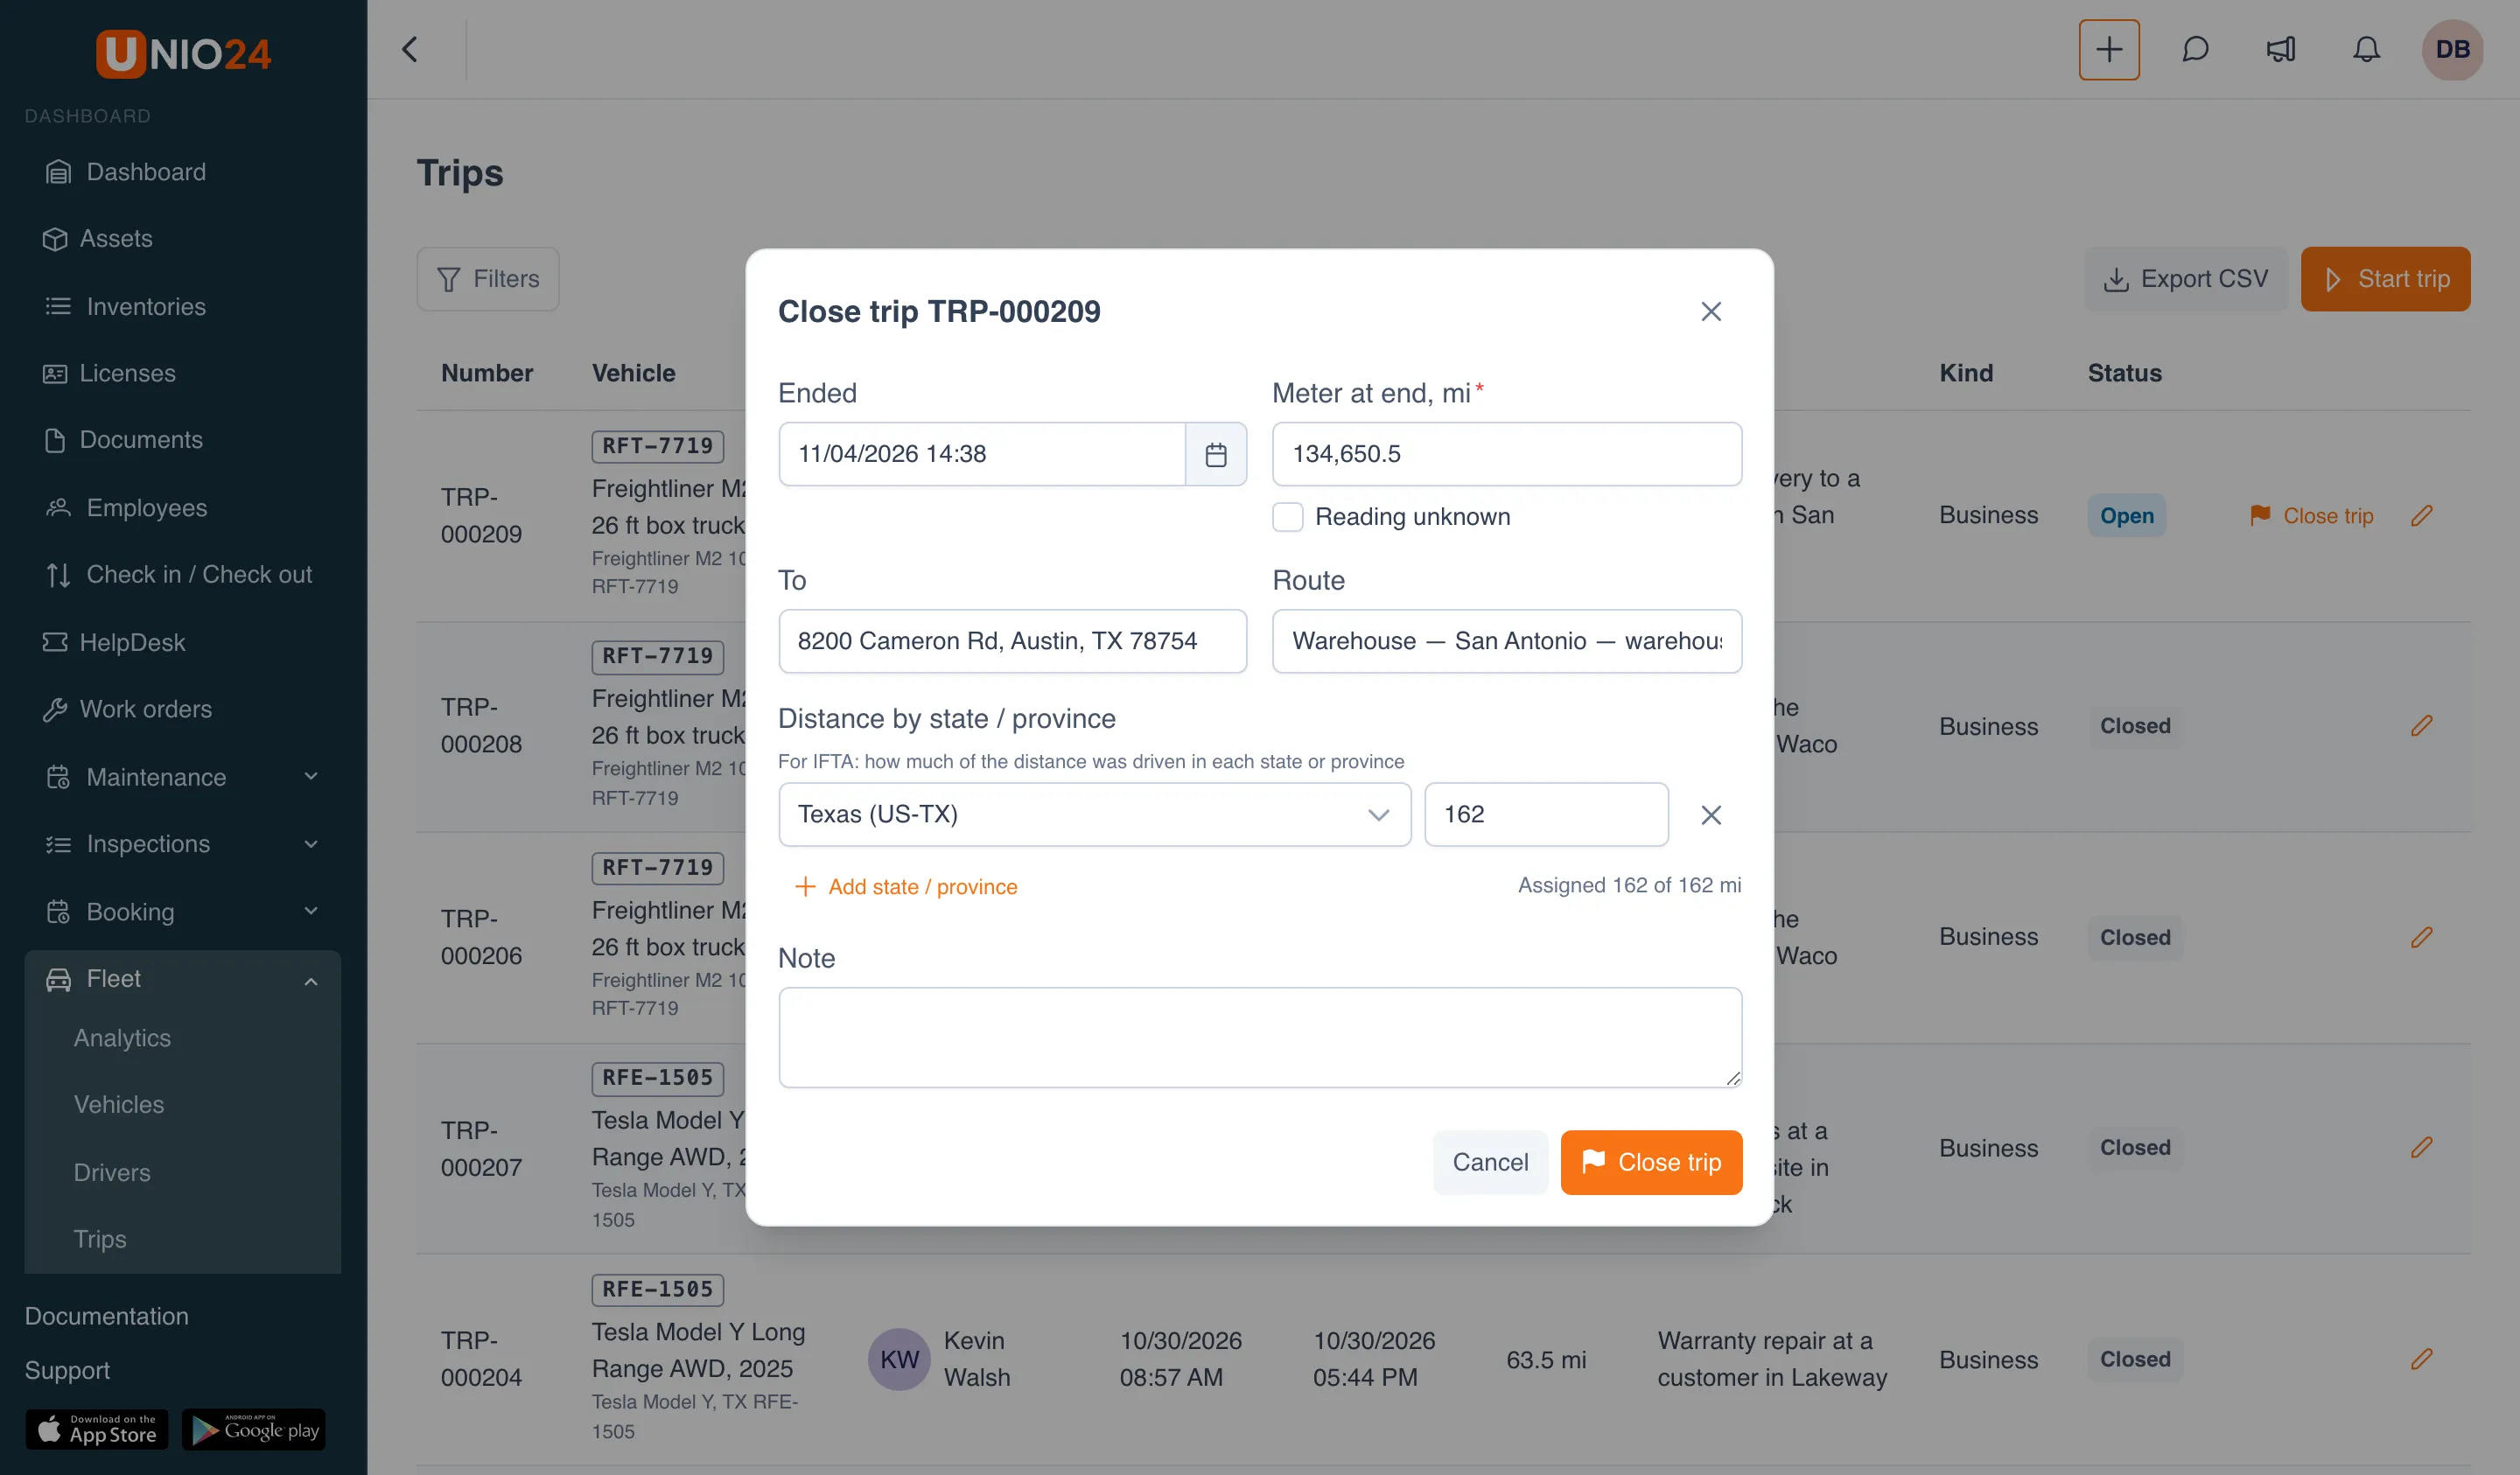
Section titled “Distance by state or province”Companies in the United States and Canada see the Distance by state / province section when they close a trip, enter a finished trip after the fact, or correct a closed trip. It’s the input for the IFTA report: how many miles of the trip were driven in each state or province.
- Click Add state / province.
- Choose the state in the list — you can type to search, for example “Texas”.
- Enter the Distance driven in that state.
- Repeat for every state the trip went through. Use Remove at the end of a row to delete it.
Under the rows, UNIO24 shows how much of the trip is split: “Assigned 162 of 162 mi”. Each state can be listed only once, and the total can’t exceed the trip distance — a larger total turns red and the trip isn’t saved. A trip with no states is saved too; the IFTA report lists such trips separately.
Correct a closed trip
Section titled “Correct a closed trip”A closed trip isn’t deleted — it’s only corrected, with a reason.
- In the trip’s row, click Edit.
- Correct the fields you need. A reading that is already saved to the vehicle’s meter doesn’t change.
- Fill in Reason for the correction — it’s required for a closed trip and is kept in the trip history.
- Click Save.
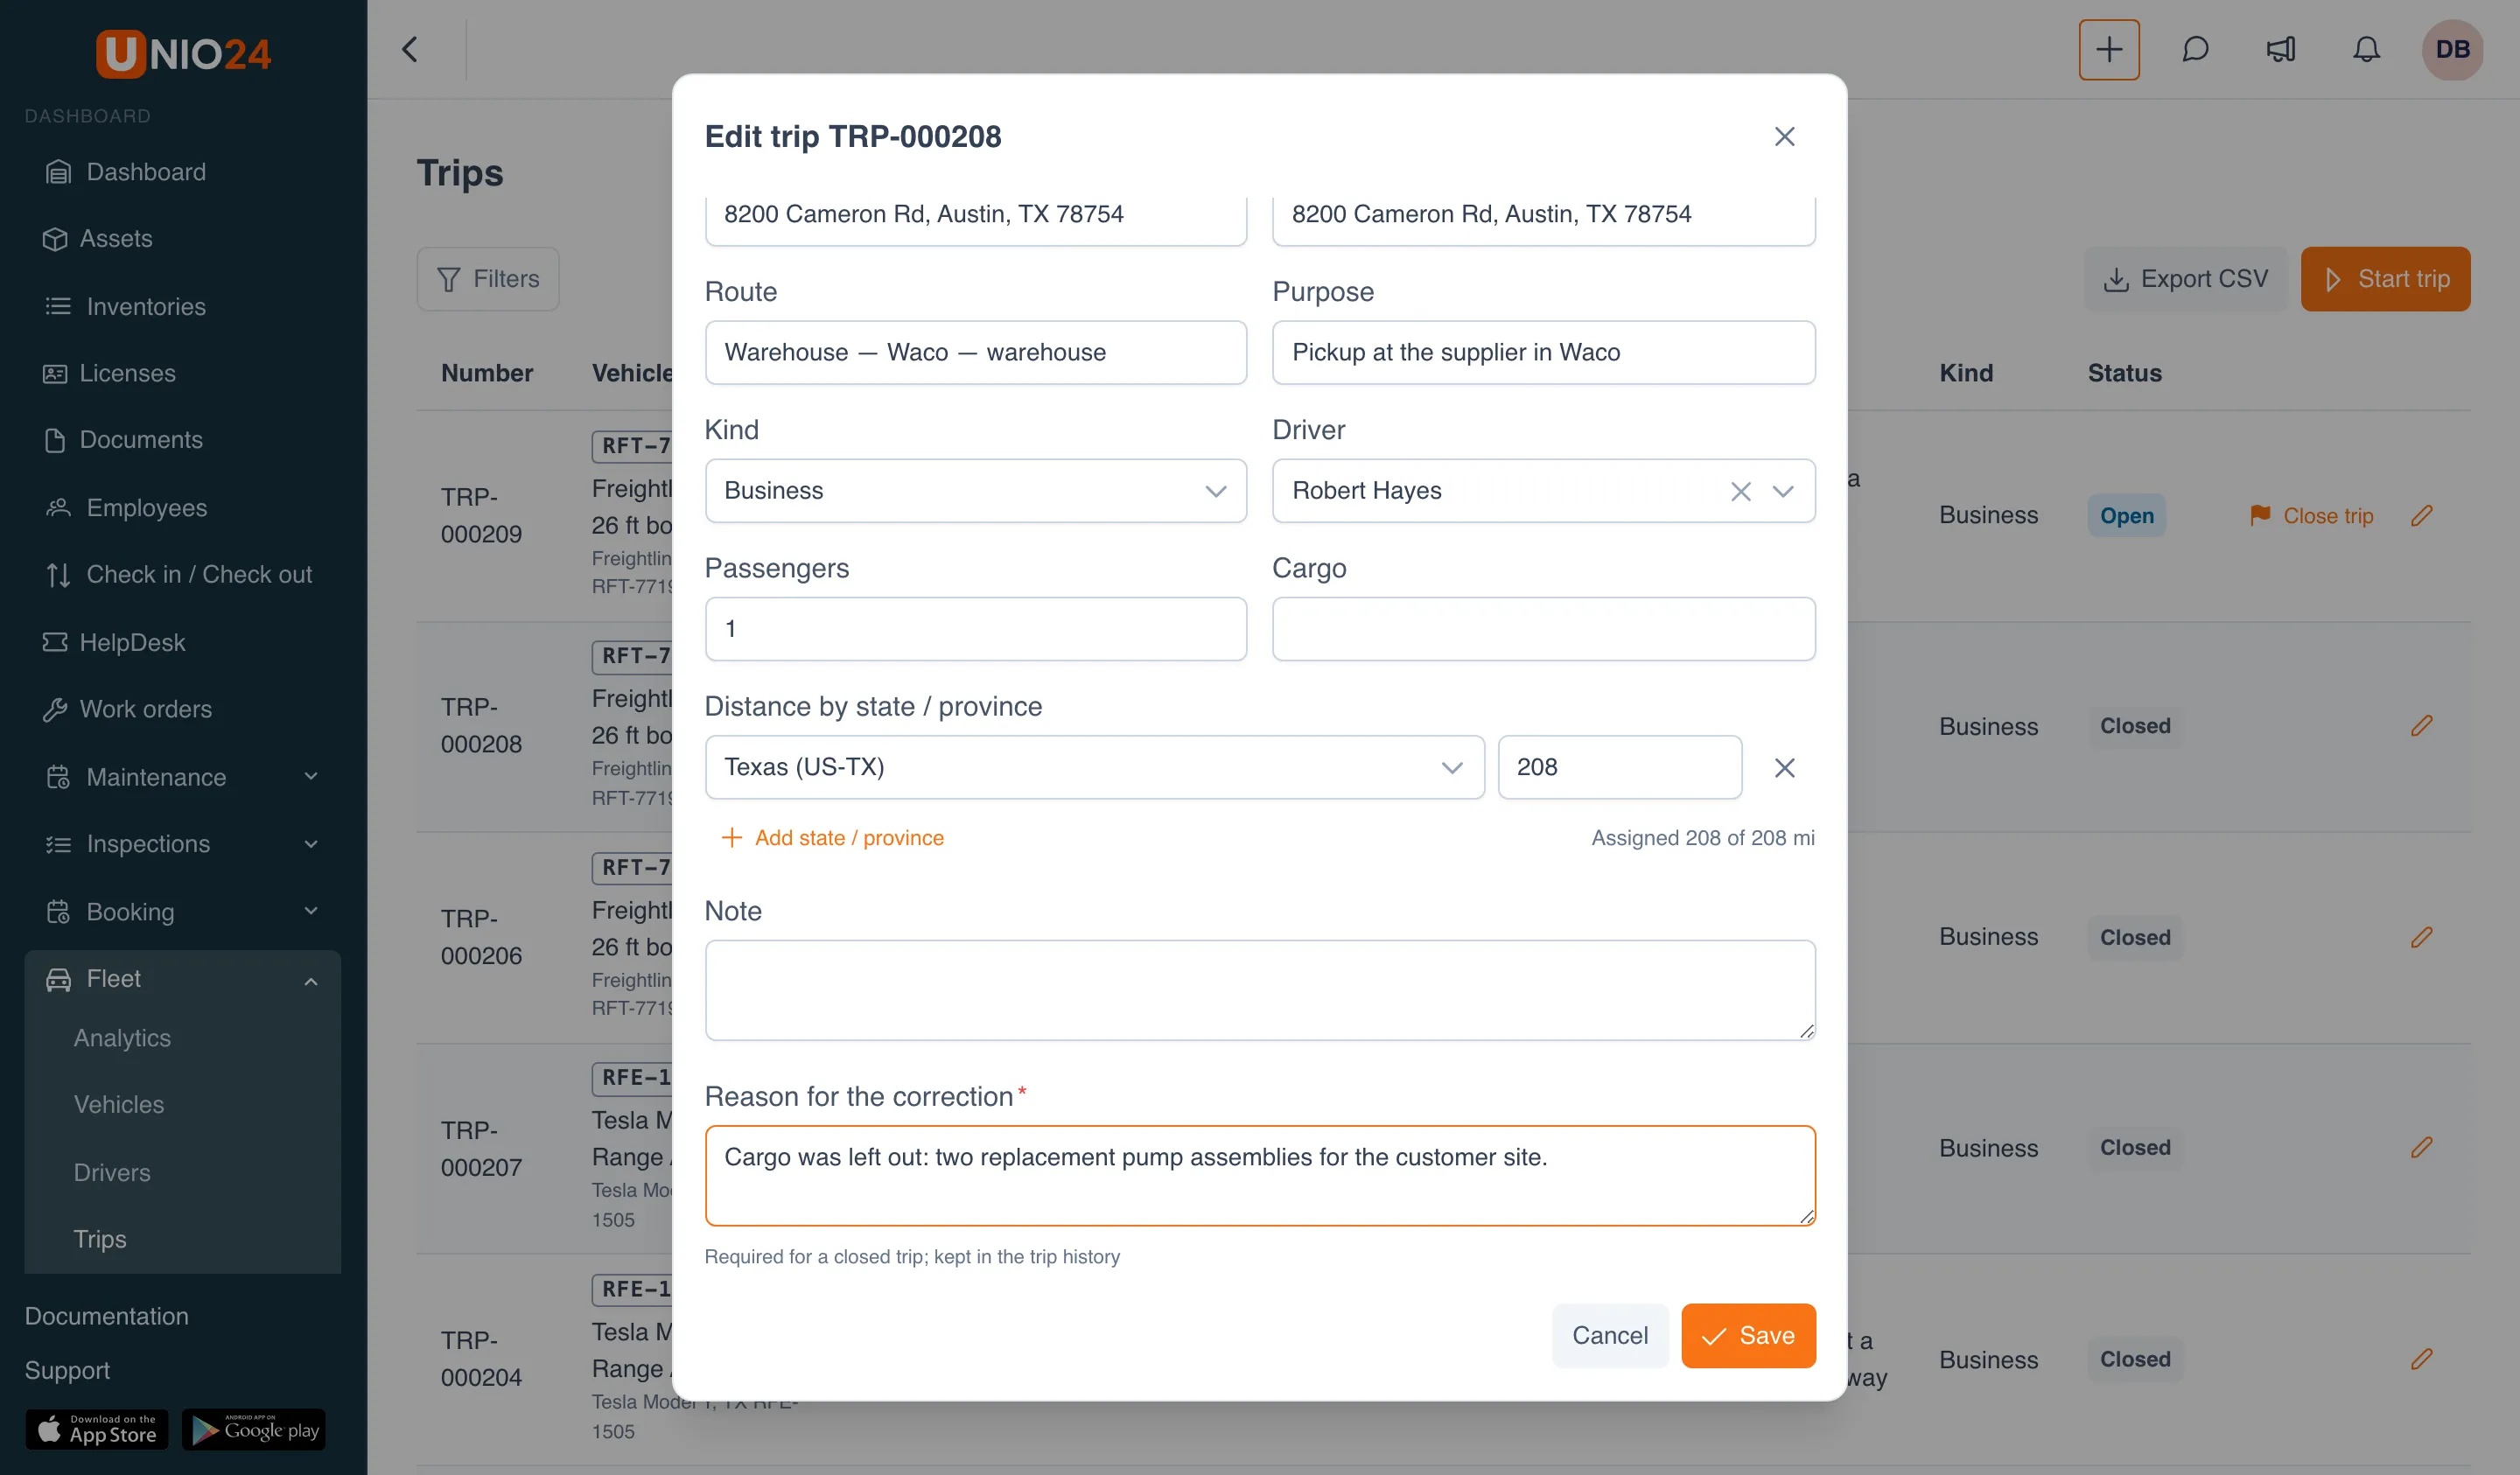
Closed trips are corrected by people with that right; a driver can correct their own trip within a day after closing it — for example, to add a forgotten meter at end.
Export trips
Section titled “Export trips”Click Export CSV. The file contains the trips shown in the list with the current filters (Filters: vehicle, driver, status, trip kind and period), together with their correction history and reasons.
Waybill
Section titled “Waybill”The waybill collects the trips and refuelings of one vehicle for a period and compares the actual fuel used with the norm.
- Open the vehicle card: Fleet → Vehicles → the vehicle.
- Click Waybill at the top right.
- Set the period: From and To — no longer than 366 days.
- Click Show norm vs actual.
- To get the document, click Download PDF.
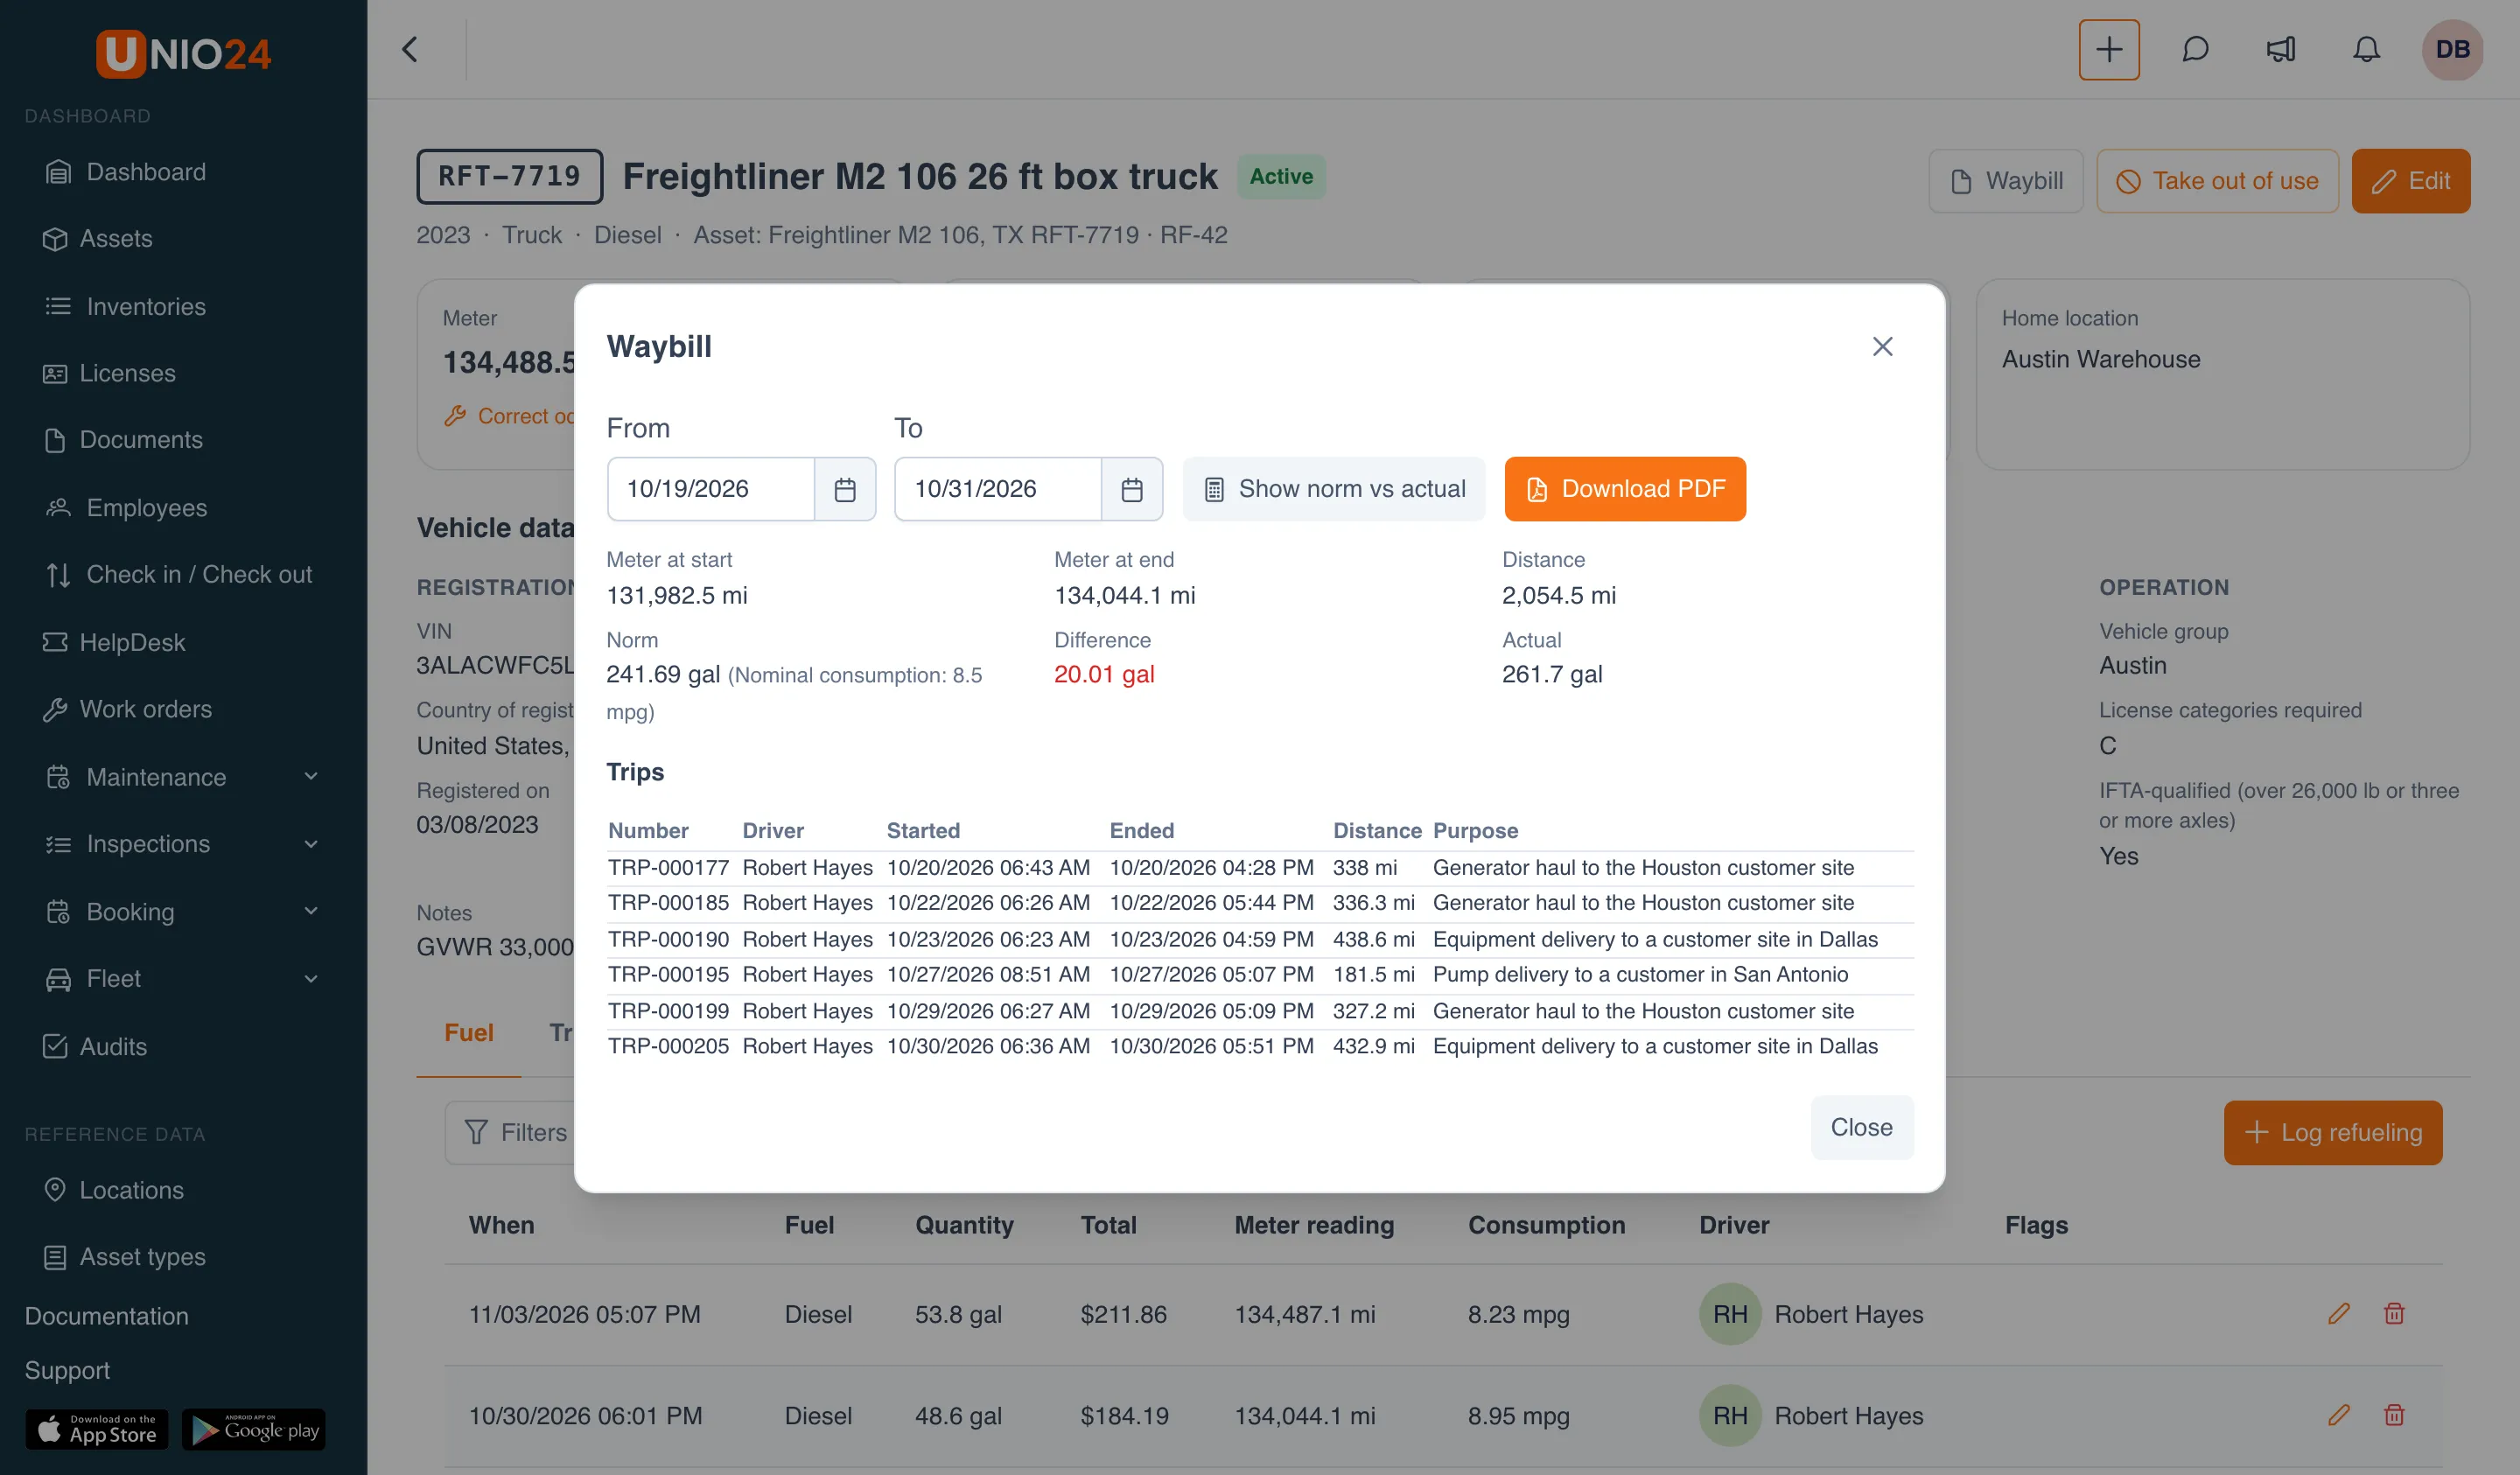
- Norm — the fuel the vehicle should have used for the period’s distance at its Nominal consumption (with mpg, the distance divided by the mpg). In winter months the norm is also multiplied by the Winter coefficient; such trips are marked “winter” in the table.
- Actual — how much fuel (or energy, for an electric vehicle) refuelings recorded for the period. AdBlue isn’t counted.
- Difference — actual minus norm. Overuse is shown in red.
If the vehicle has no nominal consumption, the dialog says “The vehicle has no nominal consumption, so the norm cannot be calculated”. Nominal consumption is set in the vehicle data; the winter coefficient, the winter months and the PDF details (organization, dispatcher, mechanic, medic) are set in Configure fleet.
The waybill is available to people who see all fleet records; drivers don’t get the button.
Other expenses
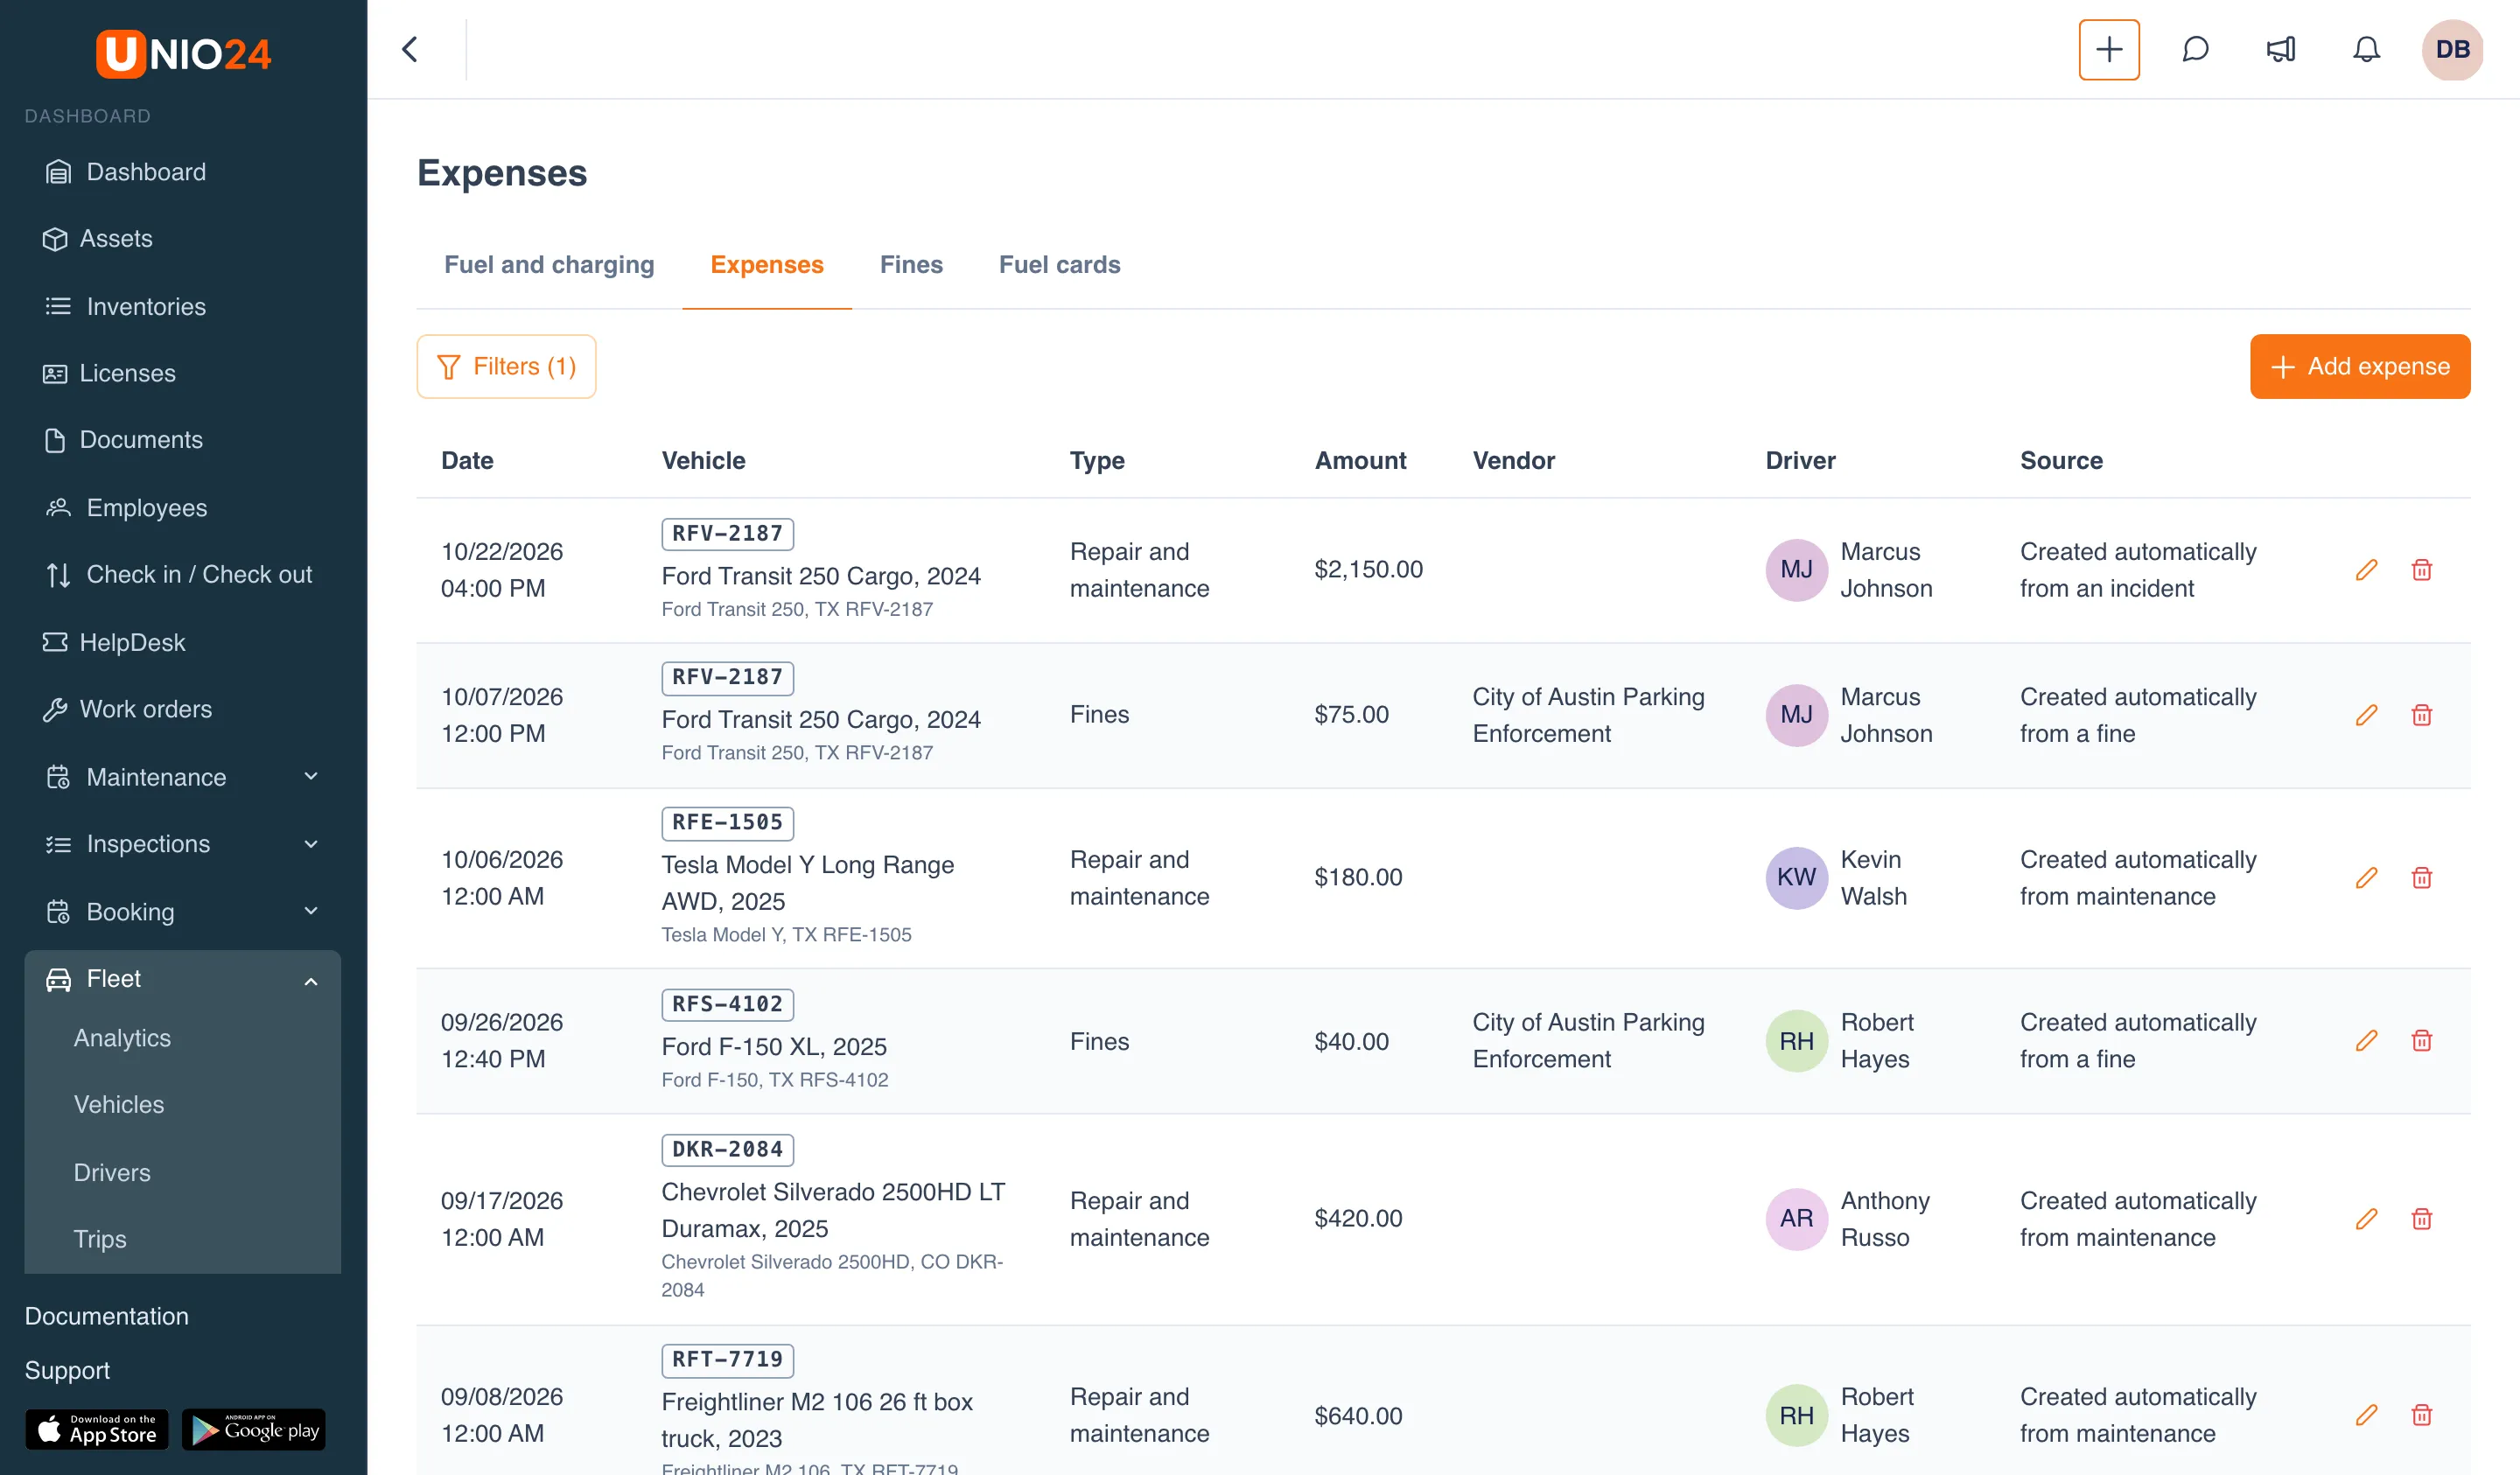
Section titled “Other expenses”The Expenses tab collects everything apart from fuel.
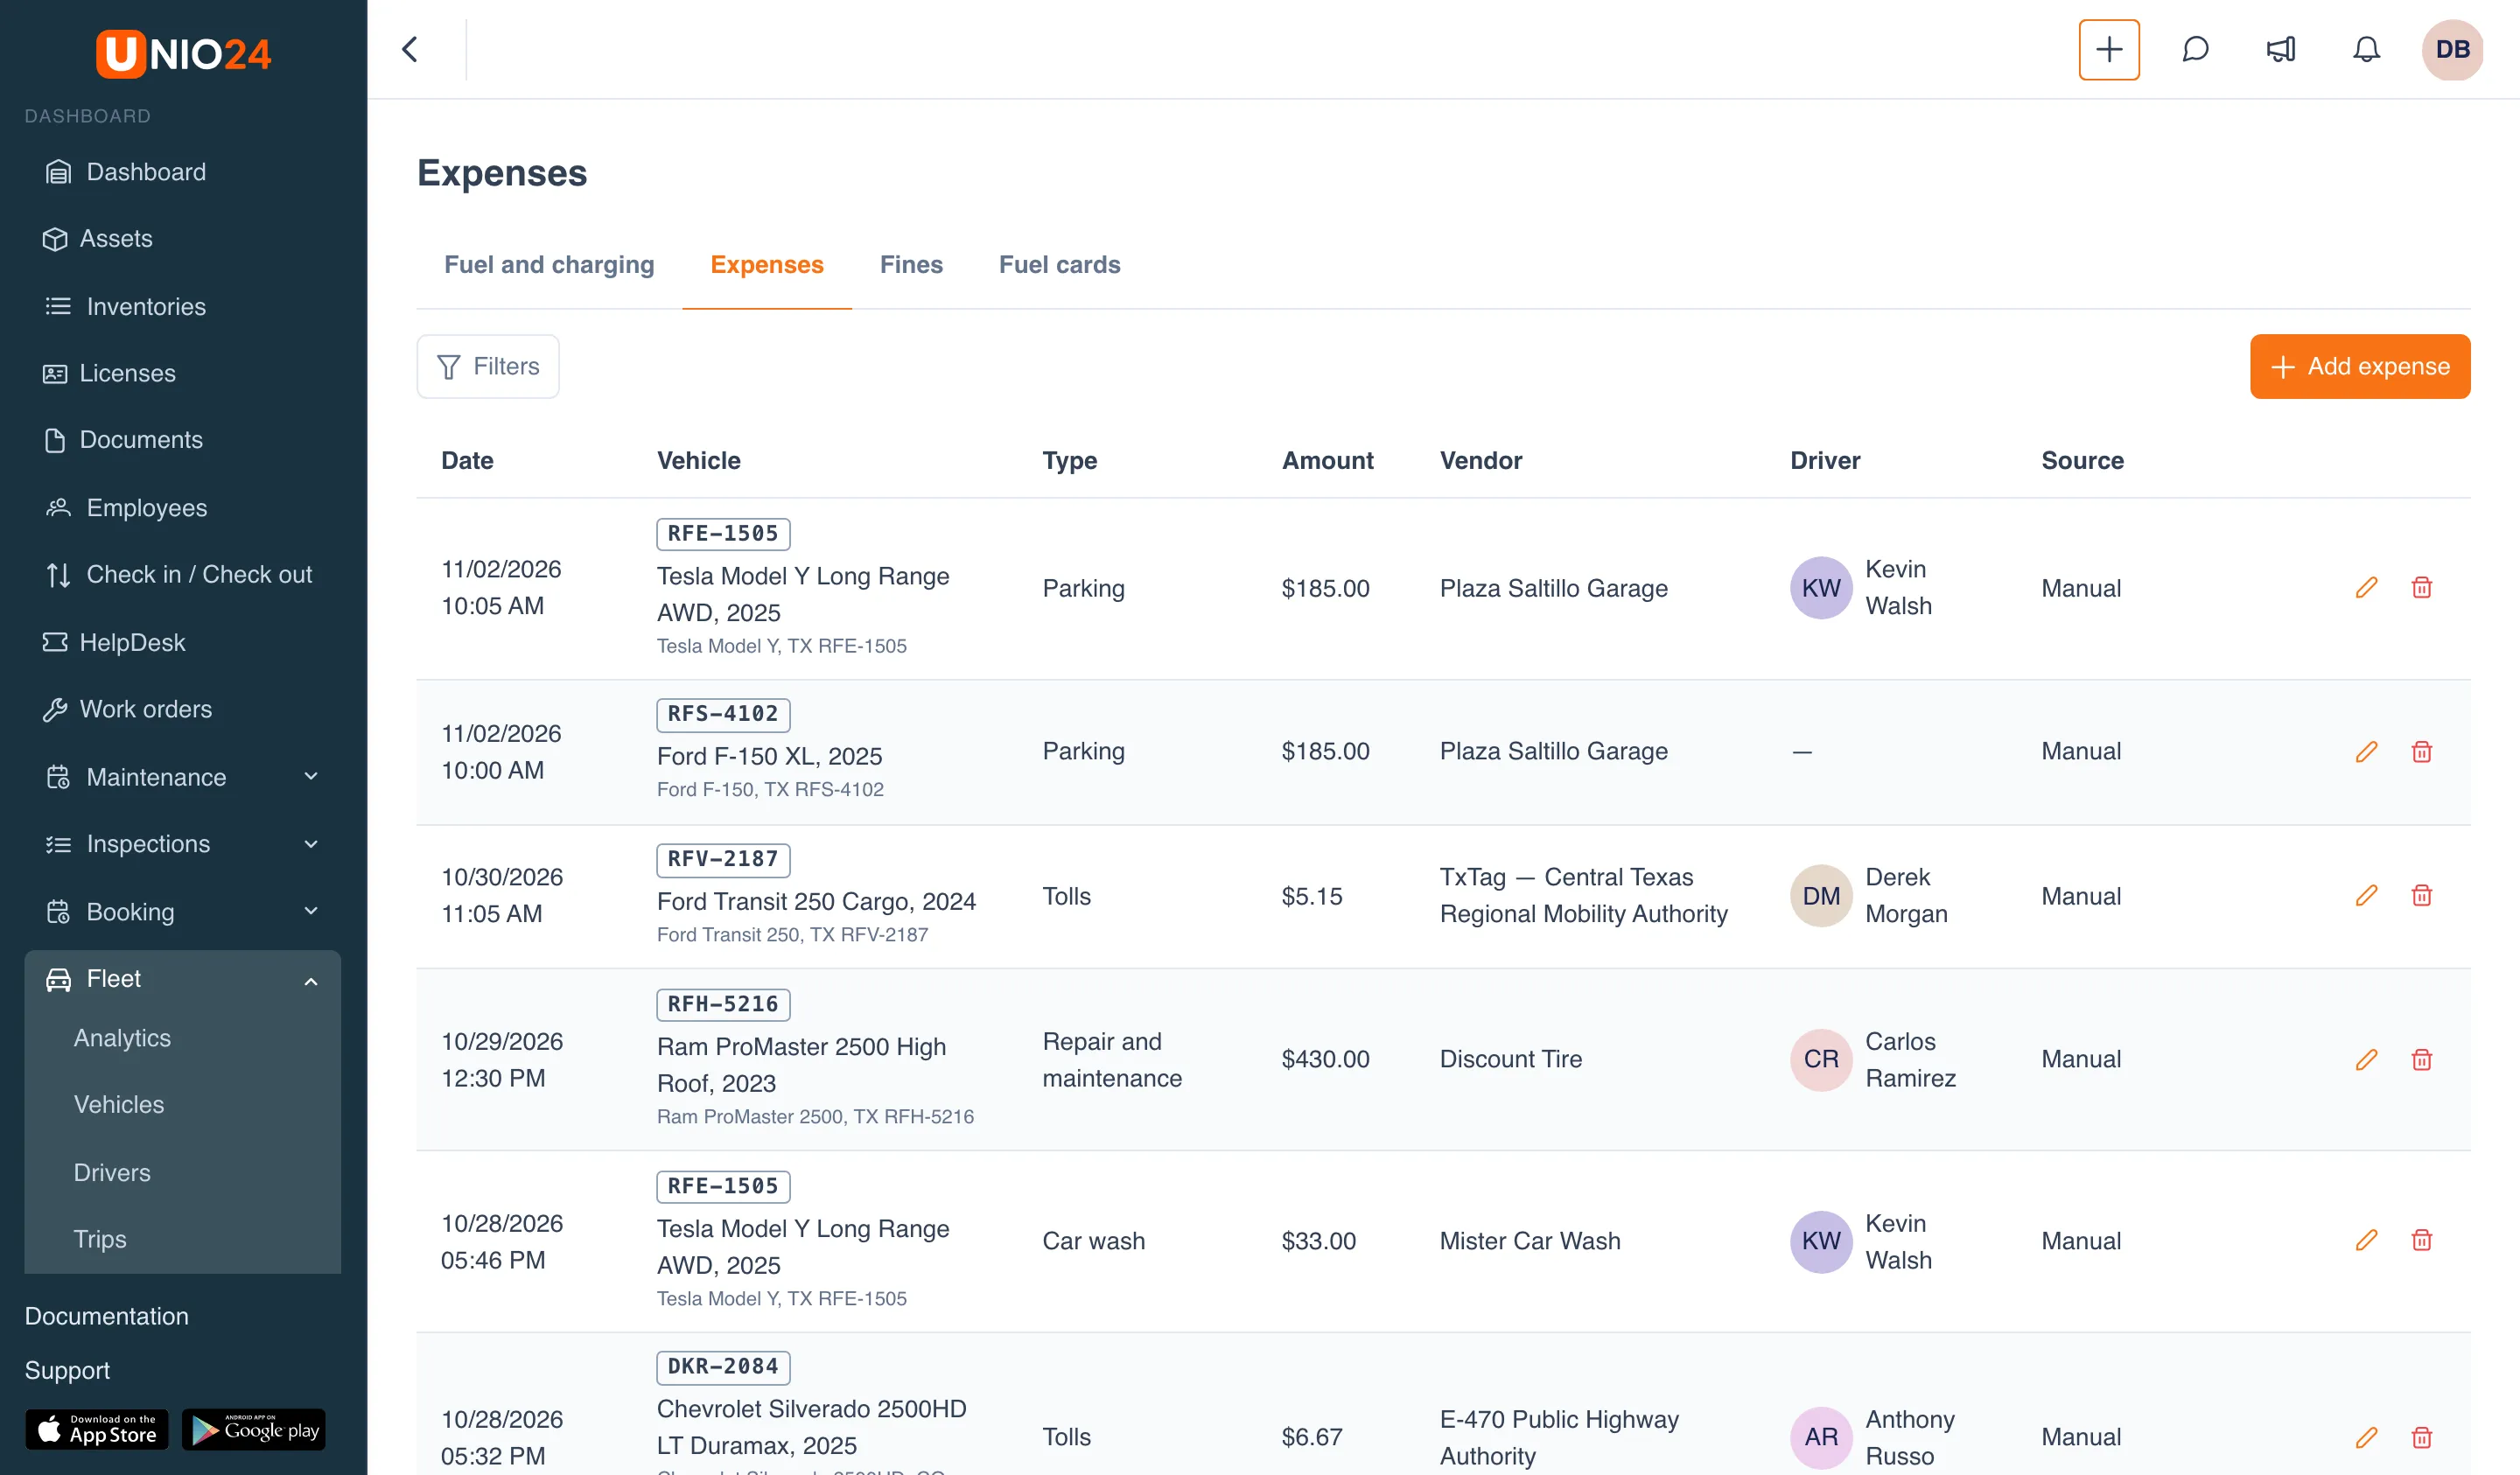
Add an expense
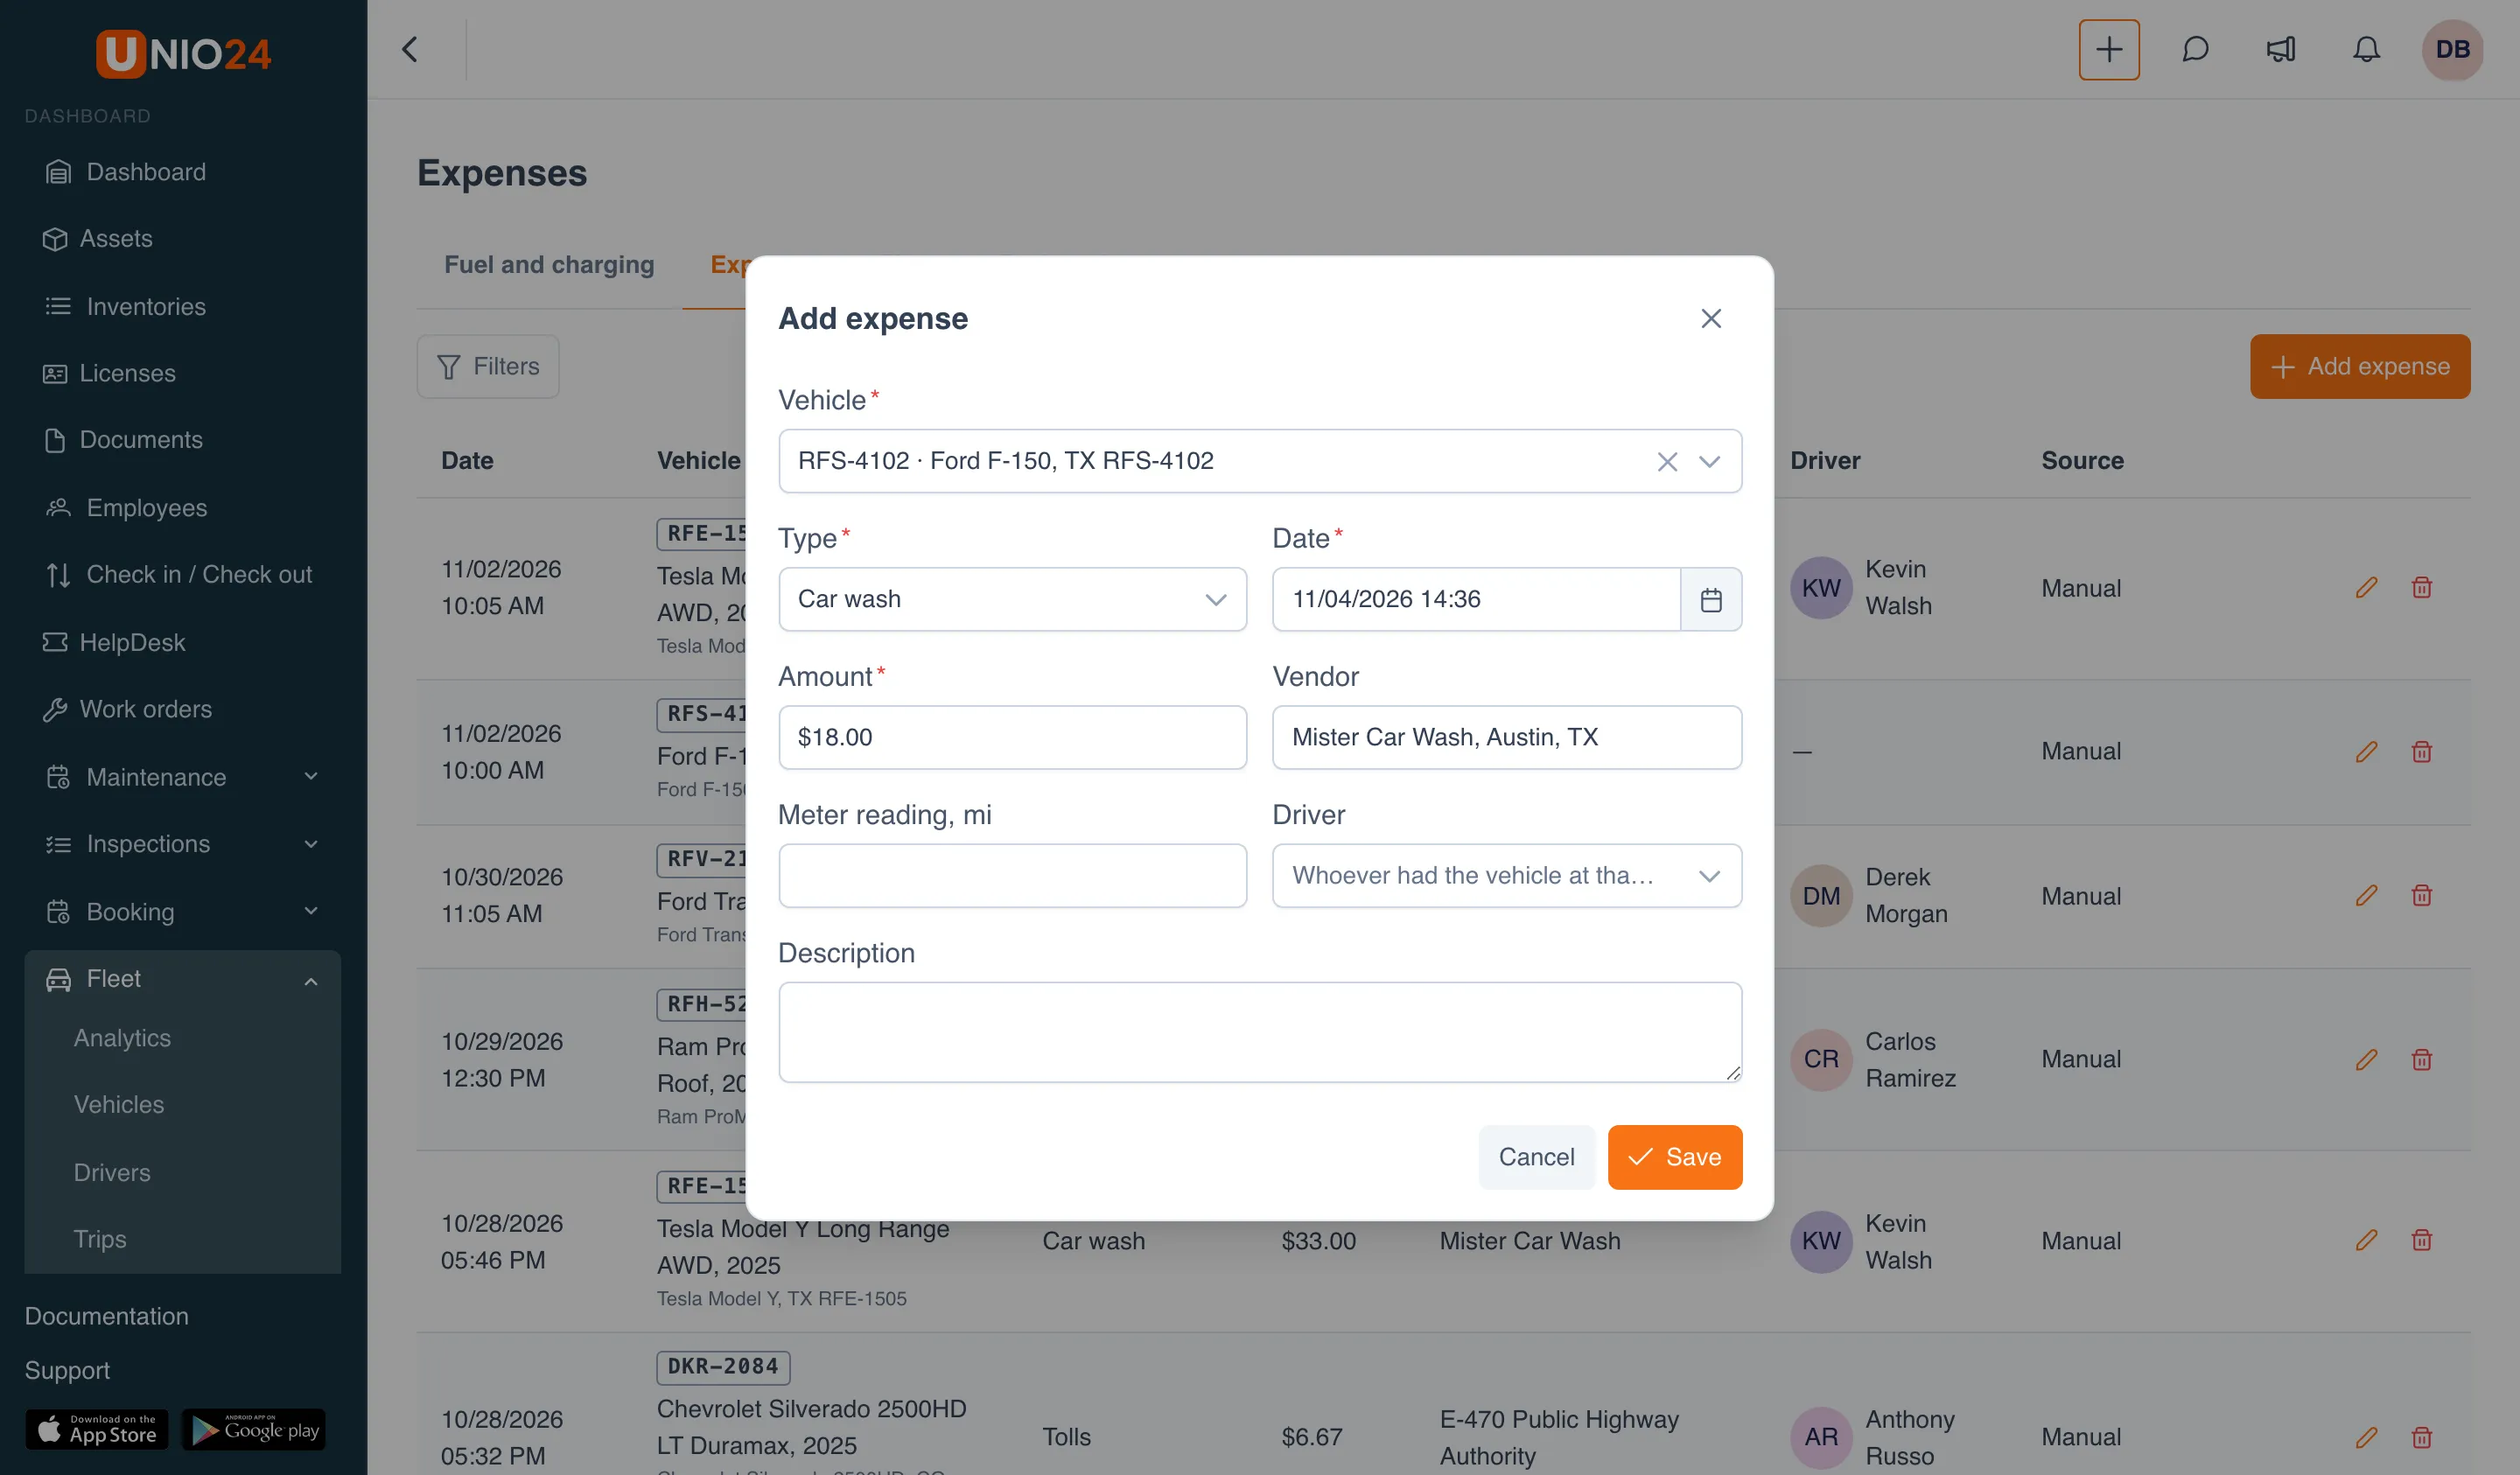
Section titled “Add an expense”- Open Fleet → Expenses, the Expenses tab, and click Add expense.
- Choose the Vehicle and the expense Type, for example Parking, Tolls, Car wash or Insurance.
- Enter the Date and the Amount.
- If needed, fill in Vendor, Meter reading, Driver and Description. The reading here is for reference only — it isn’t saved to the vehicle’s meter.
- Click Save. Receipts are attached by opening the saved expense with Edit.
The list of expense types is set up in Configure fleet.
Expenses that appear automatically
Section titled “Expenses that appear automatically”UNIO24 creates many expenses without your involvement. Their Source column says “Created automatically from” and where from:
| Source | When the expense appears | Expense type |
|---|---|---|
| a document | a document with a cost was added to the vehicle — insurance, registration, a lease | Insurance, Registration, Lease or Other, depending on the document type |
| a repair | the vehicle came back from repair, and the repair has an amount | Repair and maintenance |
| maintenance | maintenance with a cost was completed | Repair and maintenance |
| a fine | the company paid a fine (a fine paid by the driver doesn’t go into company expenses) | Fines |
| an incident | an incident was closed with an actual cost, and no repair is linked to it | Repair and maintenance |
If the cost of a document, repair or maintenance changes later, the expense doesn’t change by itself — correct it manually. Expenses from fines and incidents, on the other hand, follow them: correct the payment of a fine or the cost of an incident, and the expense is recalculated.
To see only these expenses, click Filters and in the Source section choose Automatic only (or Manual only).
Cost of ownership
Section titled “Cost of ownership”On the vehicle card, the Costs tab shows what the vehicle cost for a period.
- Open the vehicle card and go to the Costs tab.
- Set the period: From and To. It defaults to the current month; the period can’t be longer than 366 days.
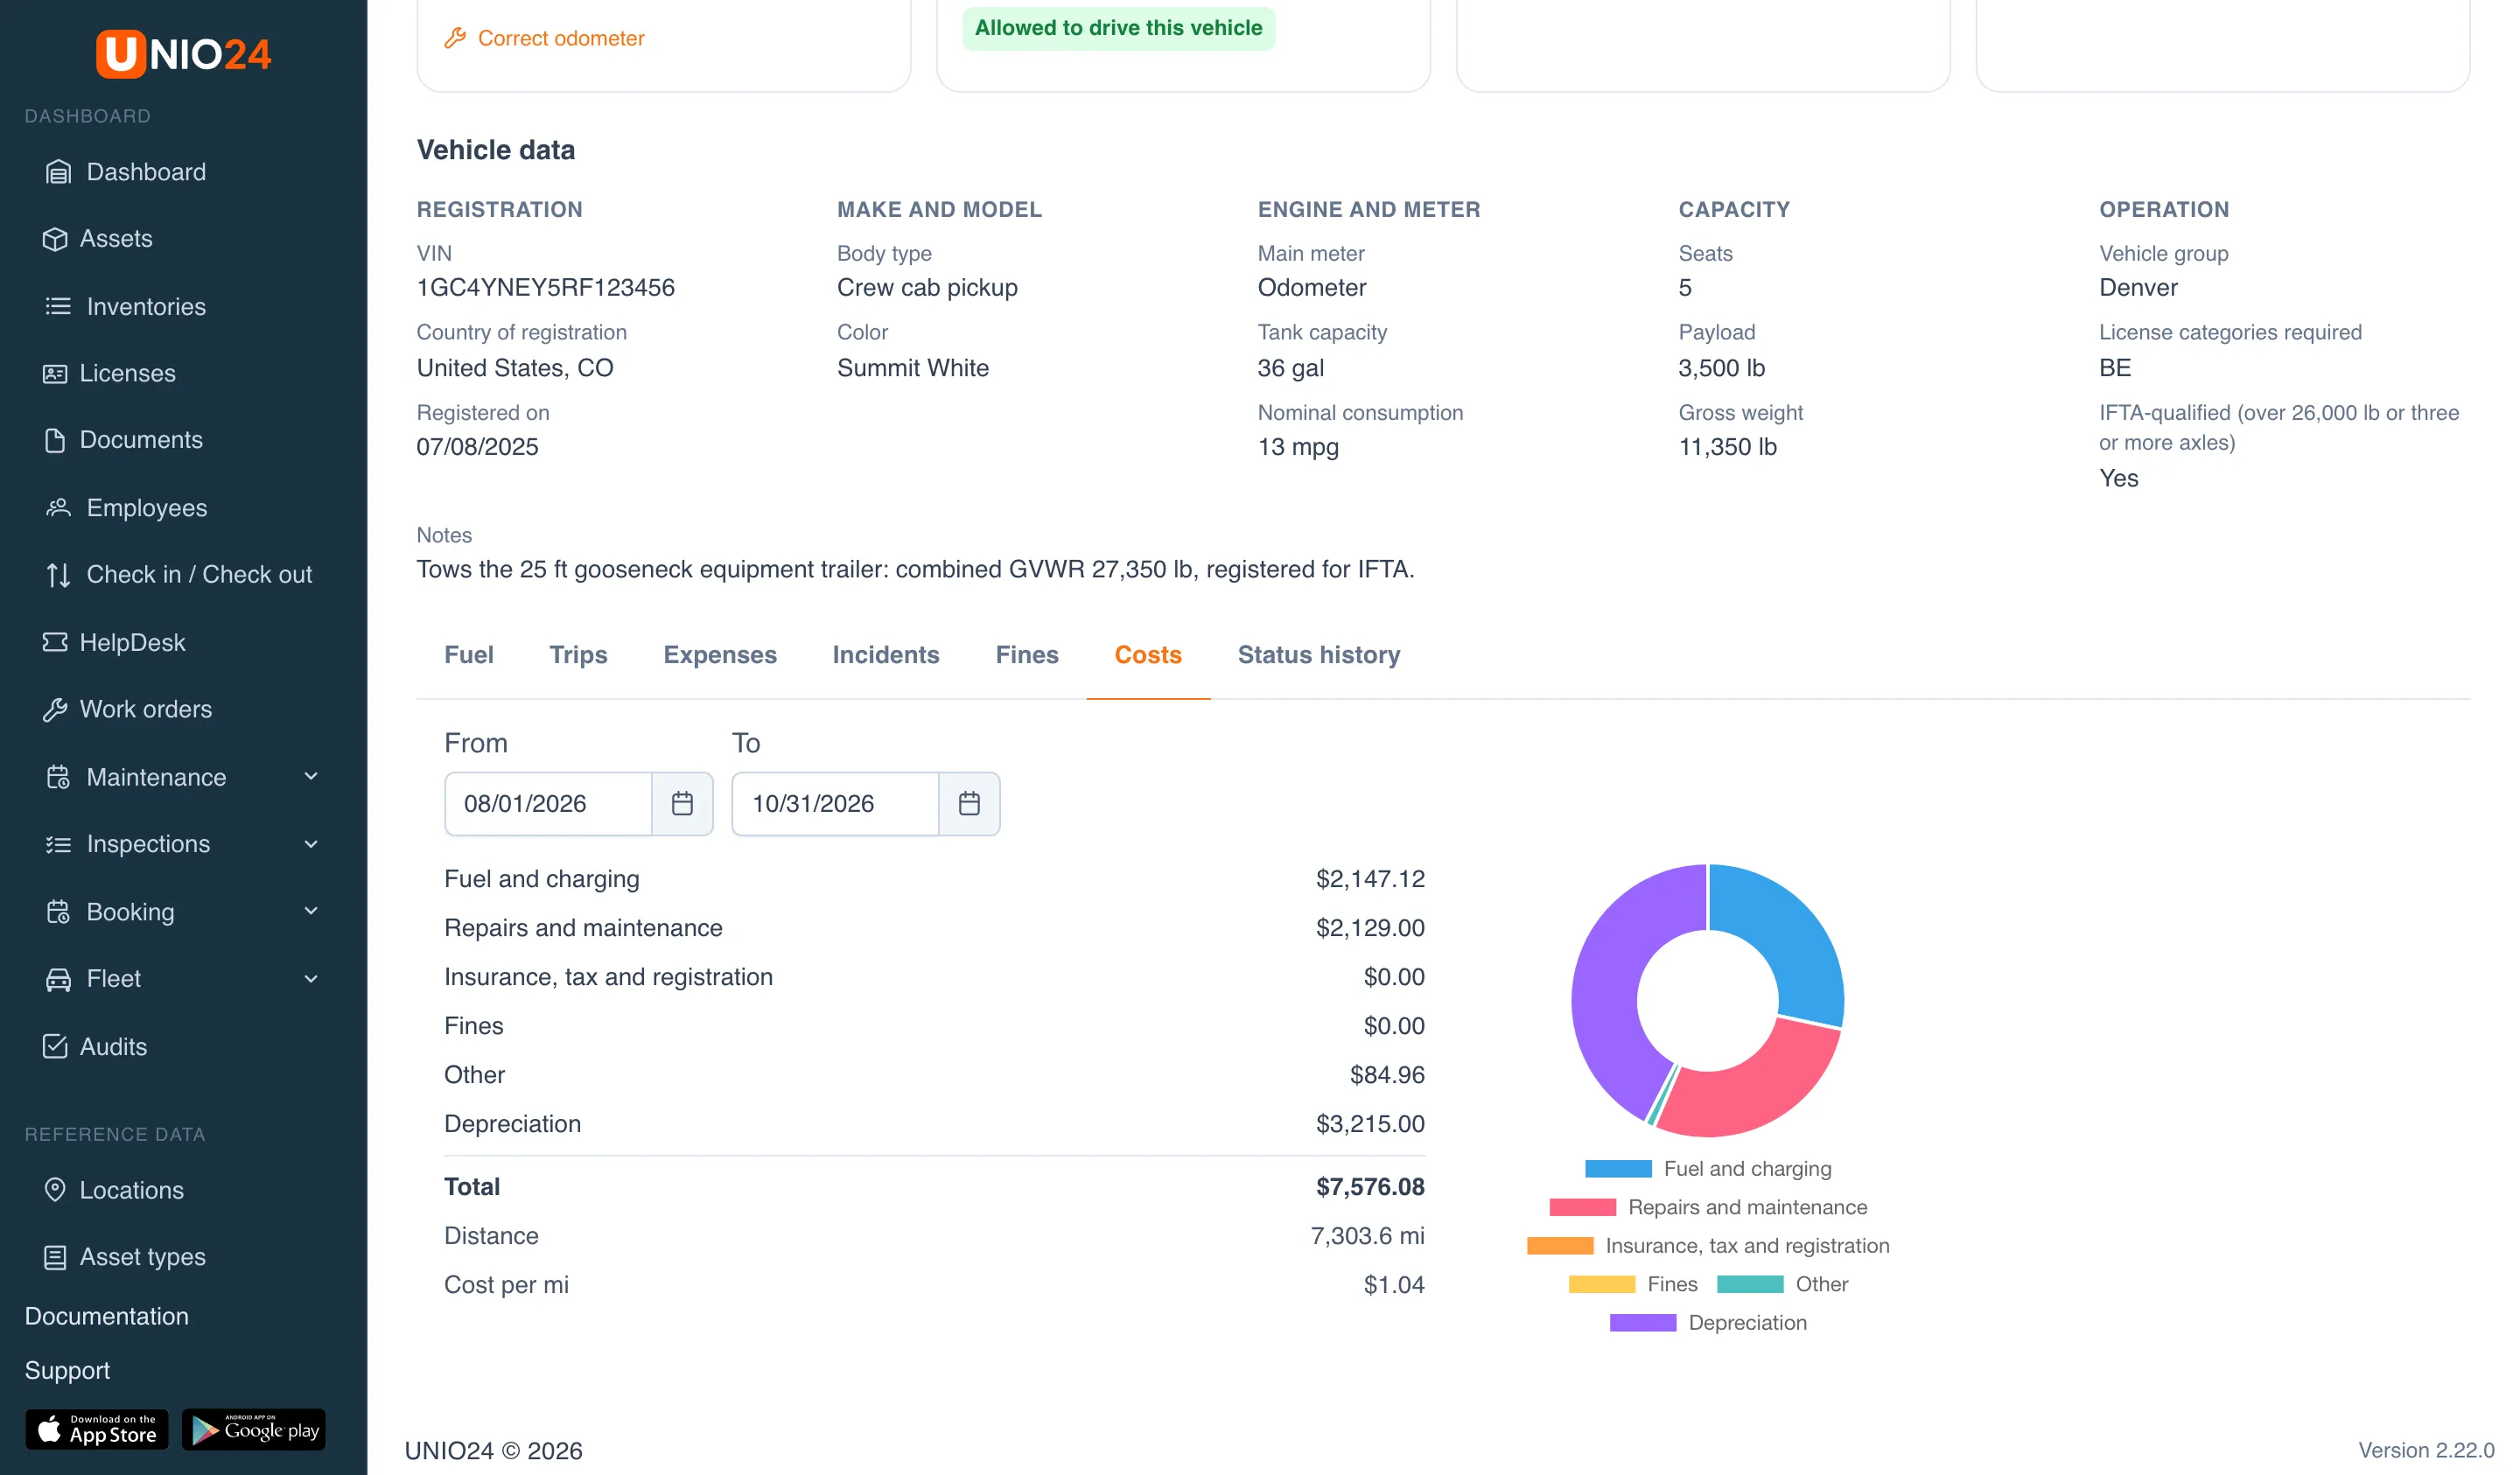
- Fuel and charging — refuelings and charges in the period;
- Repairs and maintenance, Insurance, tax and registration, Fines, Other — expenses of these types, entered manually and created automatically;
- Depreciation — in equal monthly parts: the asset’s price minus its residual value, divided by the depreciation period, starting from the date it was put into service. The depreciation period is set in Configure fleet;
- Total, the Distance for the period and the Cost per mi.
Amounts are counted in the company’s currency. Records in another currency aren’t included in the total — a line under the table says how many such records were left out.
To compare costs across the whole fleet, see Fleet deadlines and analytics.
Useful links
Section titled “Useful links”- Fleet — what the module does and how it works
- Vehicles and drivers — vehicles, drivers, driving eligibility and odometer correction
- Configure fleet — nominal consumption, the flag threshold, the waybill, expense types, depreciation
- Incidents and fines — accidents, breakdowns and fines
- Fleet deadlines and analytics — costs and consumption across the fleet, and the IFTA report
- Fleet reference — fields, statuses, refueling flags, rights and notifications