

Vehicles and drivers
This page covers everyday tasks with vehicles and drivers.
Adding and changing vehicles takes the Manage vehicles permission; drivers take Manage drivers. The list of all vehicles and drivers is visible to people with the View vehicles, fuel entries and trips permission.
Vehicles
Section titled “Vehicles”Add a vehicle
Section titled “Add a vehicle”A vehicle is an asset of a vehicle type. You can create a new asset right away or add vehicle data to an asset that already exists.
- In the main menu on the left, open Fleet → Vehicles.
- Click Add vehicle at the top right.
- Choose where the asset comes from:
- New asset: choose the Vehicle type and, if needed, fill in Asset name and AssetID. If the type you need isn’t there, choose Add vehicle type in the type list: you can create a new asset type or mark an existing one;
- Existing asset: in the Asset without a vehicle profile field, find the asset by name or number. The list has only assets of vehicle types that don’t have vehicle data yet.
- In Odometer reading today, enter the current mileage (engine hours for a forklift). Mileage is counted from this reading. If the asset’s meter already has readings, leave the field empty.
- In the Registration section, fill in VIN, Plate number, Registered on, and Country of registration. For a vehicle registered in the United States, also choose the State of registration (for Canada, the Province of registration). Fill in from VIN fills in the make, model, and year from the VIN if the vehicle is in the VIN decoder database.
- In the Make and model section: Make, Model, Year, Body type, Color, and Class.
- In the Engine and meter section: Powertrain and Main meter (Odometer or Engine hours). For fuel vehicles, enter the Tank capacity and Nominal consumption; for electric vehicles, the Battery capacity. UNIO24 uses them to calculate consumption and find anomalies in fuel entries.
- In the Capacity section: Seats, Payload, and Gross weight (in pounds with US units).
- In the Operation section, choose the Home location, Vehicle group, and License categories required. UNIO24 suggests categories by class (car and van: B, truck: C, bus: D, motorcycle: A); the driver check compares them with the driver’s categories. A company in the United States or Canada also sees the IFTA-qualified (over 26,000 lb or three or more axles) checkbox here: qualified vehicles go into the IFTA report.
- Click Save.
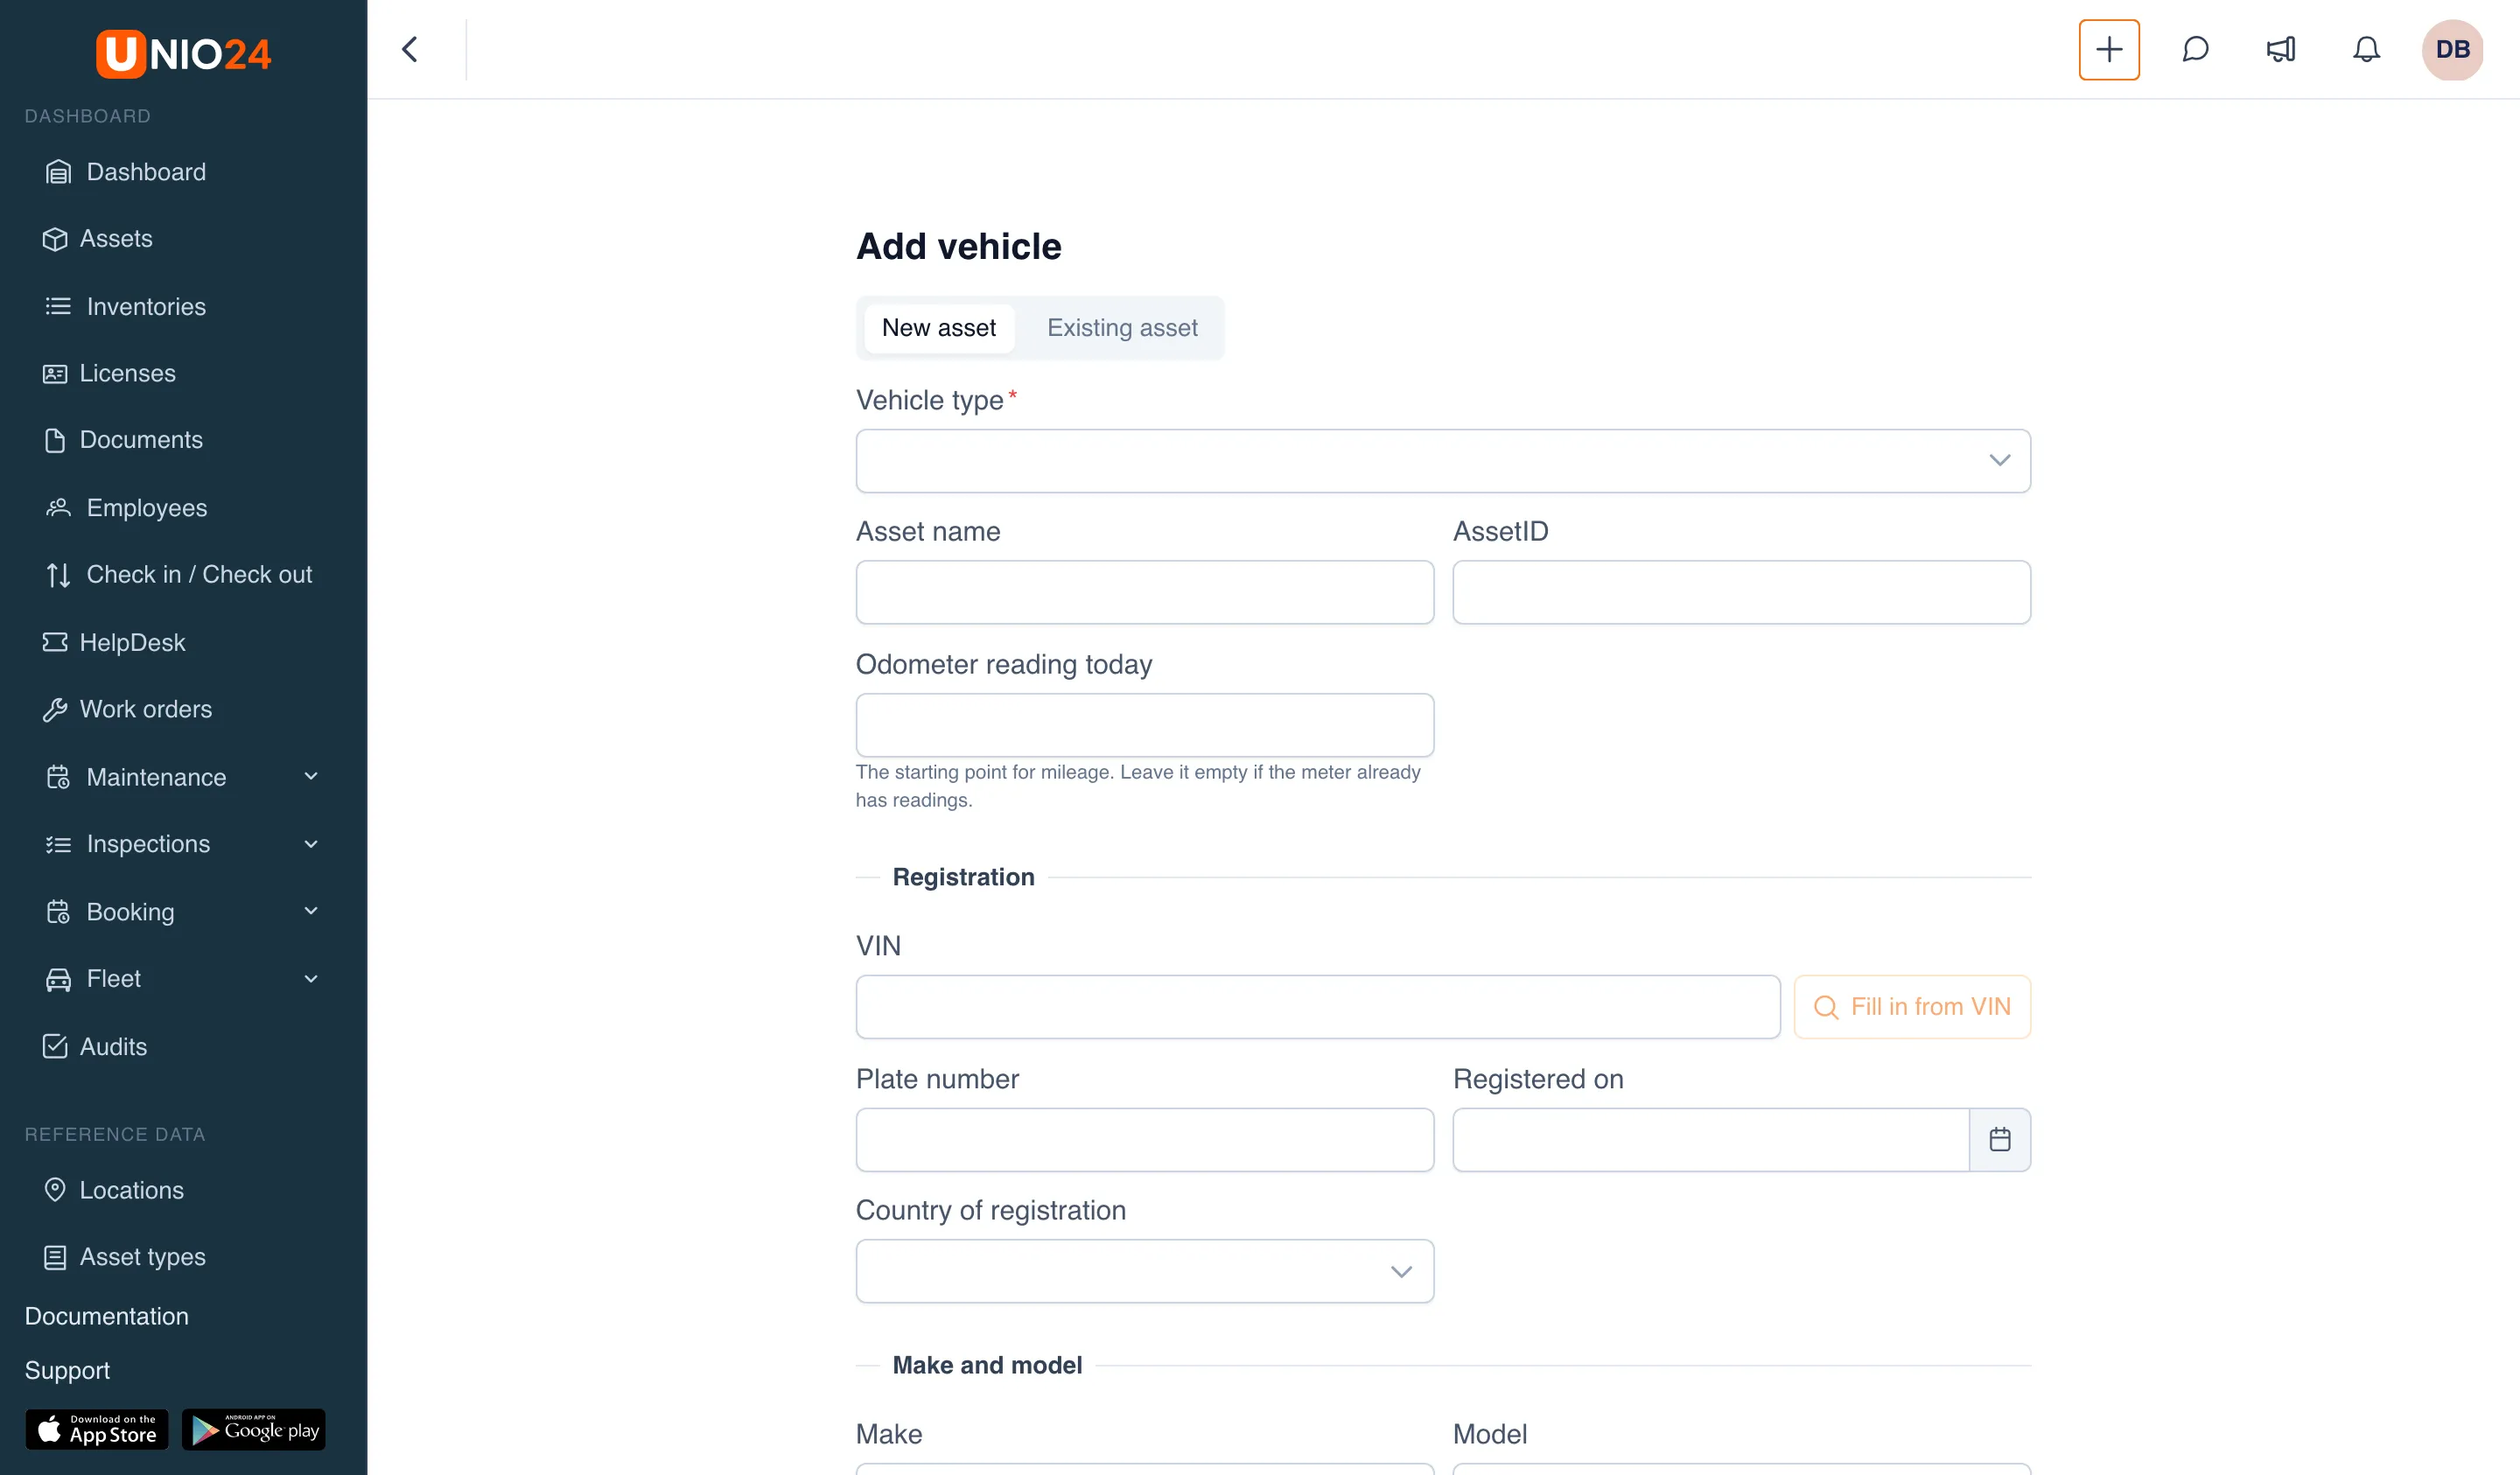
A new asset is placed at the home location. Plate numbers and VINs can’t repeat within the company; plate numbers are compared without spaces and hyphens.
You can also create a vehicle profile from the asset card: on the Vehicle tab, click Create vehicle profile.
Find a vehicle
Section titled “Find a vehicle”- Open Fleet → Vehicles.
- In the search box, type a plate number, VIN, make, model, or name.
- Click Filters and choose a Status, Class, Vehicle group, or Home location. Written-off vehicles are hidden by default; to see them, check Show written-off in the More section.
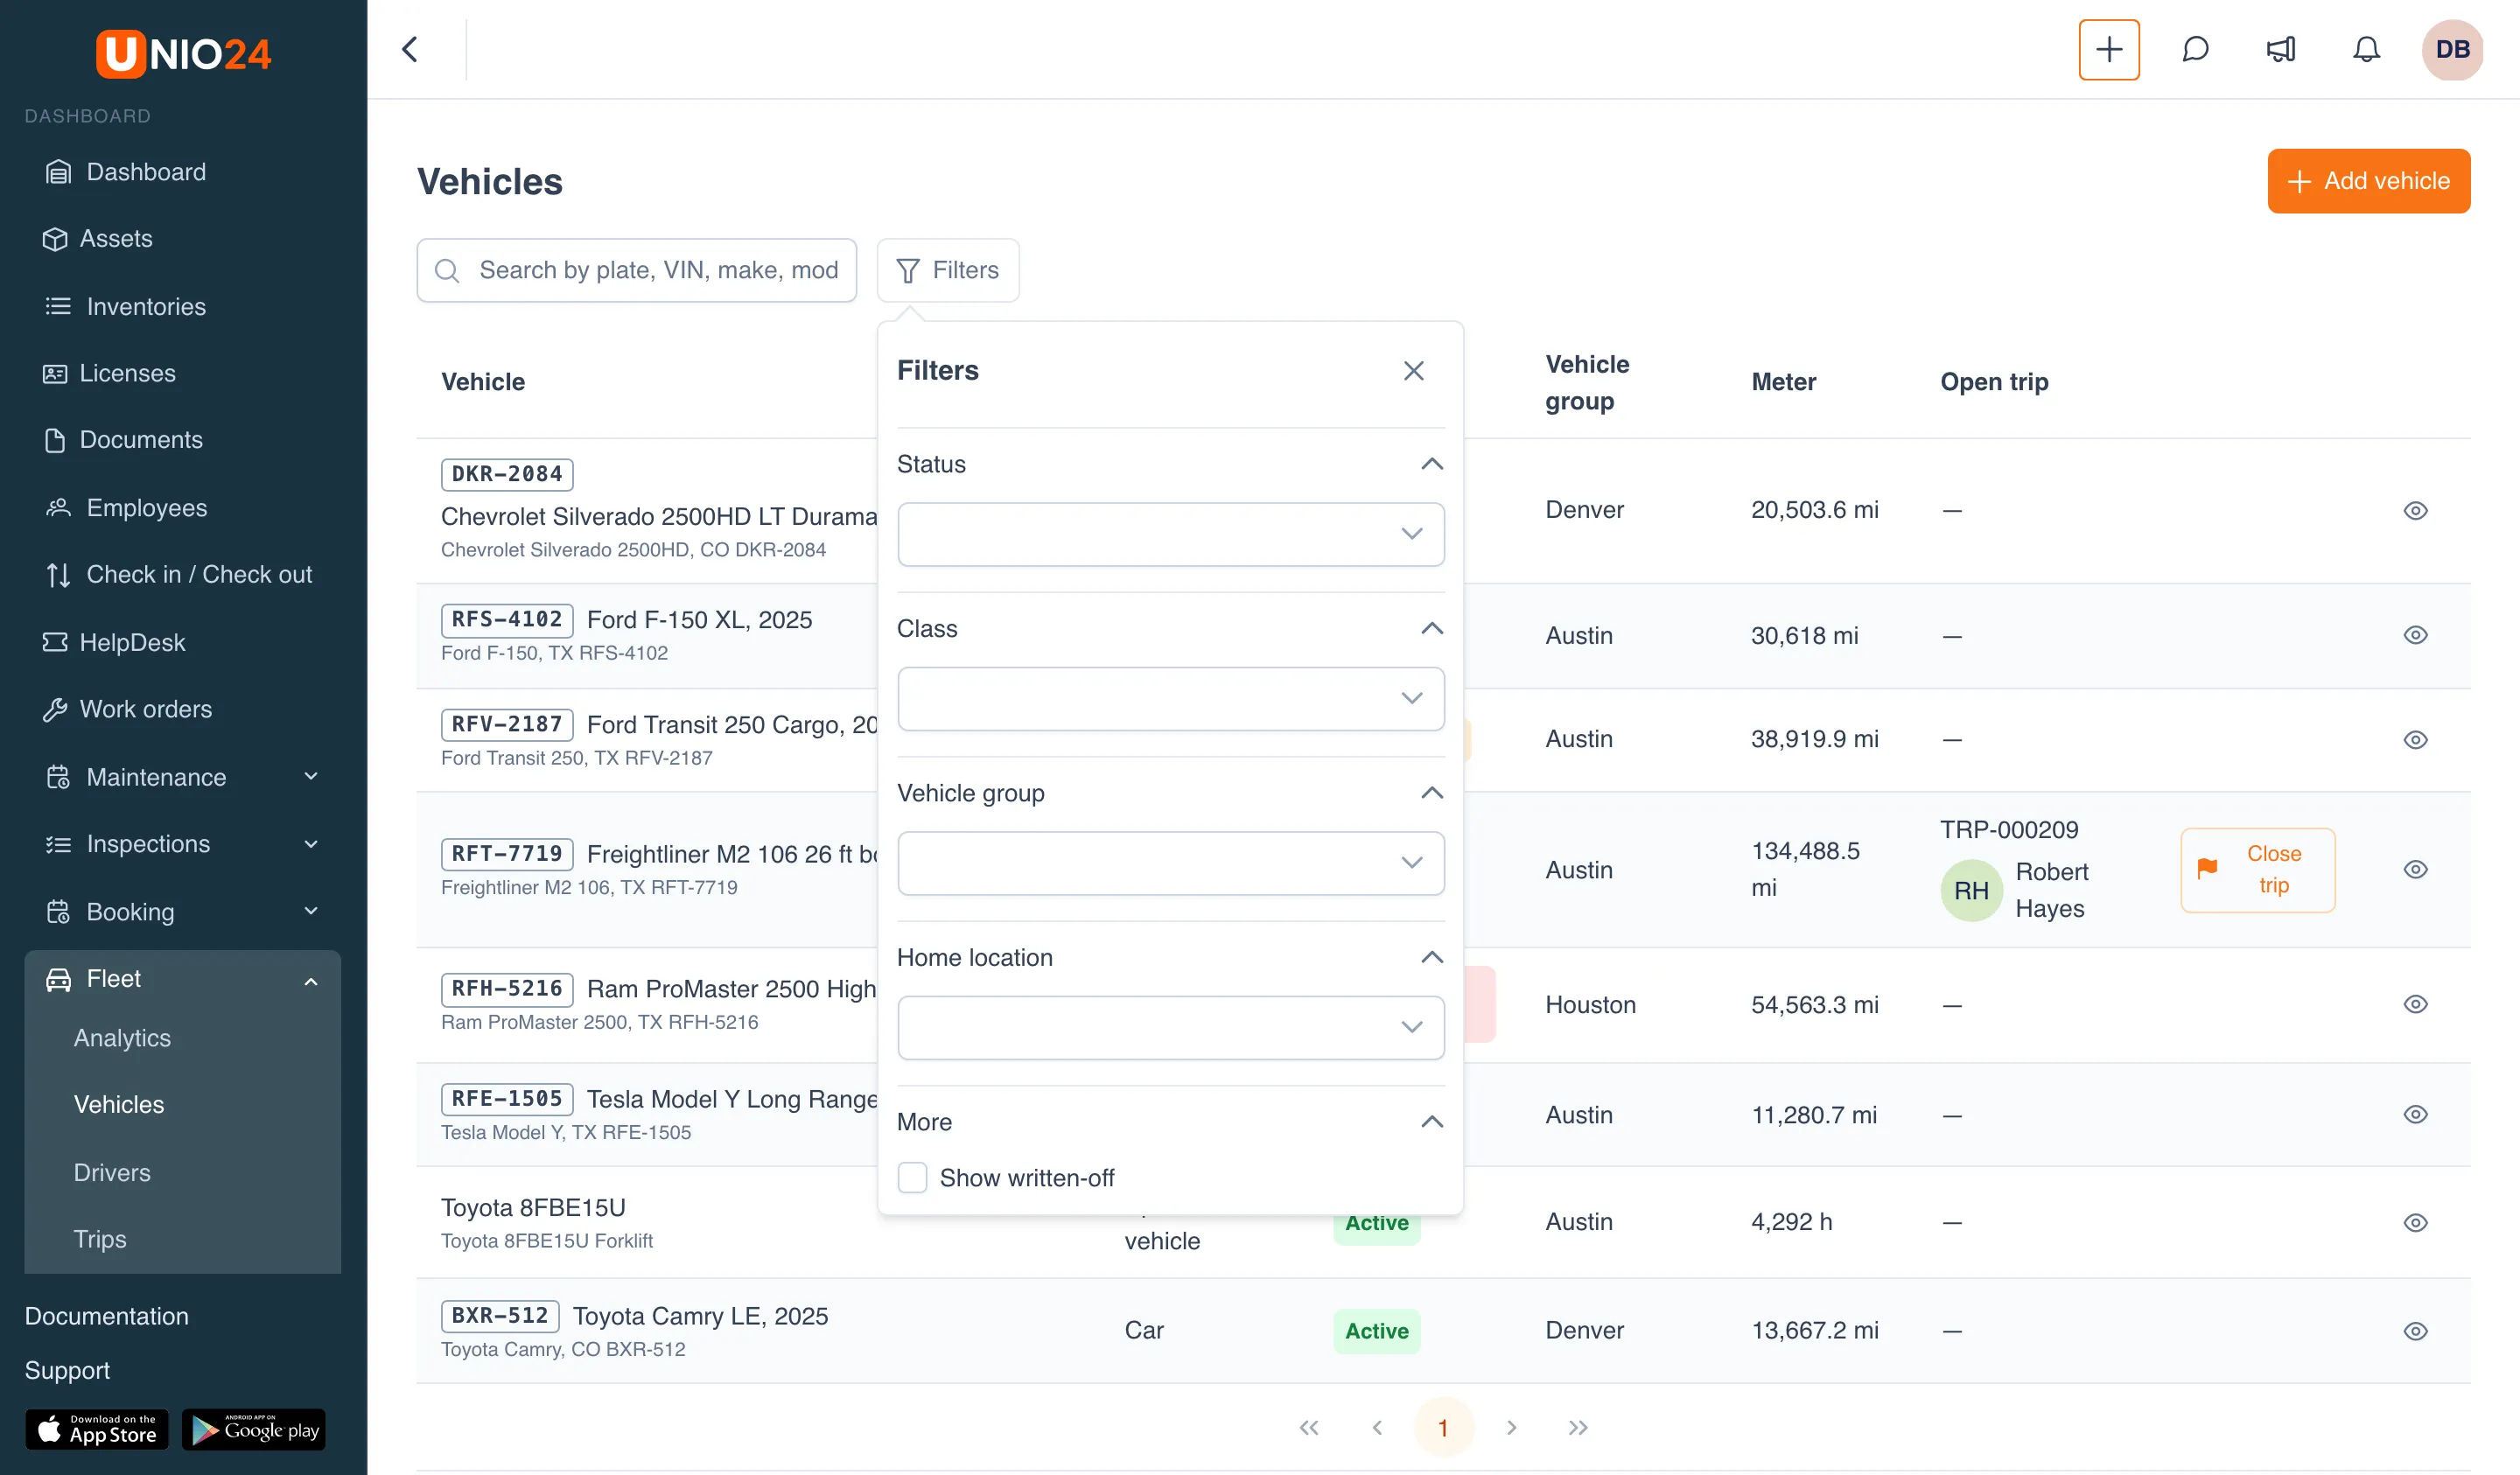
The Open trip column shows who is on a trip right now; Close trip ends it (see Fuel, trips and expenses). To open a card, click Open the vehicle at the end of the row.
The vehicle card
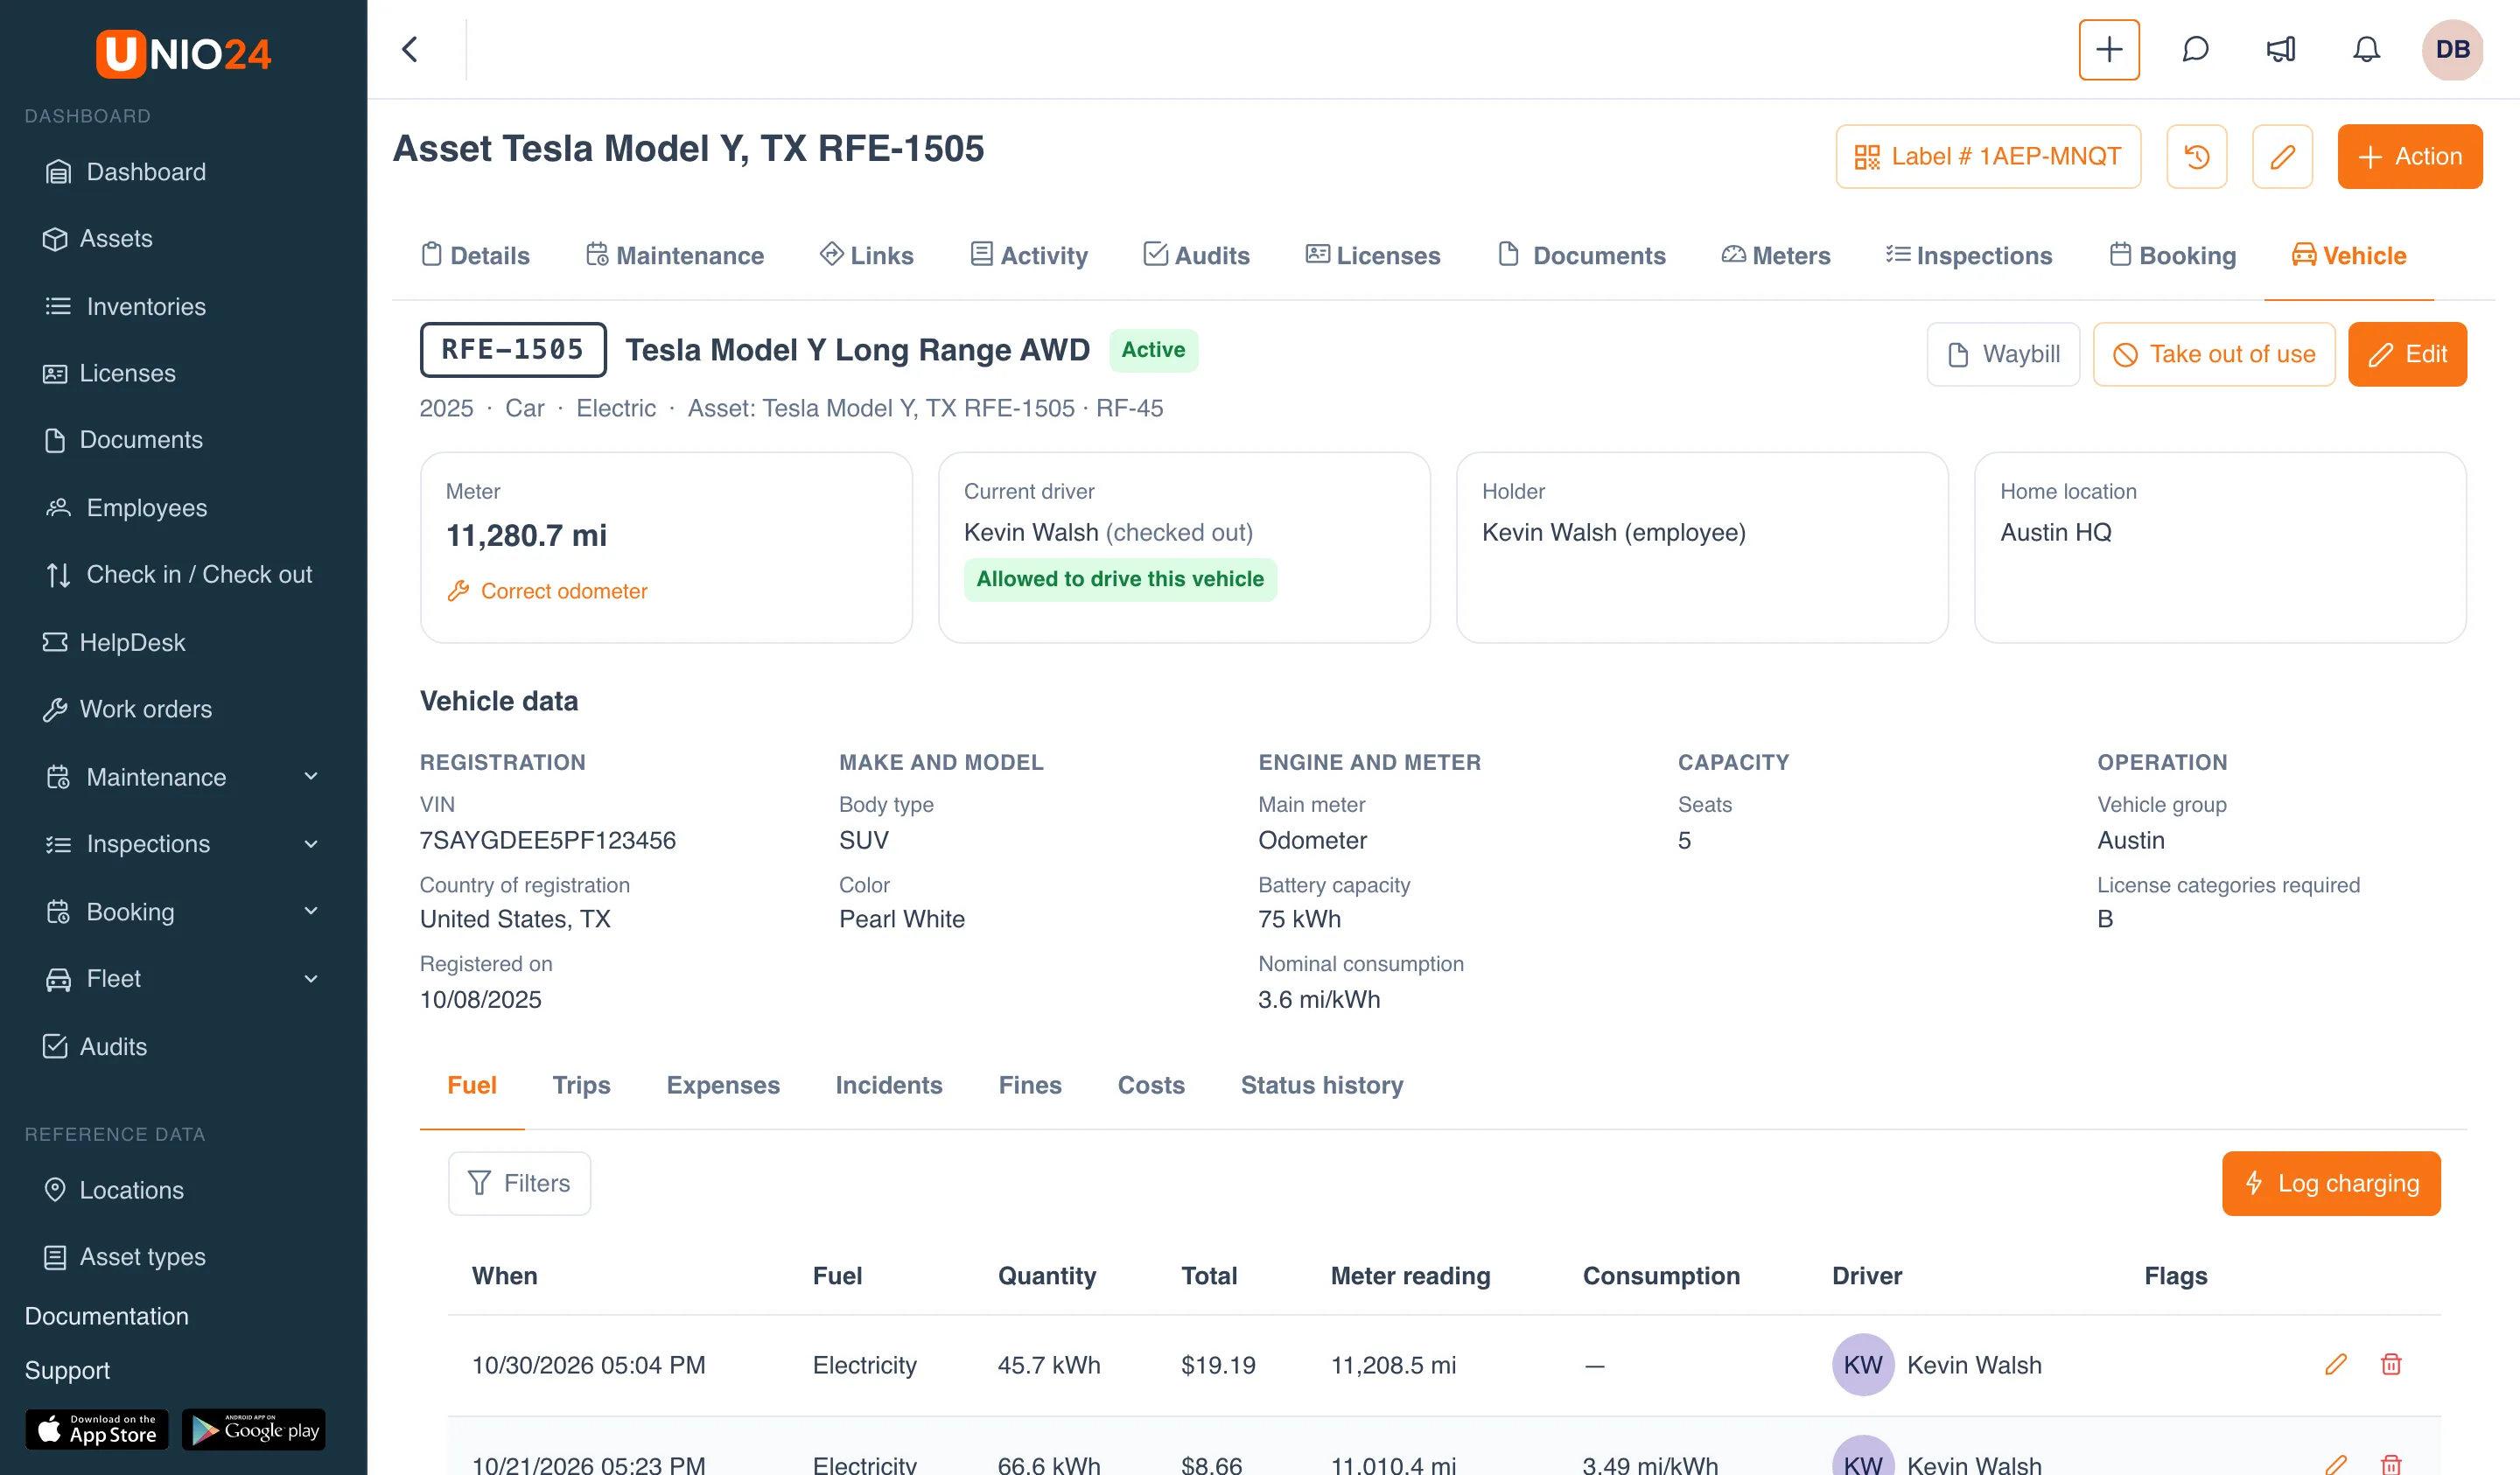
Section titled “The vehicle card”At the top of the card are the plate number, make and model, status, year, class, powertrain, and a link to the asset. On the right are the Waybill, Take out of use, and Edit buttons.
- Why it is out of use: this yellow box appears only when the vehicle isn’t active. It lists every open cause: what is happening (In the shop or Out of service), where the cause comes from (work order, repair, inspection defect, incident with its number, or set by hand), since when, and the Return to use action.
- Tiles: Meter with the Correct odometer action; Current driver, with the source (trip, on a booking, checked out) and whether the driver is allowed to drive this vehicle; Holder, who the asset is checked out to; and Home location.
- Vehicle data: registration, make and model, engine and meter, capacity, operation.
- Tabs: Fuel, Trips, Expenses, Incidents, Fines, Costs (cost of ownership for a period), and Status history (who changed the status, when, and why).
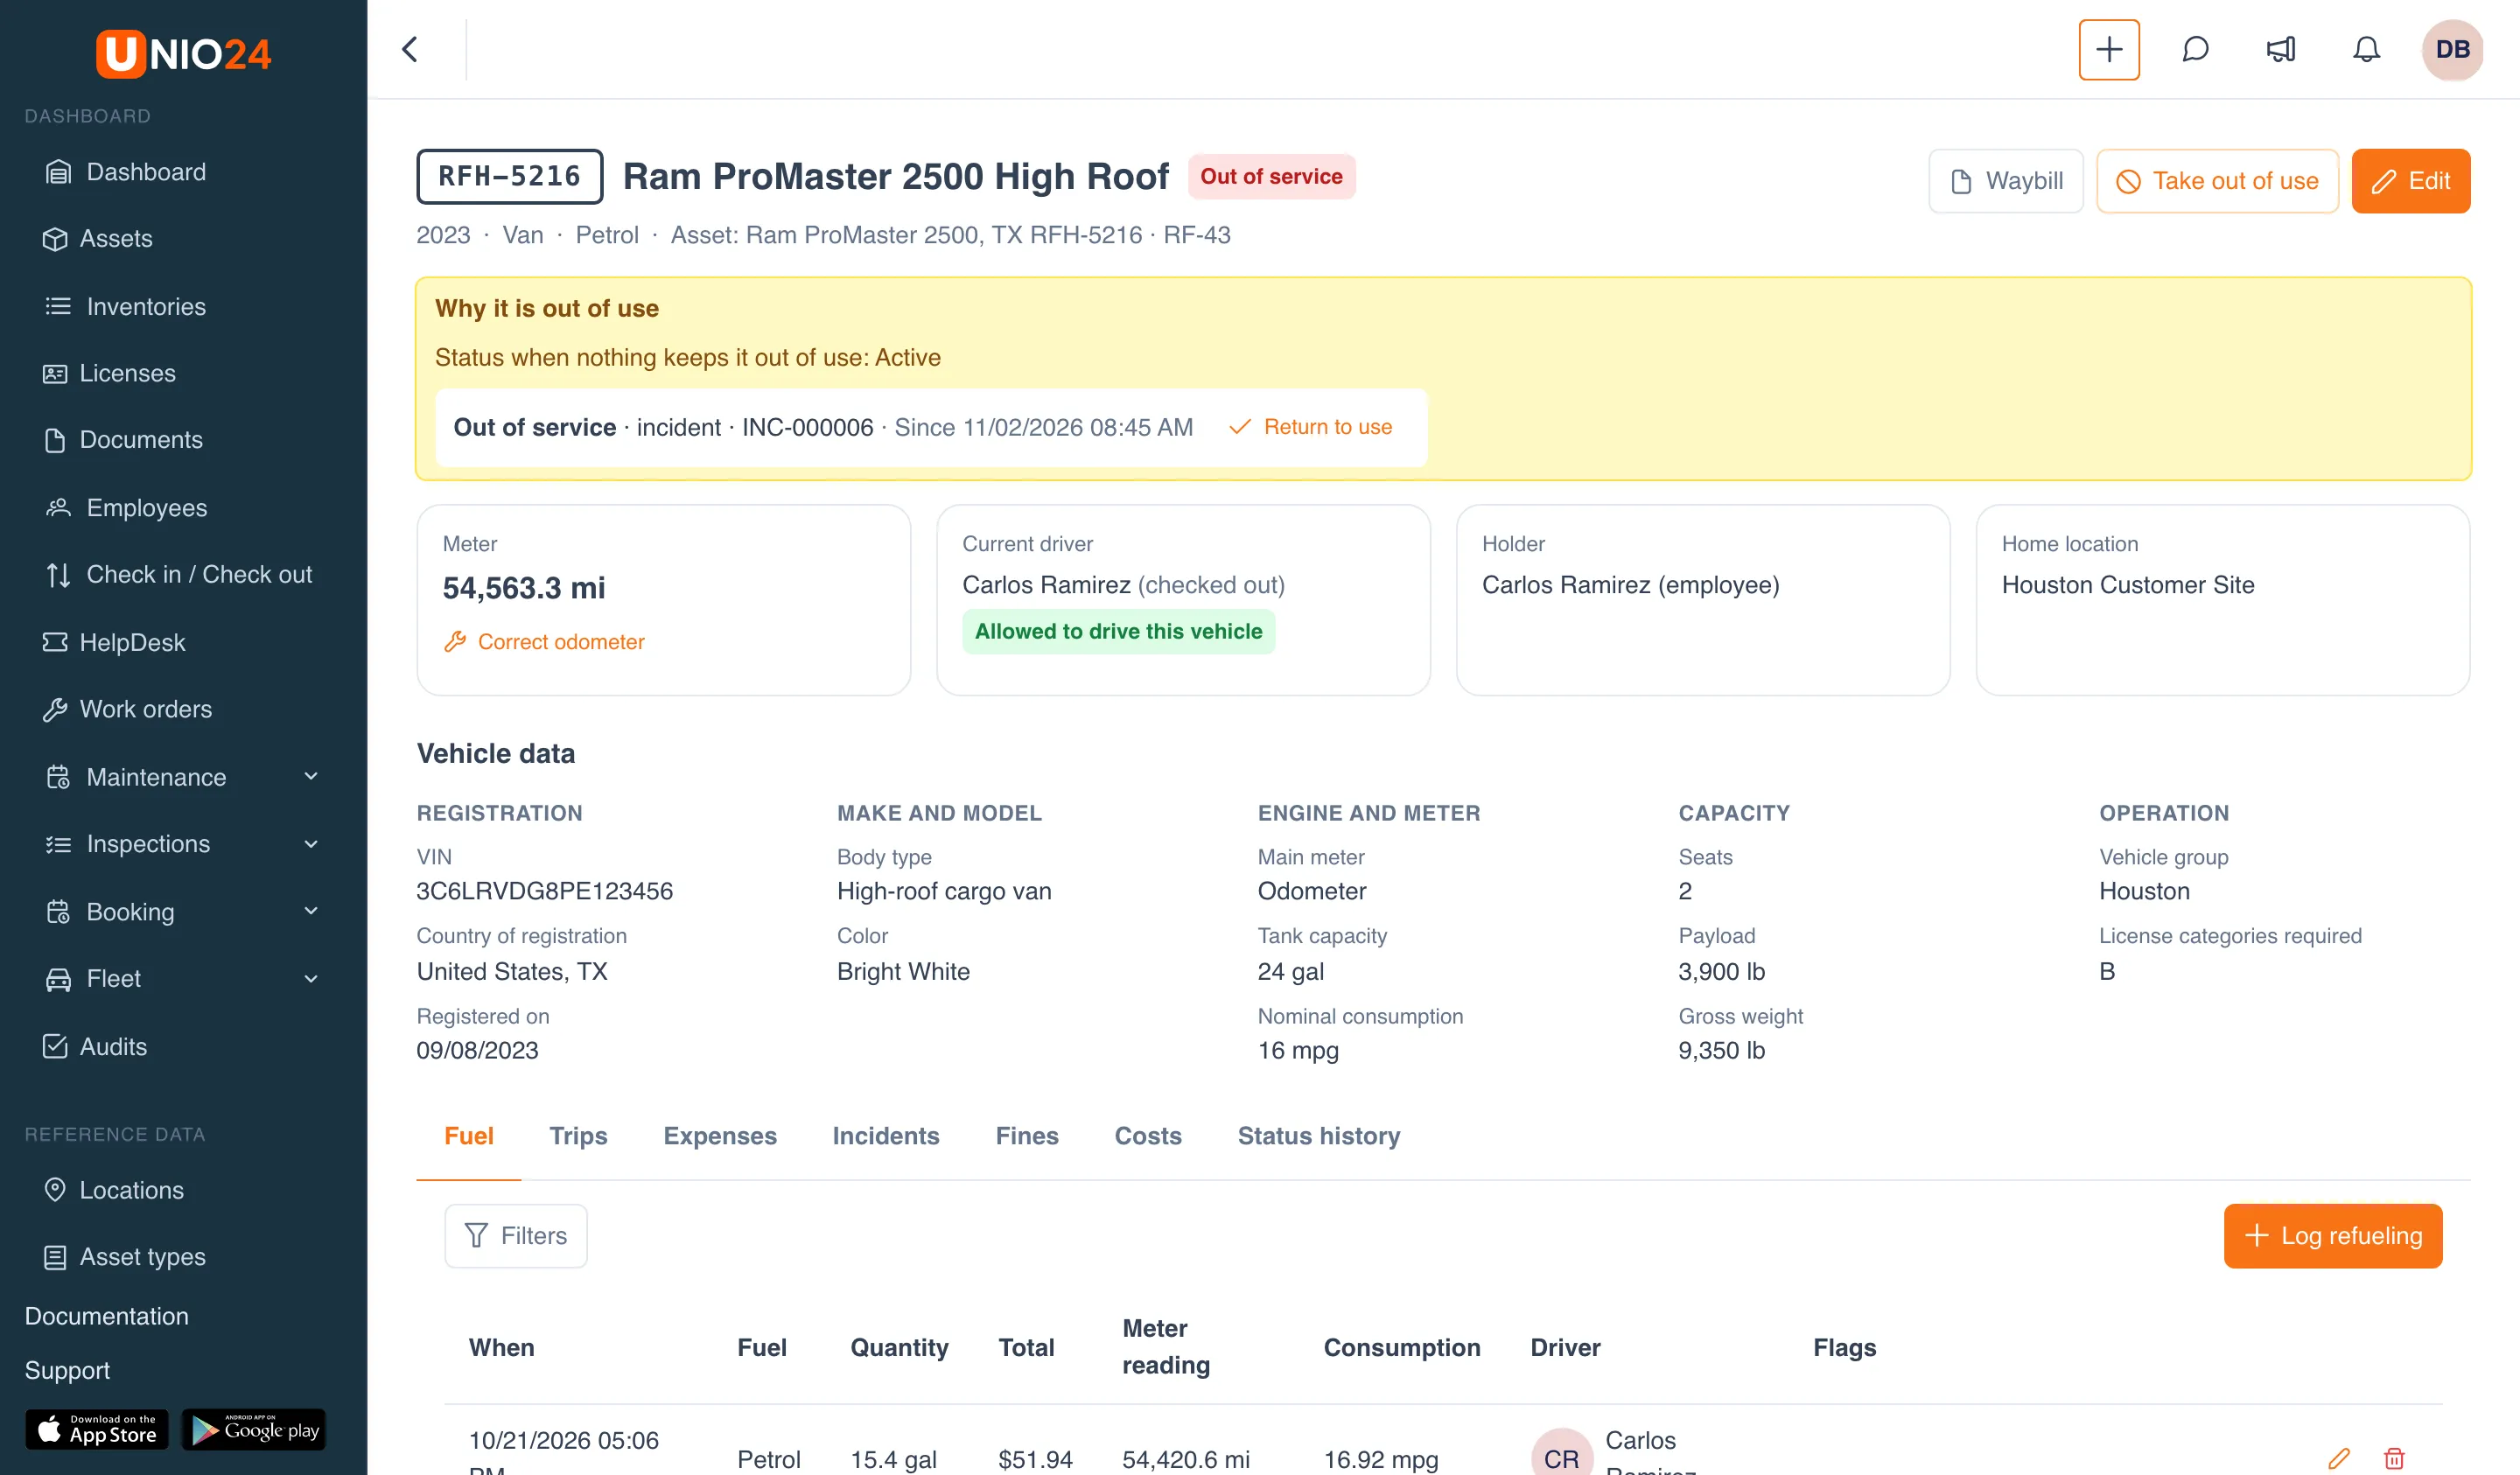
The Waybill button builds a waybill and a norm vs actual comparison from the trips and fuel entries for a period; how to do it is described in Fuel, trips and expenses.
Edit vehicle data
Section titled “Edit vehicle data”- On the card, click Edit.
- Correct the fields you need.
- In the Status section, the Status when nothing keeps it out of use field sets the vehicle’s status when it has no open causes: Active, Inactive, or Sold. In the Reason field, you can explain why the status was changed.
- Click Save.
Take a vehicle out of use
Section titled “Take a vehicle out of use”If a vehicle can’t be used but there is no work order or repair for it, for example while it waits for parts:
- On the card, click Take out of use.
- In What happens, choose In the shop or Out of service.
- Enter the Reason. It’s required.
- Click Save.
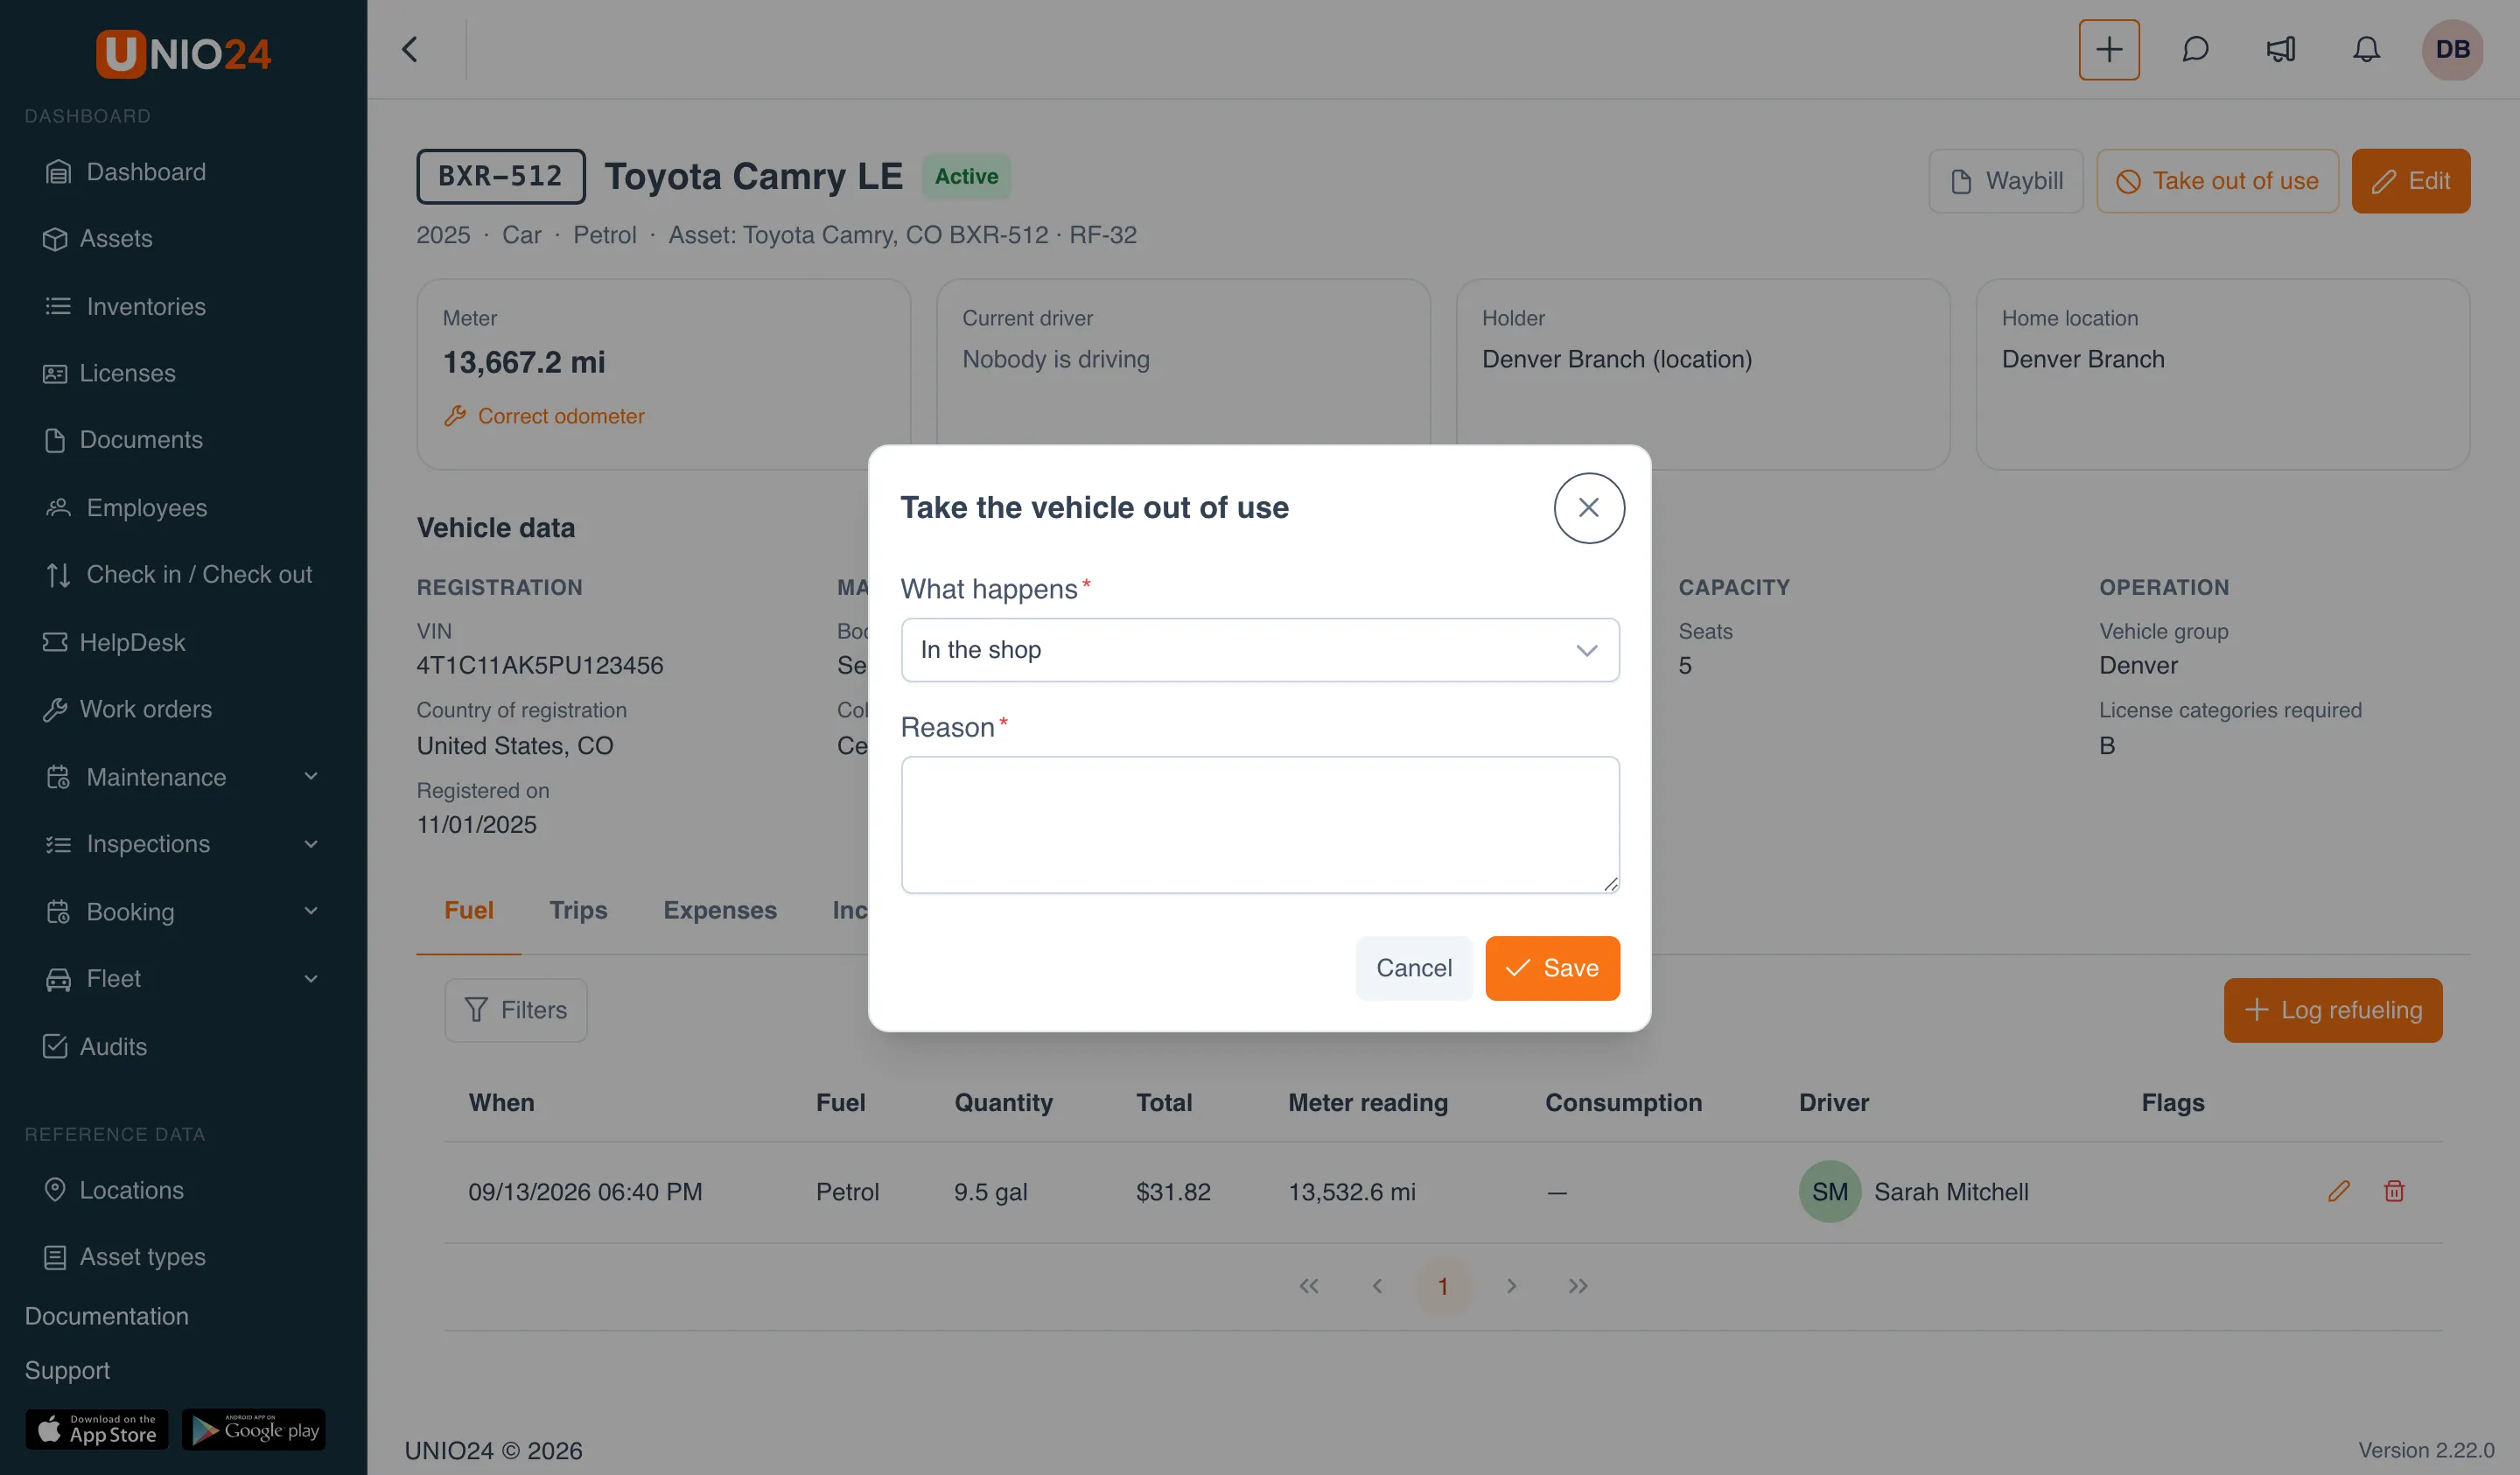
The status changes right away, and the cause appears in the Why it is out of use box. If Booking is on, the vehicle can no longer be booked; existing bookings aren’t canceled, but their participants get a conflict notification.
Return a vehicle to use
Section titled “Return a vehicle to use”Causes from a work order, repair, inspection, or incident close on their own when their source closes. You can close any cause by hand, your own or an automatic one left open by mistake:
- In the Why it is out of use box, click Return to use next to the cause.
- If needed, write a Note. It stays in the status history.
- Click Return to use.
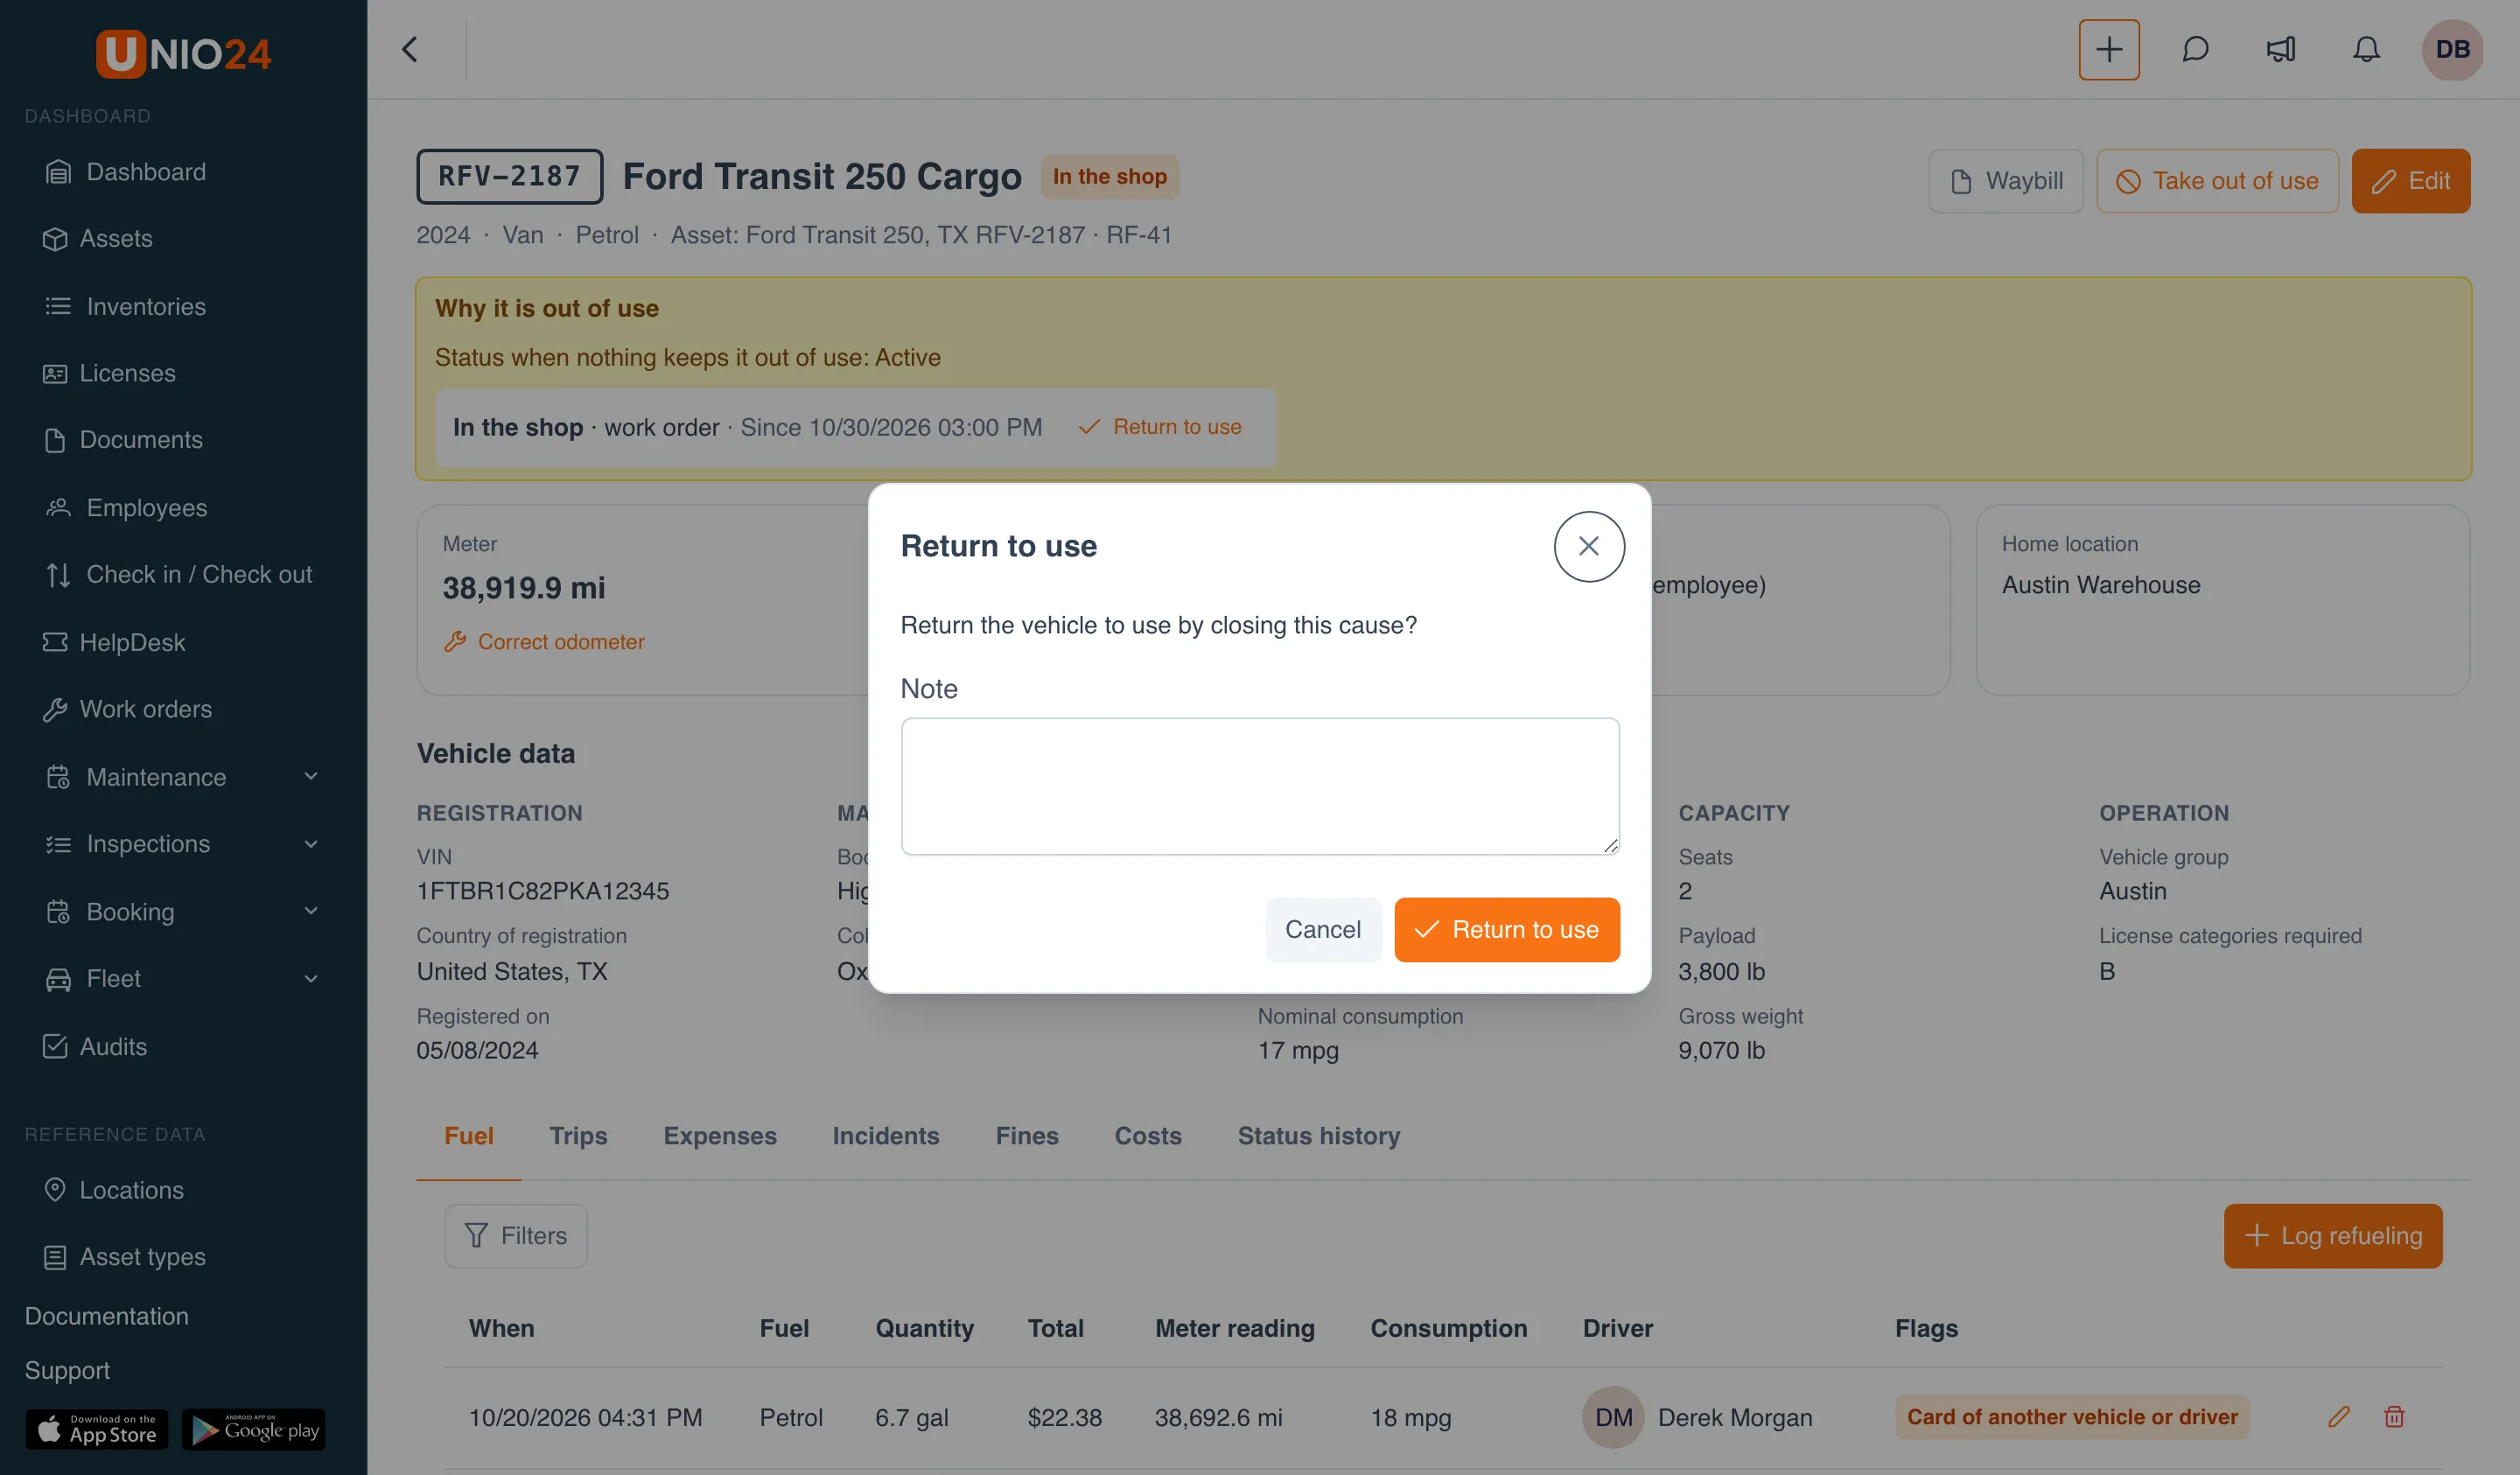
If the vehicle has other open causes, its status follows them.
Correct the odometer
Section titled “Correct the odometer”If a wrong reading got into the meter, for example an extra digit in a fuel entry:
- On the card, in the Meter tile, click Correct odometer.
- In Correct reading, enter what the meter really shows.
- Enter the Reason and click Save.
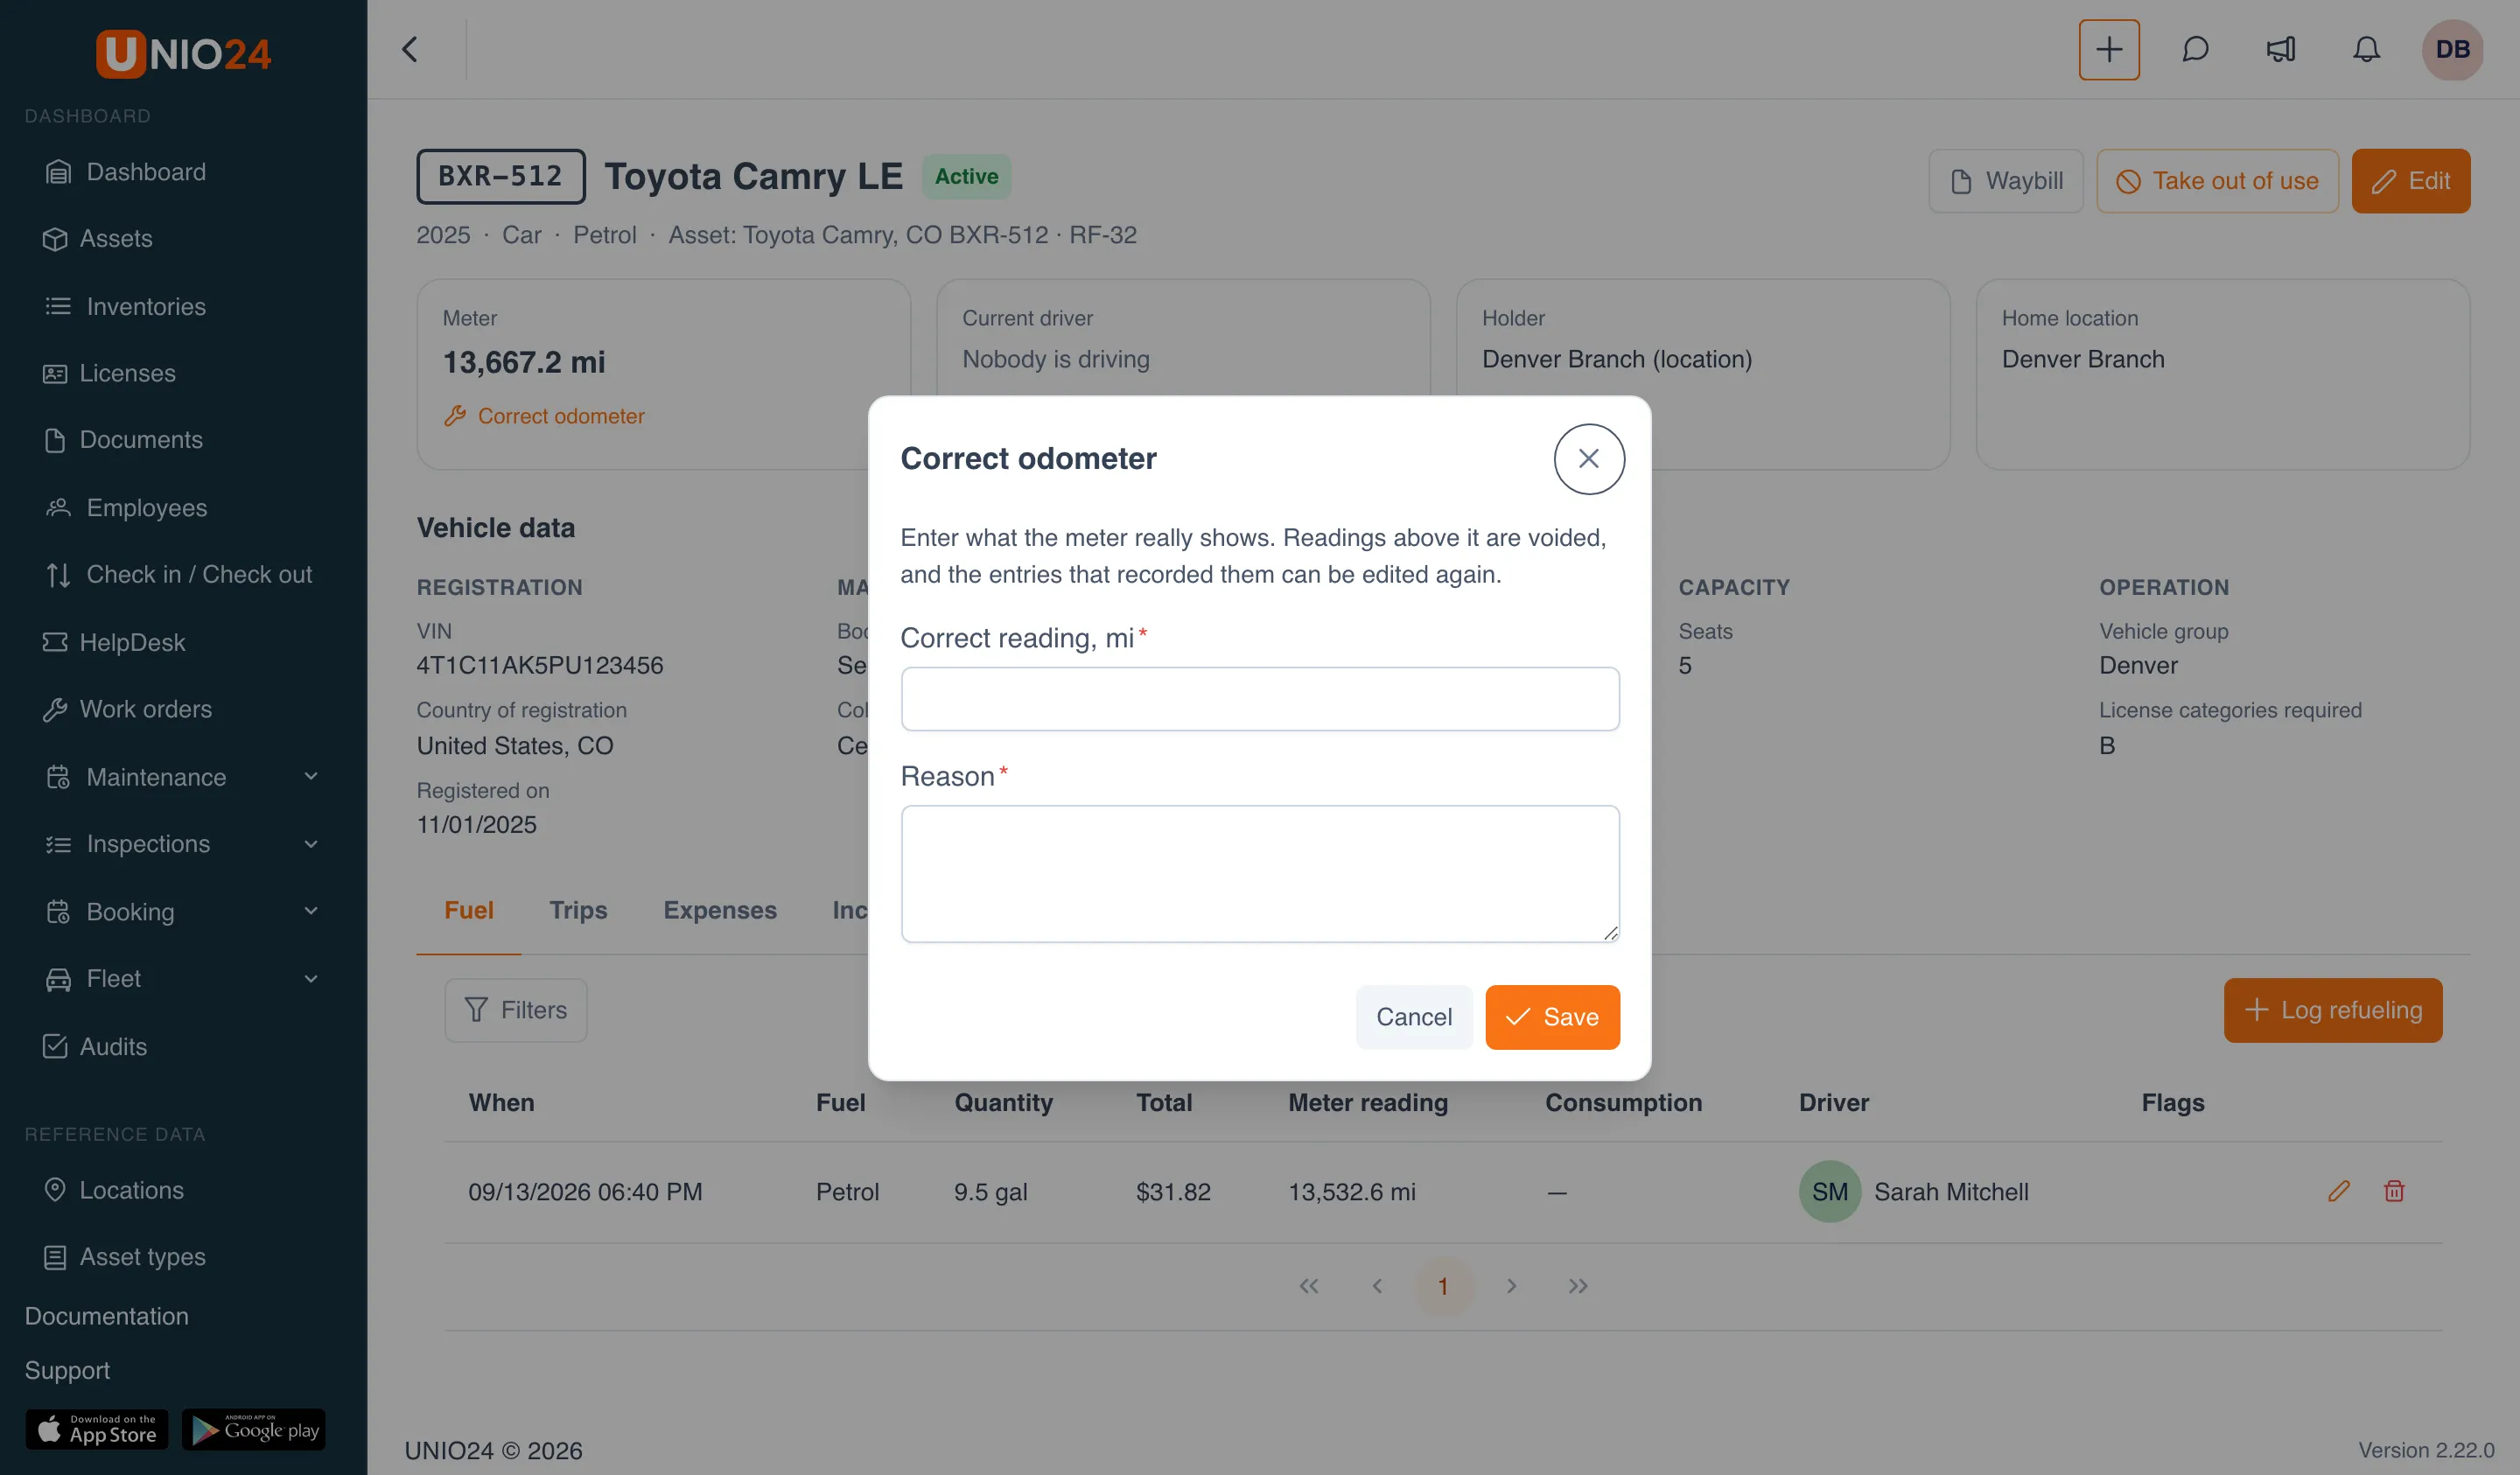
Readings above the correct one are voided, and the fuel entries and trips that recorded them can be edited again.
The Vehicle tab on the asset card
Section titled “The Vehicle tab on the asset card”An asset of a vehicle type has a Vehicle tab on its card. It shows the same vehicle card, with all the buttons and tabs. If the asset has no vehicle data yet, the tab offers Create vehicle profile. Assets of other types don’t have this tab.
Drivers
Section titled “Drivers”The driver list
Section titled “The driver list”Open Fleet → Drivers. The list shows the Employee and department, License categories, Driver status with a license check label, and the date of the Next license check. You can find a driver by name or license number, and narrow the list by status with Filters. To open a profile, click Open the driver at the end of the row.
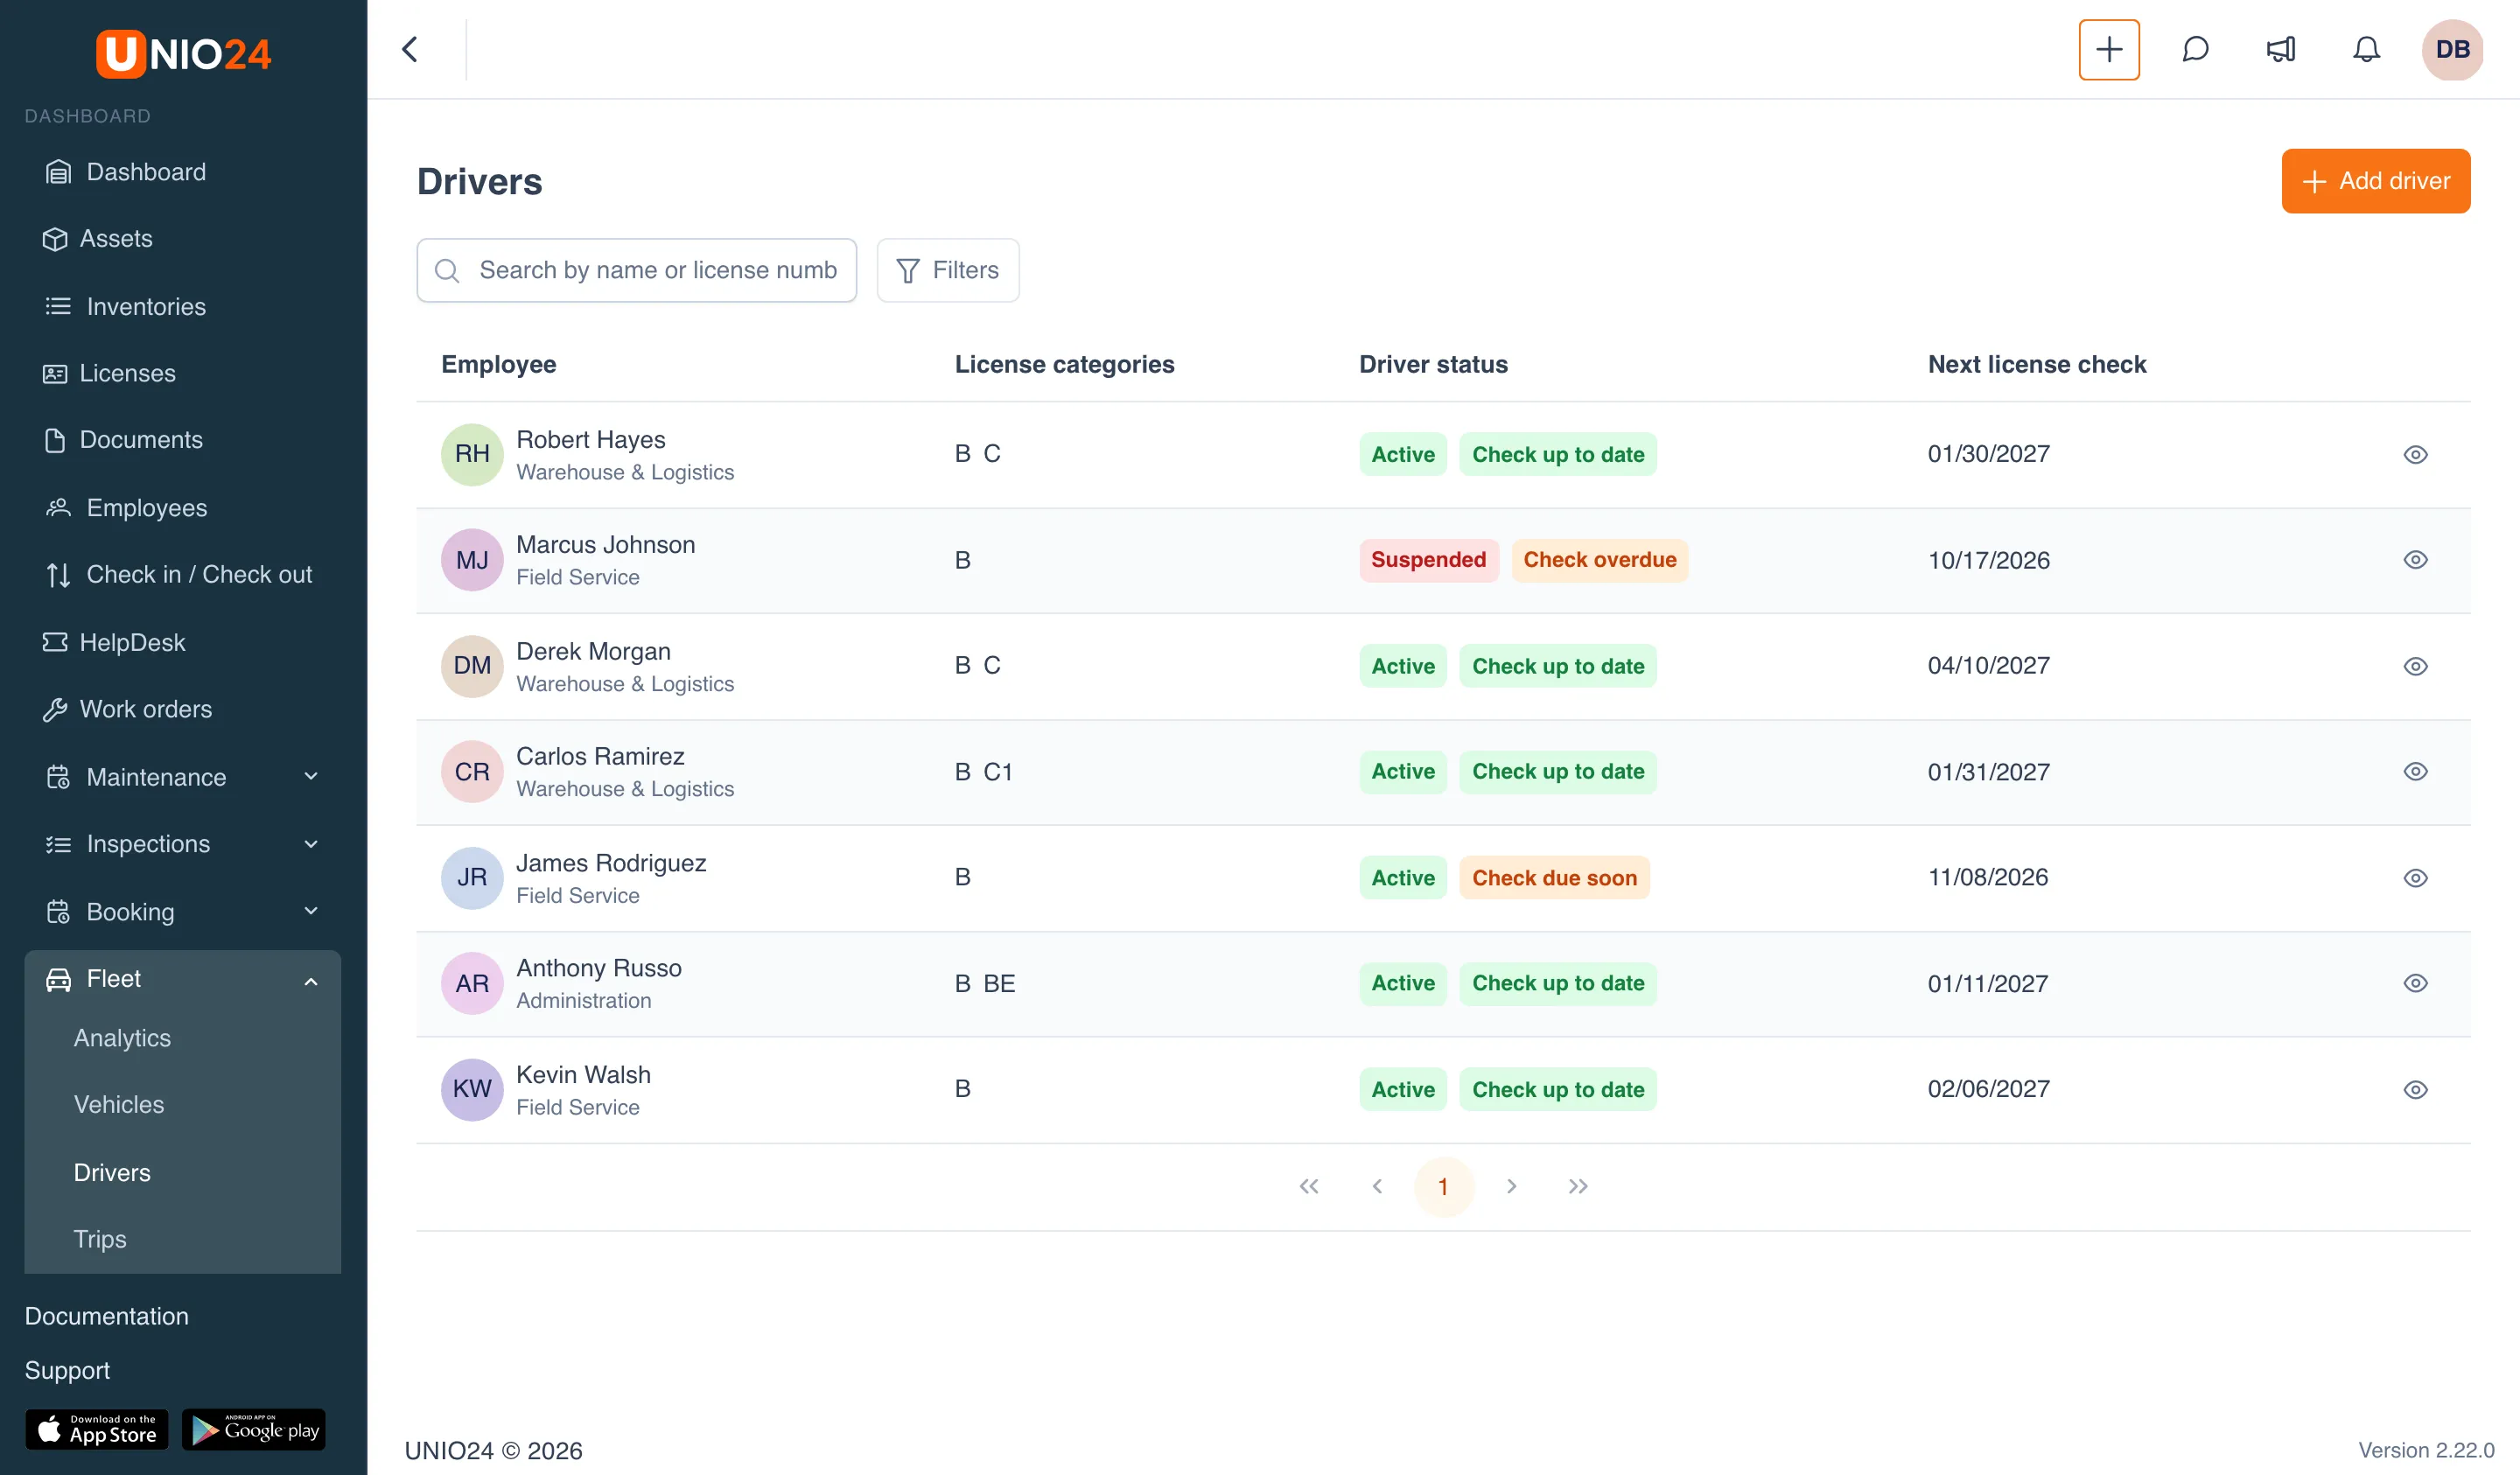
License check labels: Check up to date, Check due soon (within the next 7 days), Check due today, Check overdue, and Check failed.
Add a driver
Section titled “Add a driver”A driver isn’t created from scratch: a driver profile is added to an existing employee.
- Open Fleet → Drivers and click Add driver.
- In the Employee field, choose the employee. The list has only employees without a driver profile.
- Fill in the License number, Issued on, and Expires on dates.
- Choose which license it is: Local (issued in the company’s country; a company in the United States also chooses the State) or International, and then enter the country in Issued in.
- In the License categories section, click Add category, choose the category, and enter when it was Issued on and when it is Valid until. Repeat for each category.
- Leave the Driver status as Active; if needed, fill in Driving since, choose Permissions, and write Notes.
- Click Save.
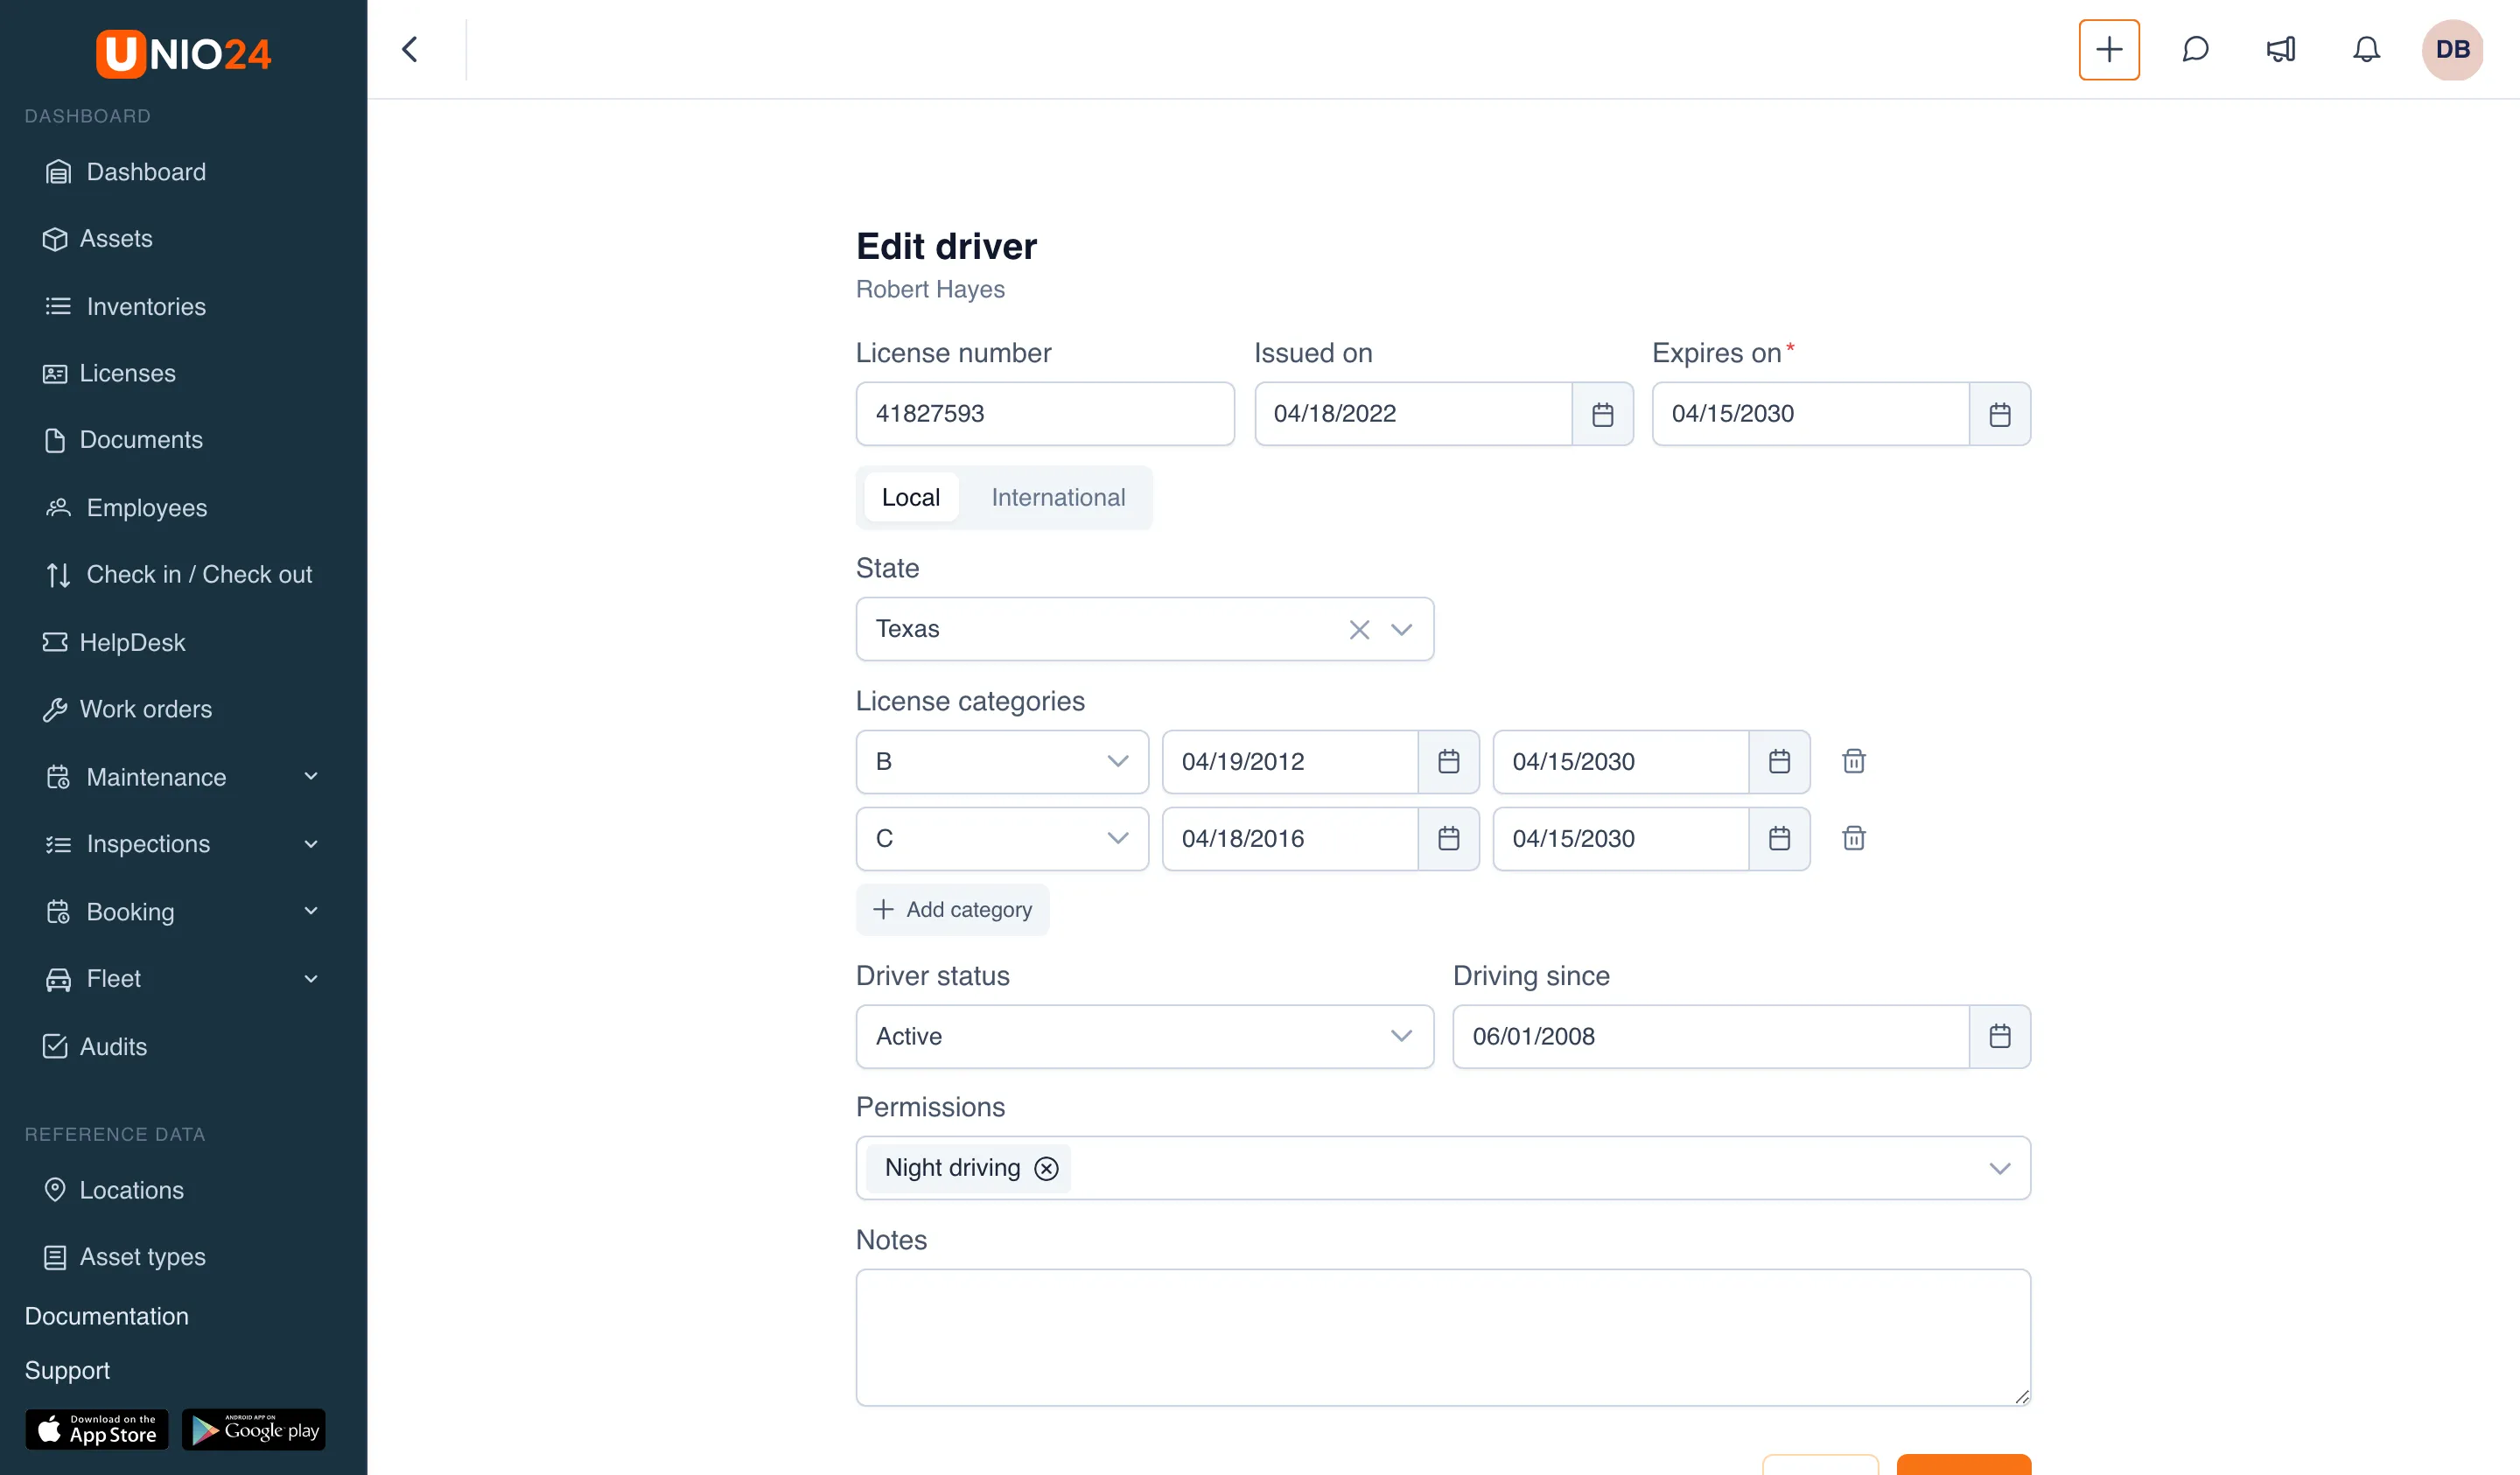
UNIO24 saves the license number and dates to the employee’s documents as a “Driver’s license”: you can see it on the employee card on the Documents tab, and you’ll get a reminder before it expires. If you later enter a new issue date, a new document appears and replaces the old one; if you only change the expiry date or number, the current document is corrected.
You can also add a driver profile from the employee card: the Driver tab → Create driver profile.
The driver profile
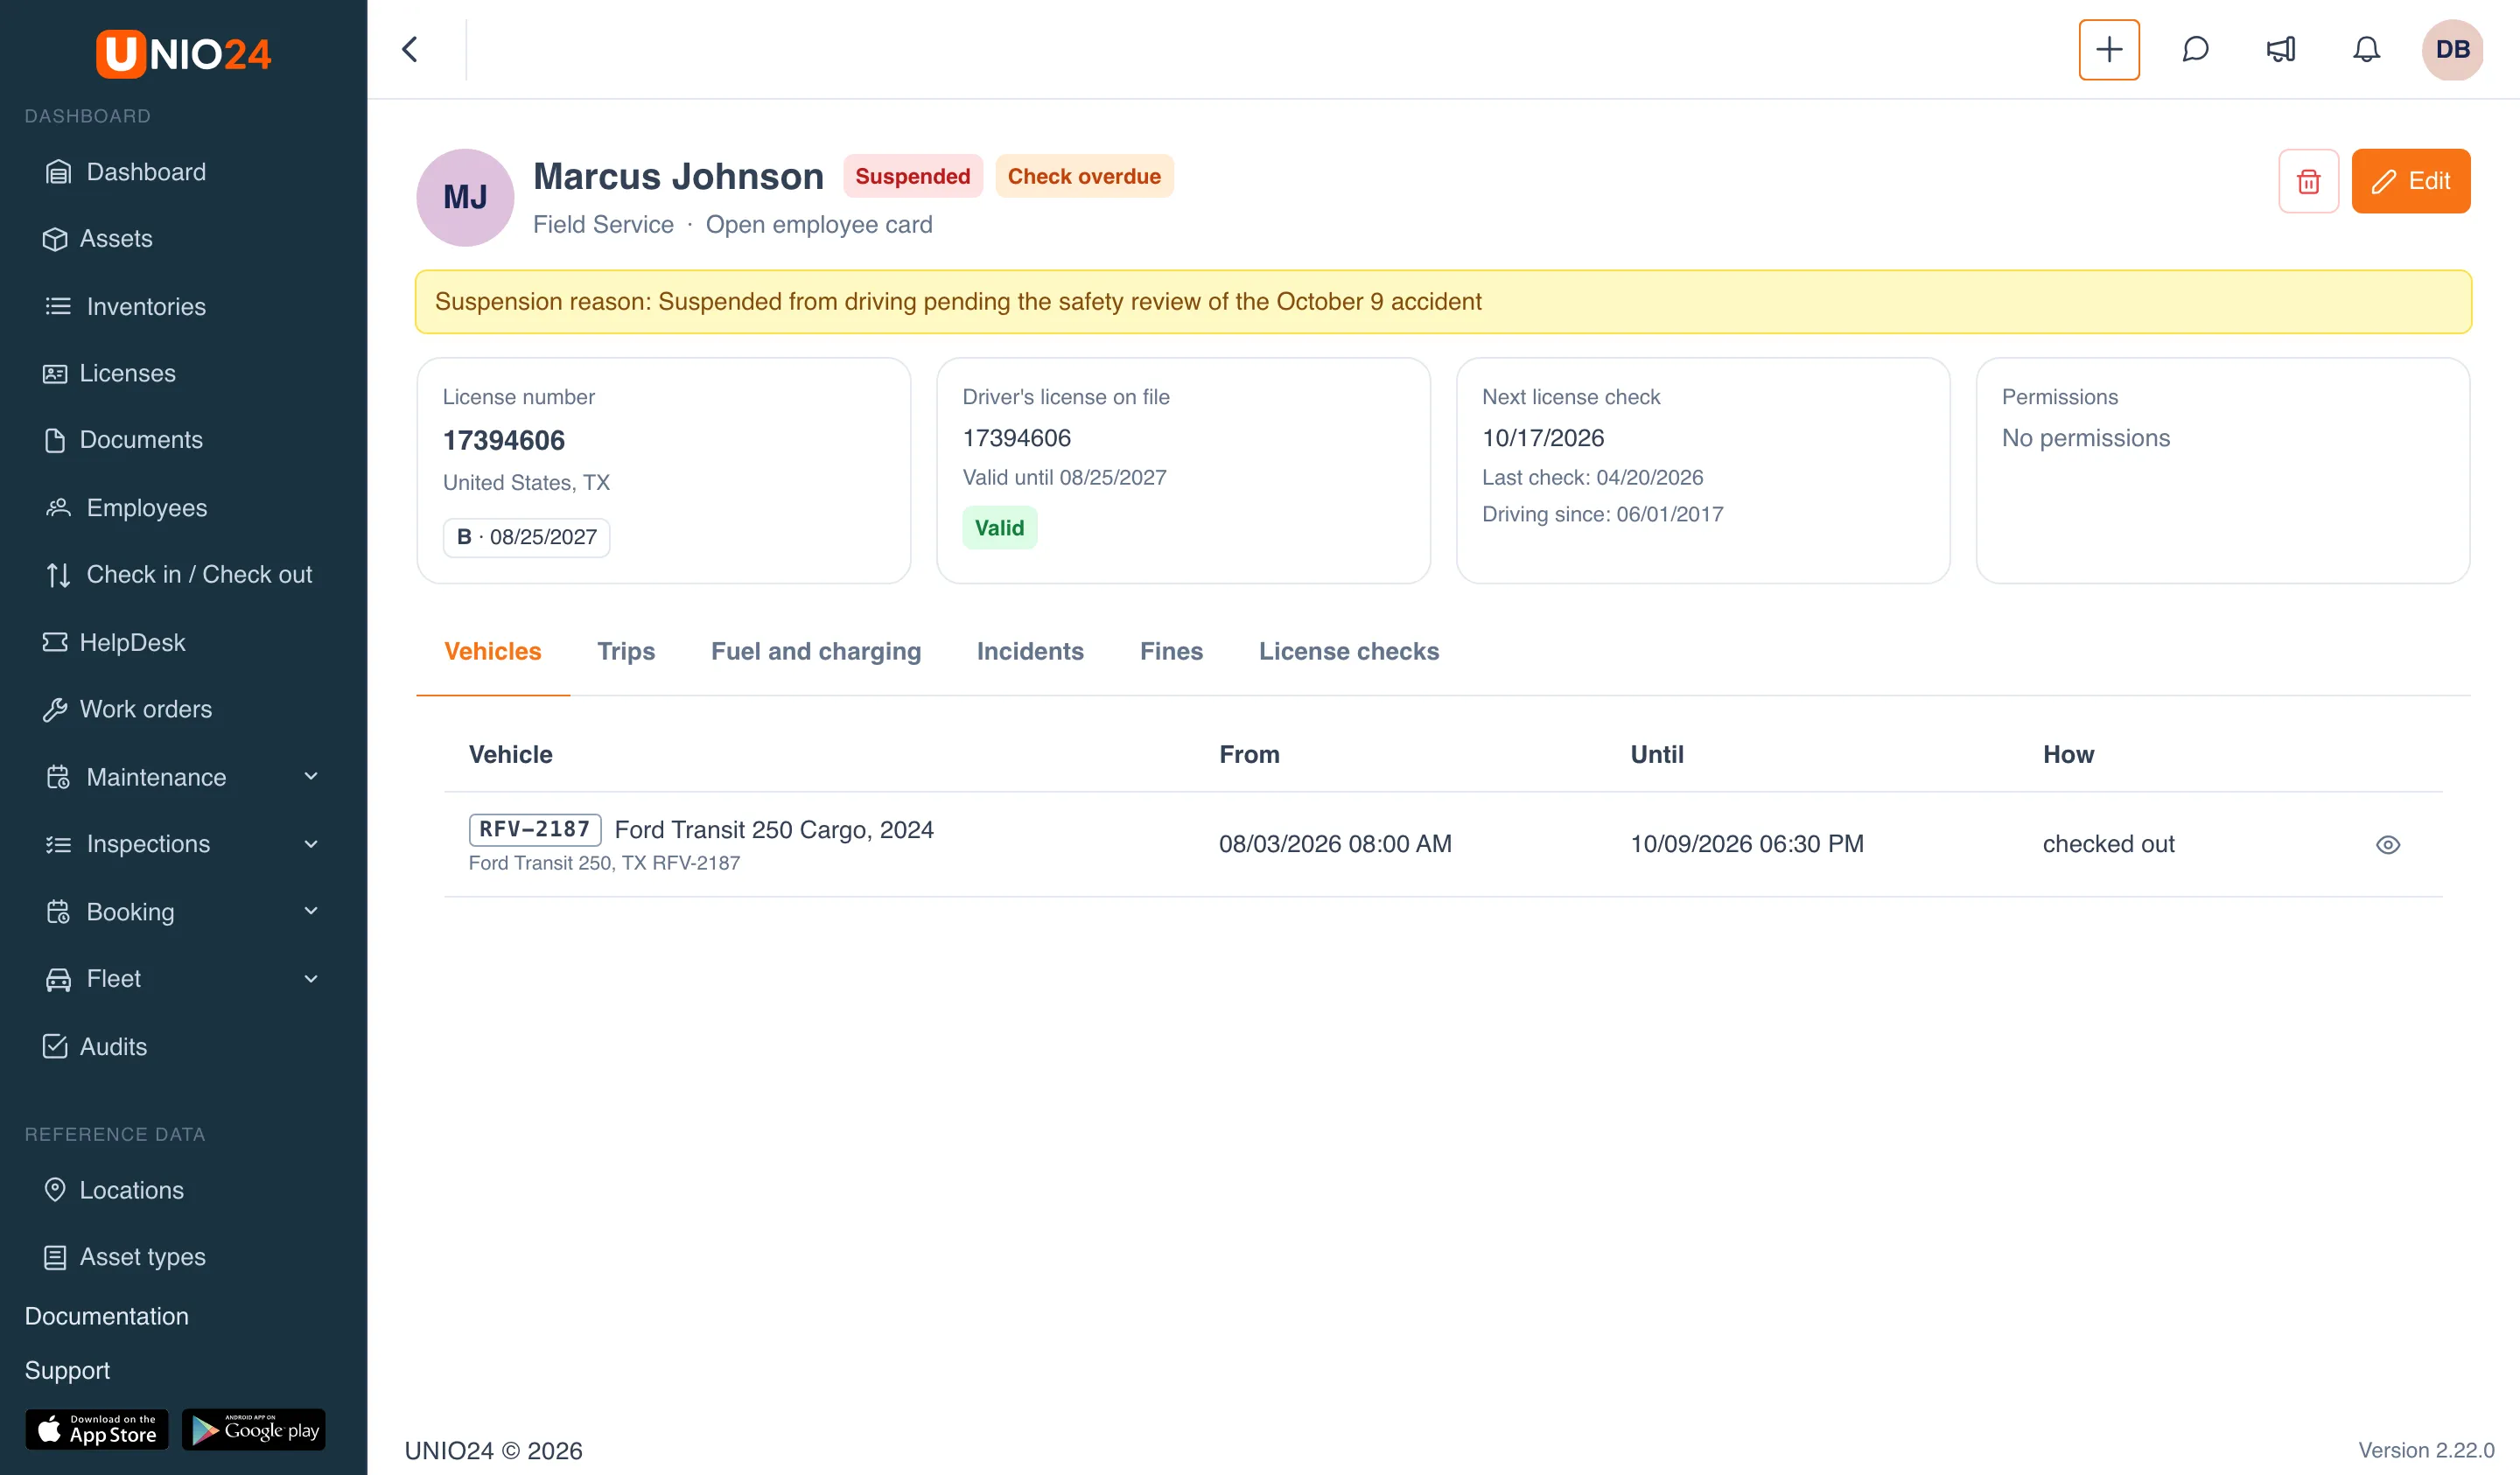
Section titled “The driver profile”At the top are the name, driver status, license check label, department, and the Open employee card link; on the right are Delete and Edit. A suspended driver has the suspension reason shown under the header.
Tiles: License number with the country and categories (each category with its expiry date; an expired one is highlighted and marked), Driver’s license on file with the number, expiry date, and document status, Next license check with the date of the last check and driving experience, and Permissions.
Tabs:
- Vehicles: which vehicles the driver had, from when until when, and how (checked out or on a booking);
- Trips, Fuel and charging, Incidents, Fines: records where this person is the driver;
- License checks: all checks with the result, method, next check date, note, and who checked.
To delete a driver profile, click Delete. License checks stay in the history; the employee and their documents aren’t deleted.
Record a license check
Section titled “Record a license check”- Open the driver profile and go to the License checks tab.
- Click Record a check.
- Enter when it was Checked on, How (Seen in person, Checked in the registry, or Other), and the Result (Valid, Invalid, or Expired).
- You can leave Next check empty: the date is calculated from the company interval. If needed, write a Note.
- Click Save.
- A Scans section appears in the same dialog: upload a photo or scan of the license and click Done.
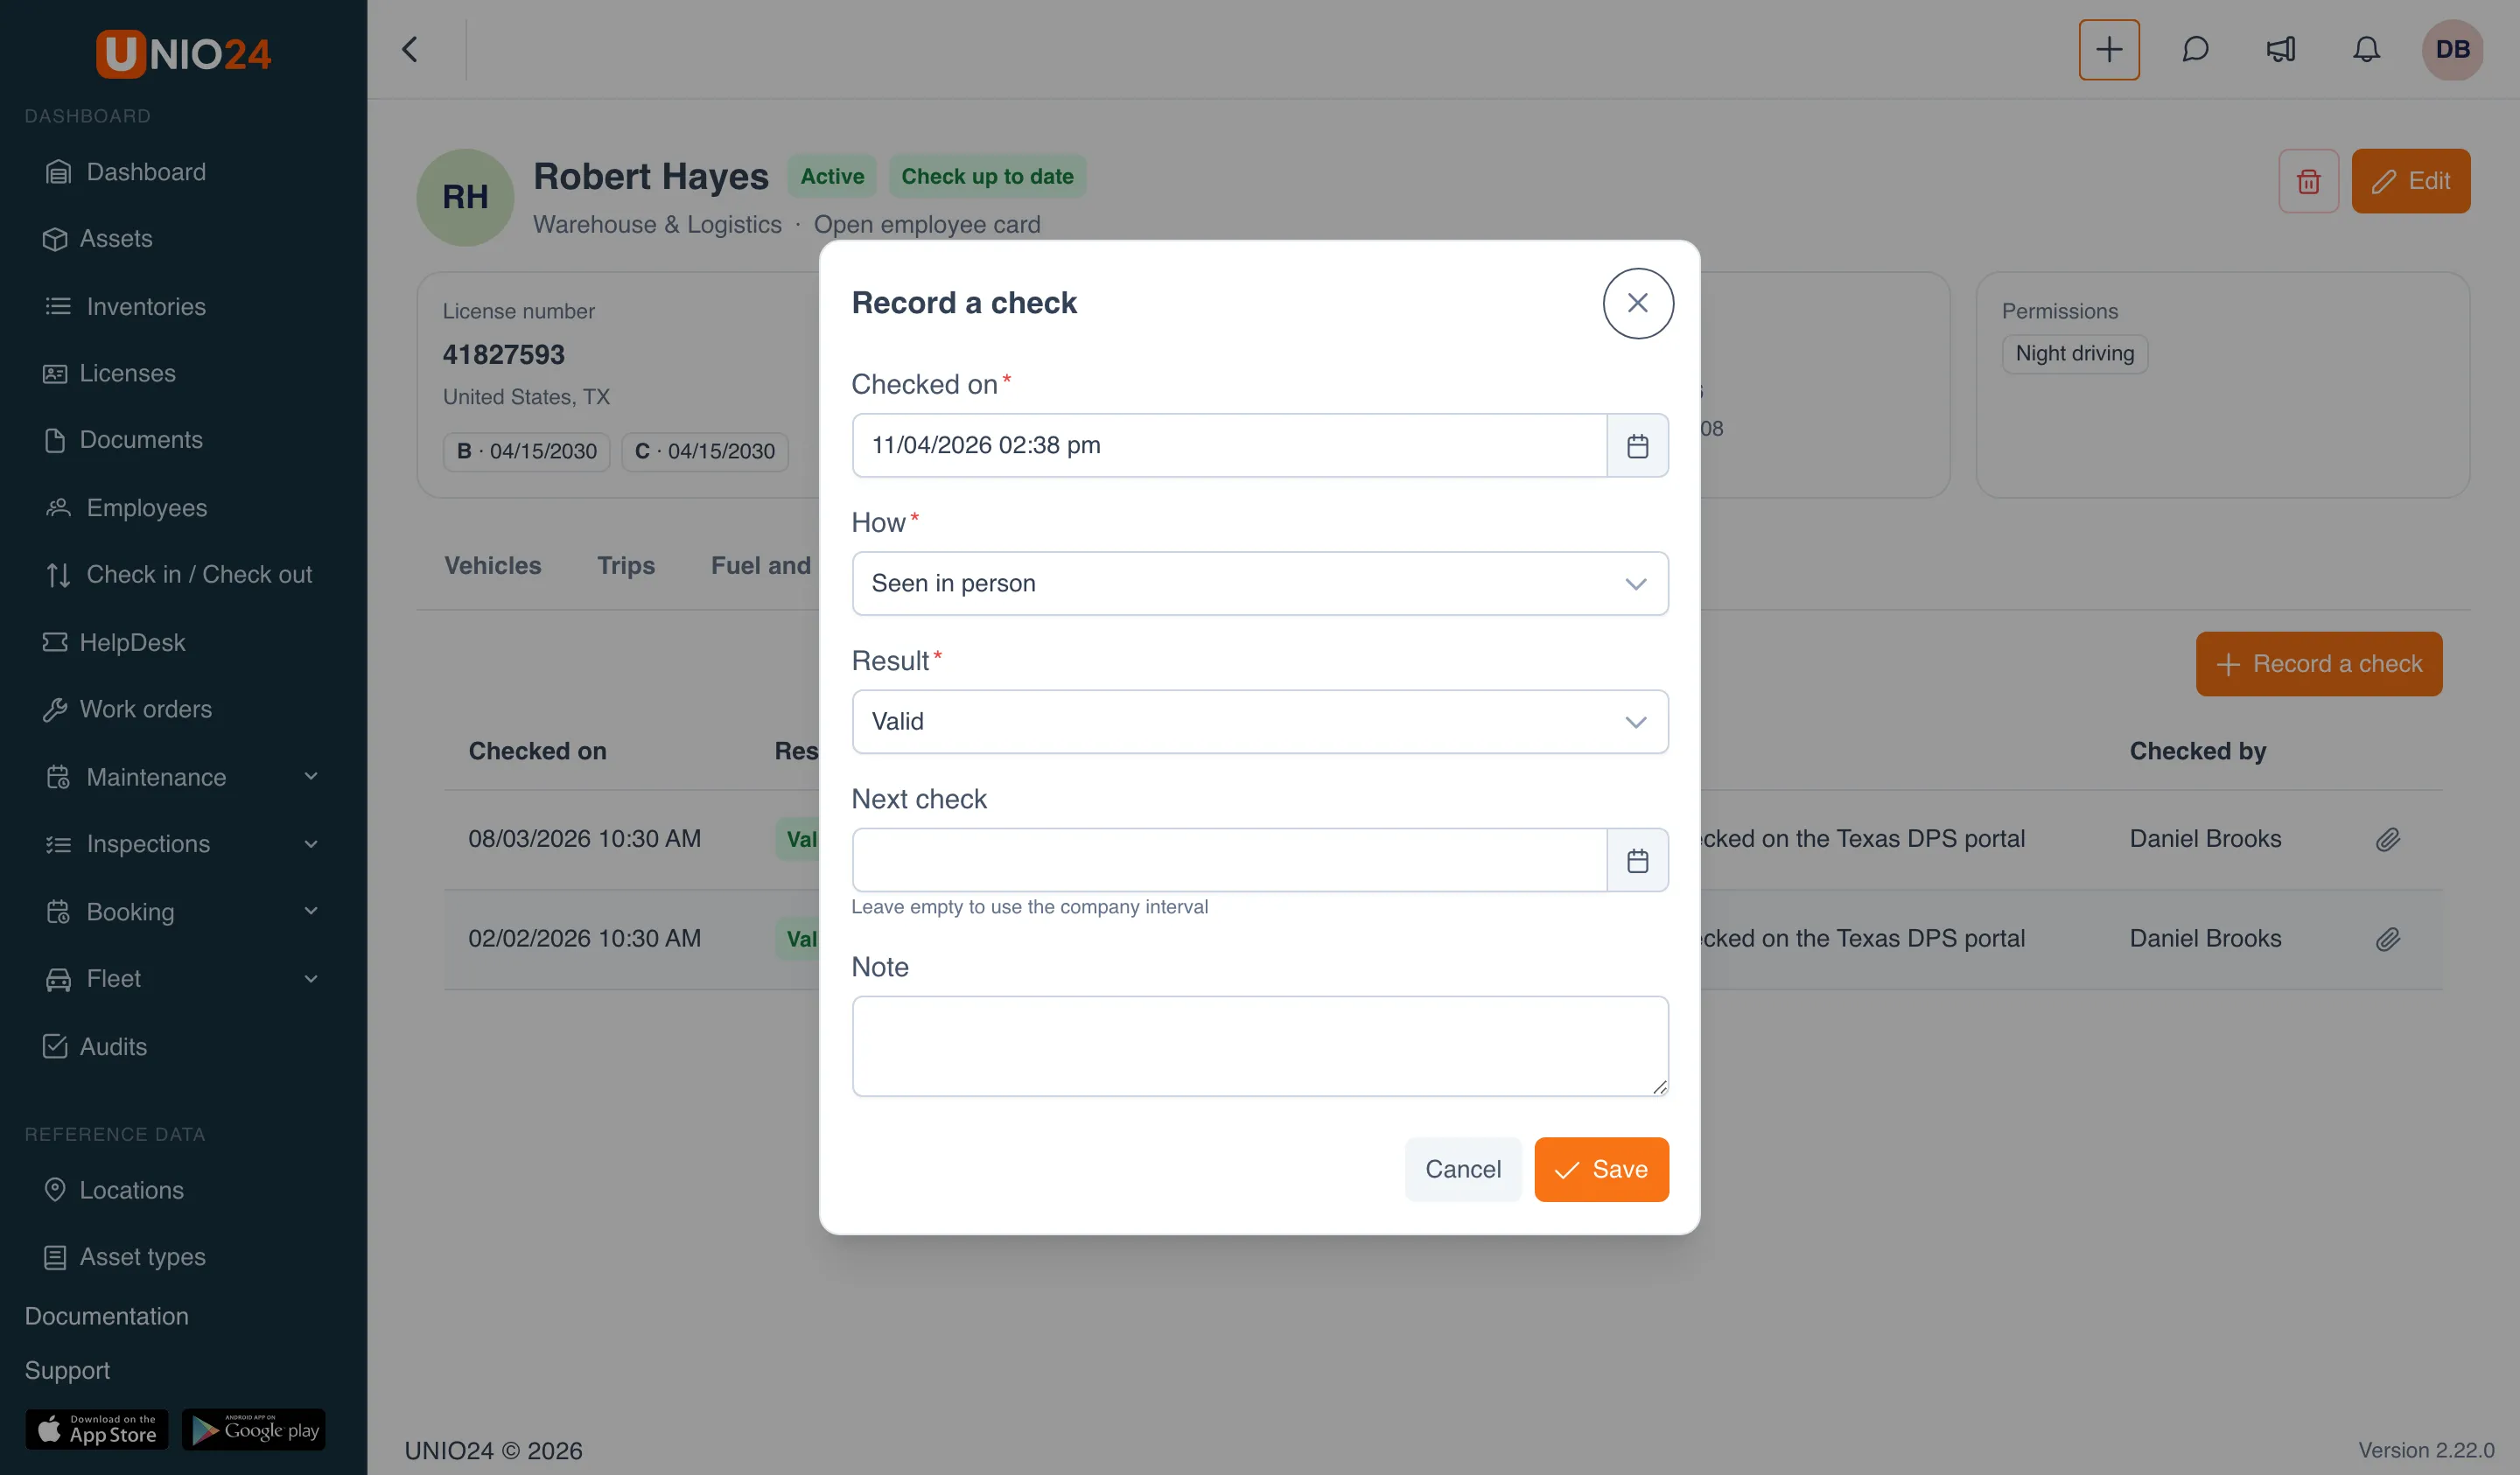
If the result is Invalid or Expired, the driver gets the Check failed label and isn’t allowed to drive until a new successful check. To see the scans of earlier checks, click Scans in the table row.
Suspend a driver
Section titled “Suspend a driver”- In the driver profile, click Edit.
- In Driver status, choose Suspended and fill in the Suspension reason. It’s required.
- Click Save.
To let the driver drive again, choose Active. The Inactive status is for a driver who no longer drives but whose profile you want to keep.
The Driver tab on the employee card
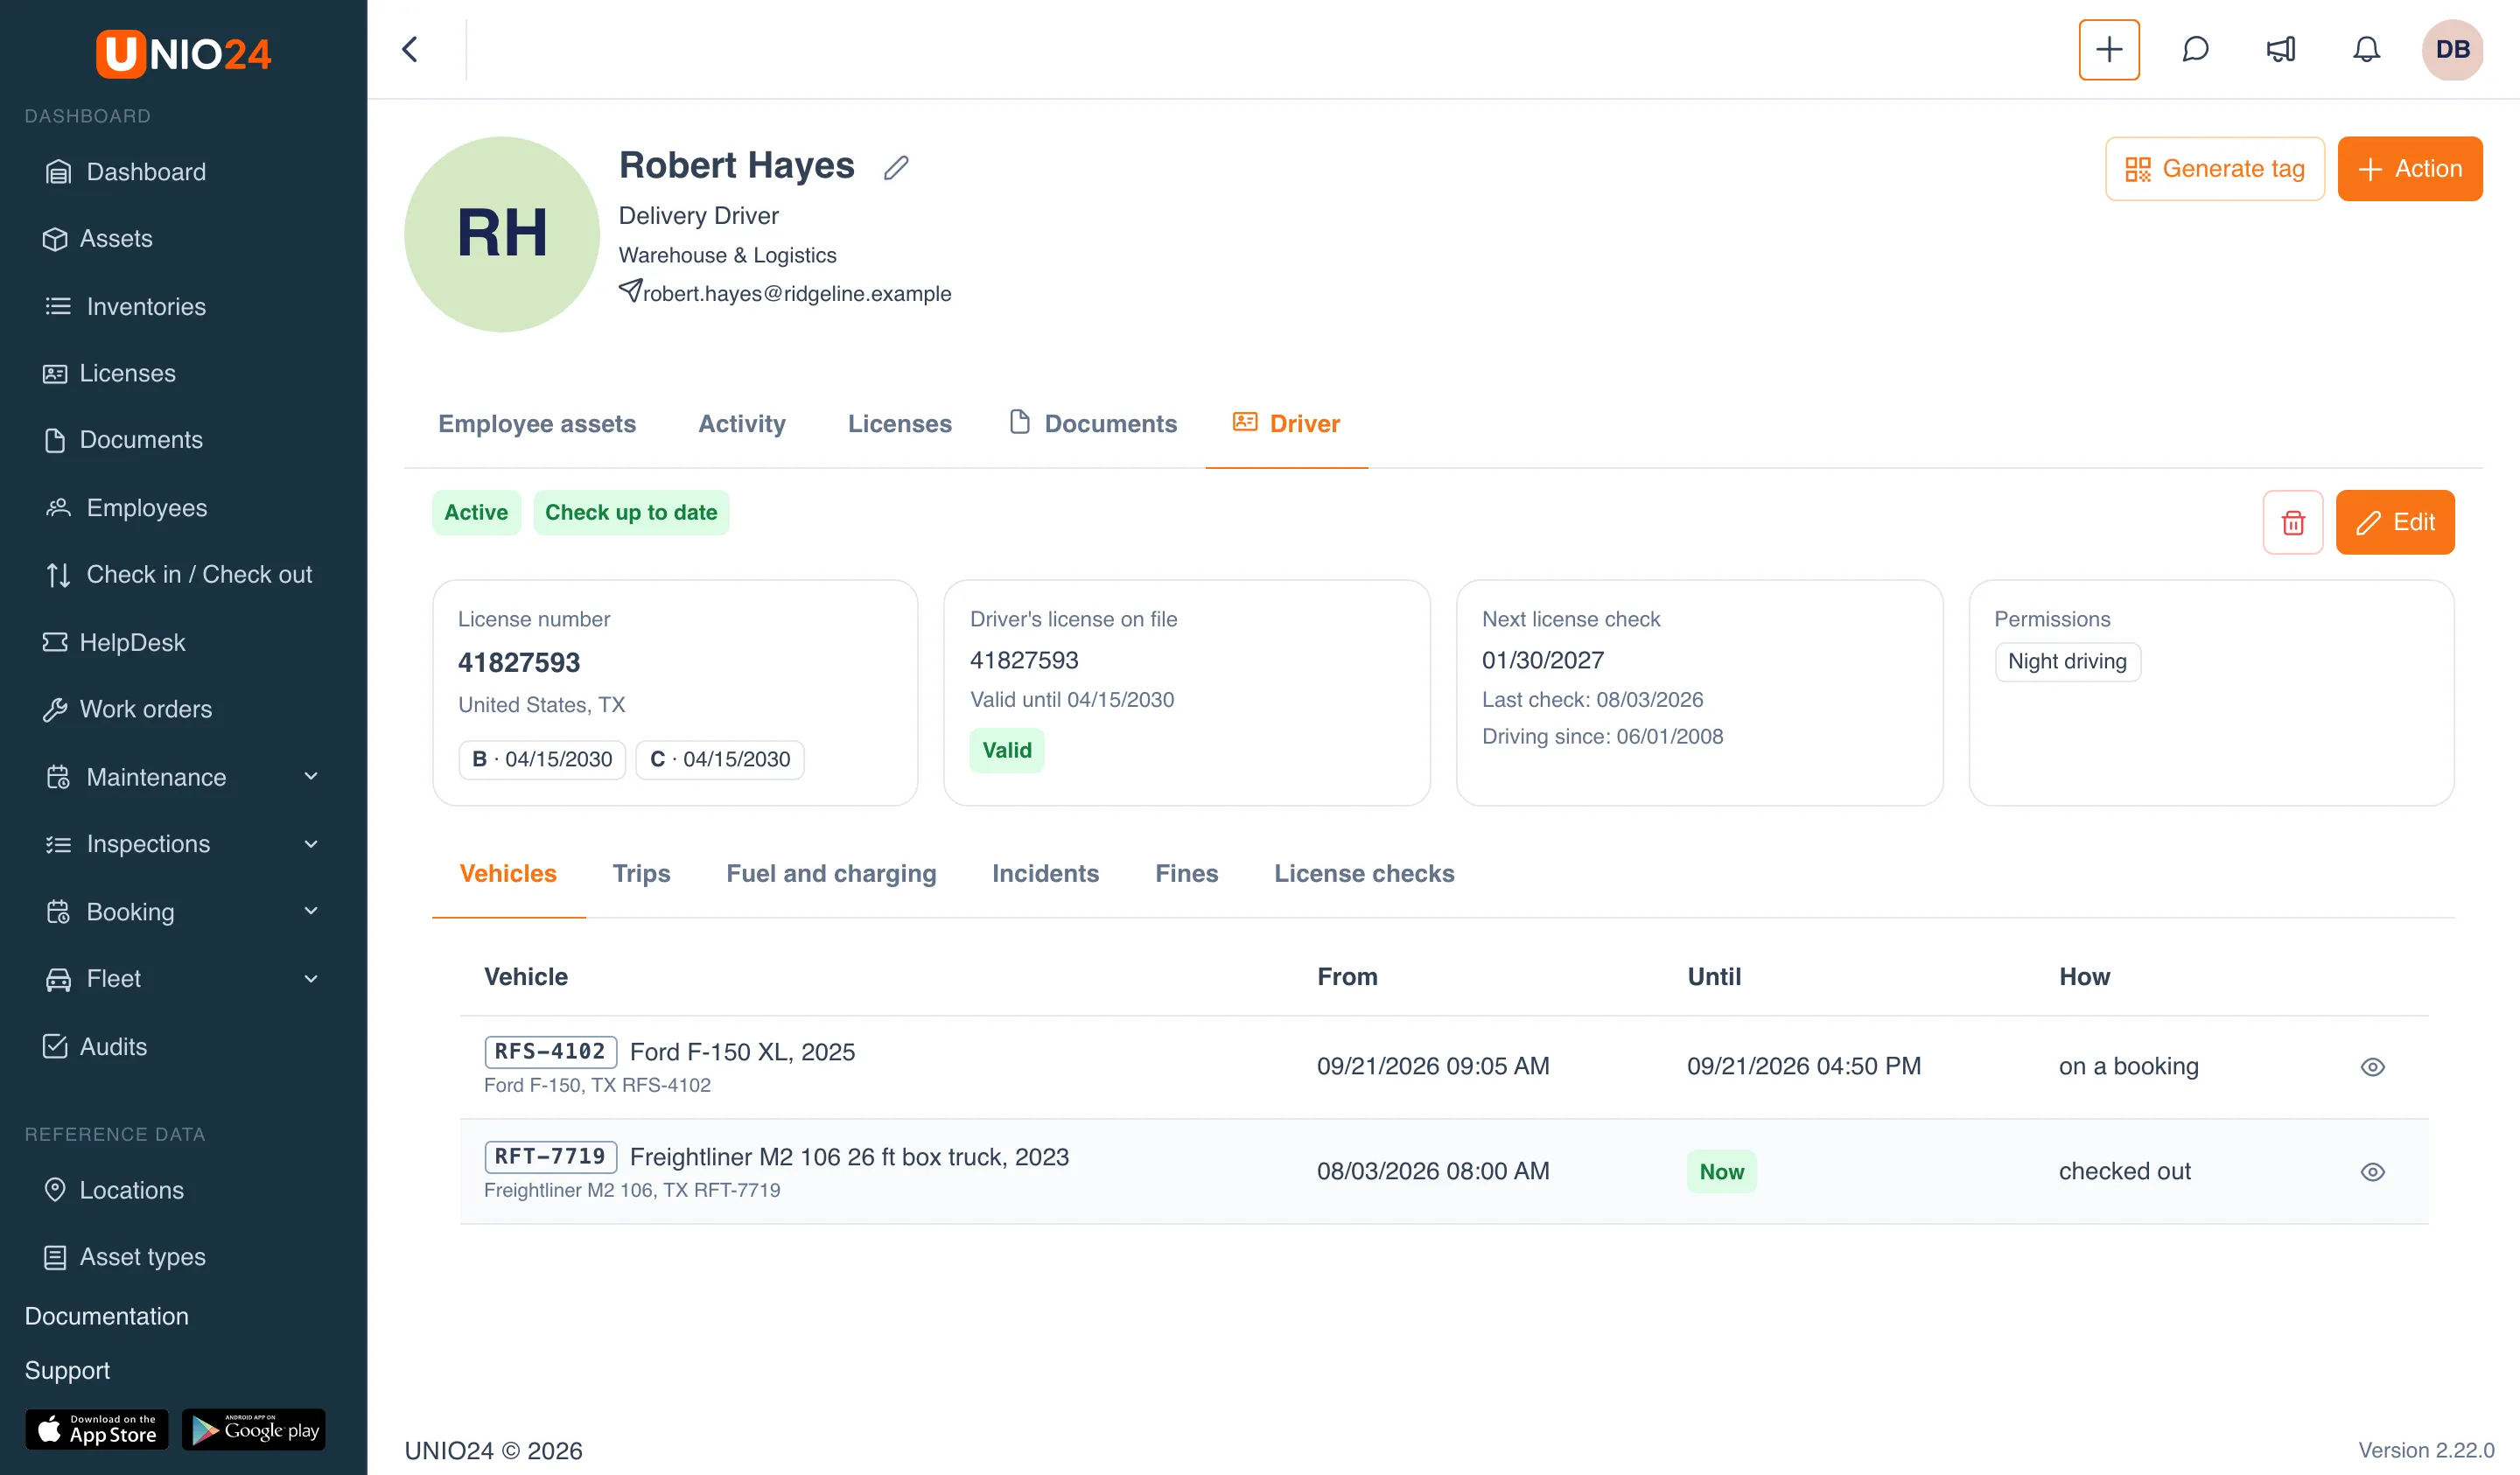
Section titled “The Driver tab on the employee card”On the employee card, the Driver tab shows the same driver profile with the Delete and Edit buttons. The tab is visible to people with the View vehicles, fuel entries and trips or Manage drivers permission.
Checking out a vehicle to a driver who isn’t allowed to drive it
Section titled “Checking out a vehicle to a driver who isn’t allowed to drive it”A vehicle is checked out to a driver with a regular asset checkout or by a booking. As soon as an employee is chosen in the checkout form, UNIO24 checks whether they are allowed to drive this vehicle and shows the reasons at the top of the form, before you save.
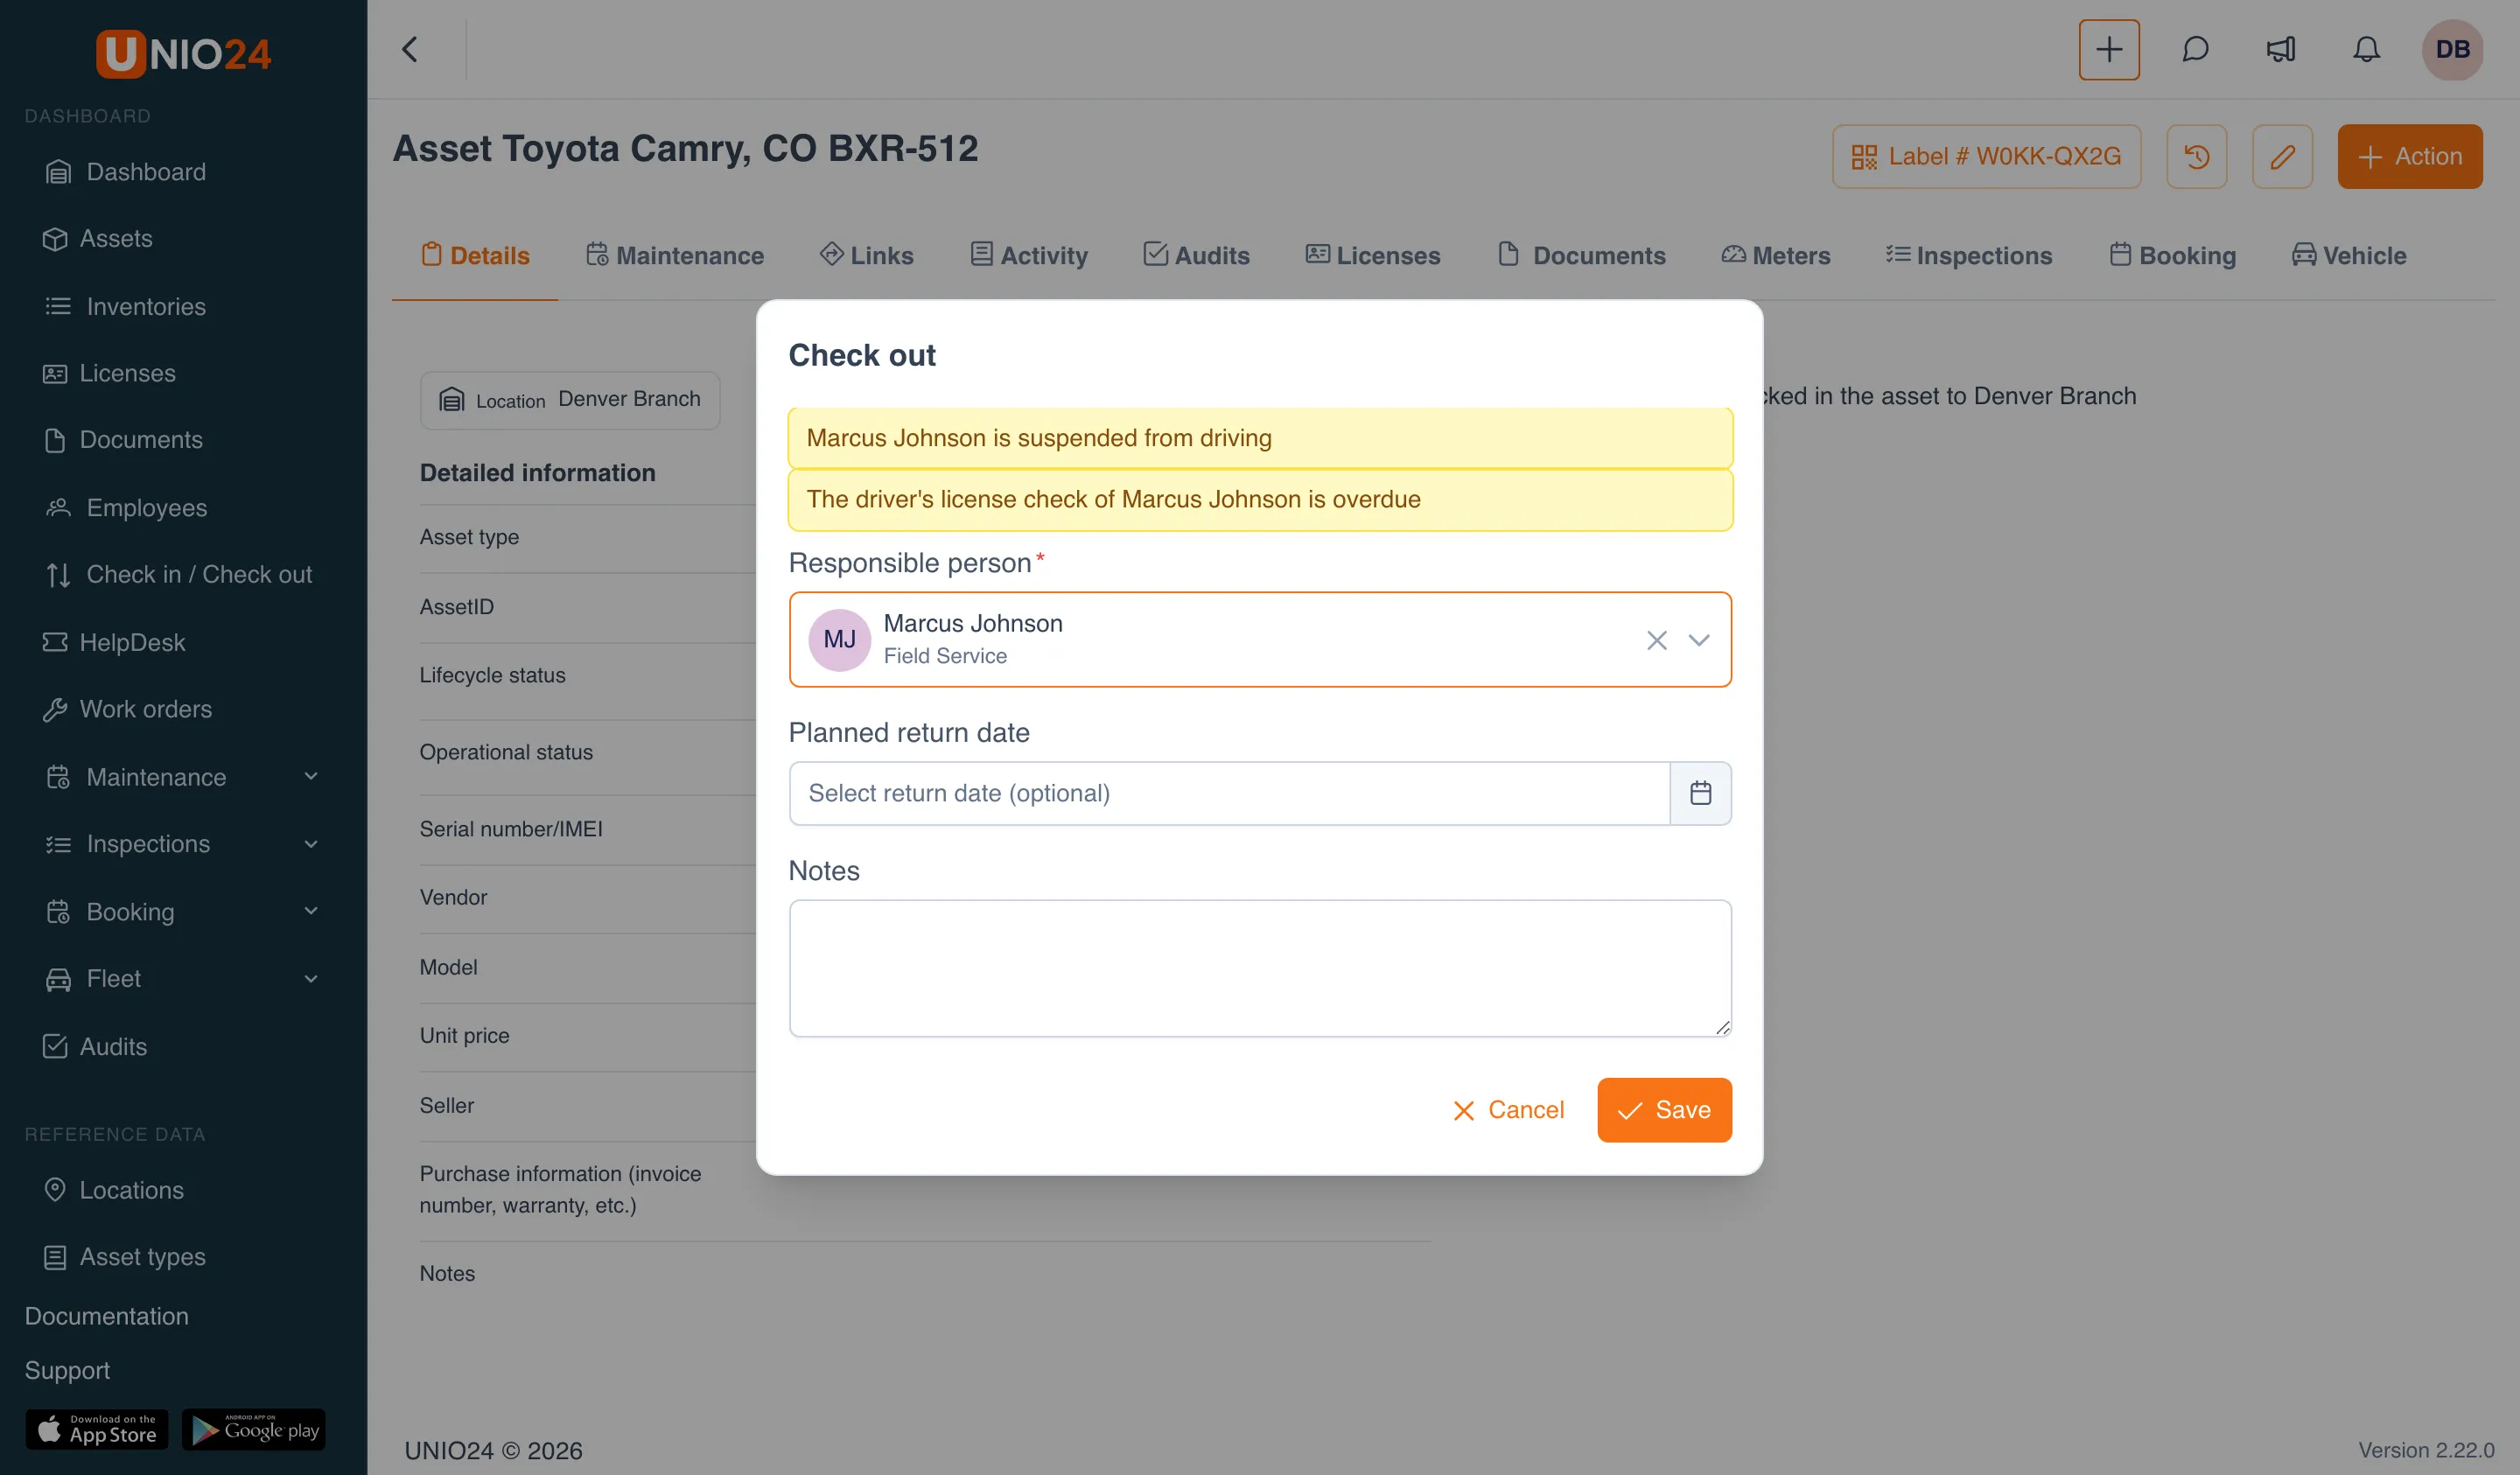
What happens next depends on the Handing a vehicle to a driver who is not allowed to drive it setting:
- Warn: you can save the checkout, and the fleet managers get a notification that the vehicle was checked out to a driver who isn’t allowed to drive it;
- Block: the form shows the reason in red, and Save is unavailable. Choose another driver or fix the profile first: add a category, renew the license, record a check.
An overdue license check only warns, even in Block mode. A checkout to a location or a group doesn’t run the driver check. All the reasons a driver isn’t allowed are listed in the Fleet reference.
What a driver sees
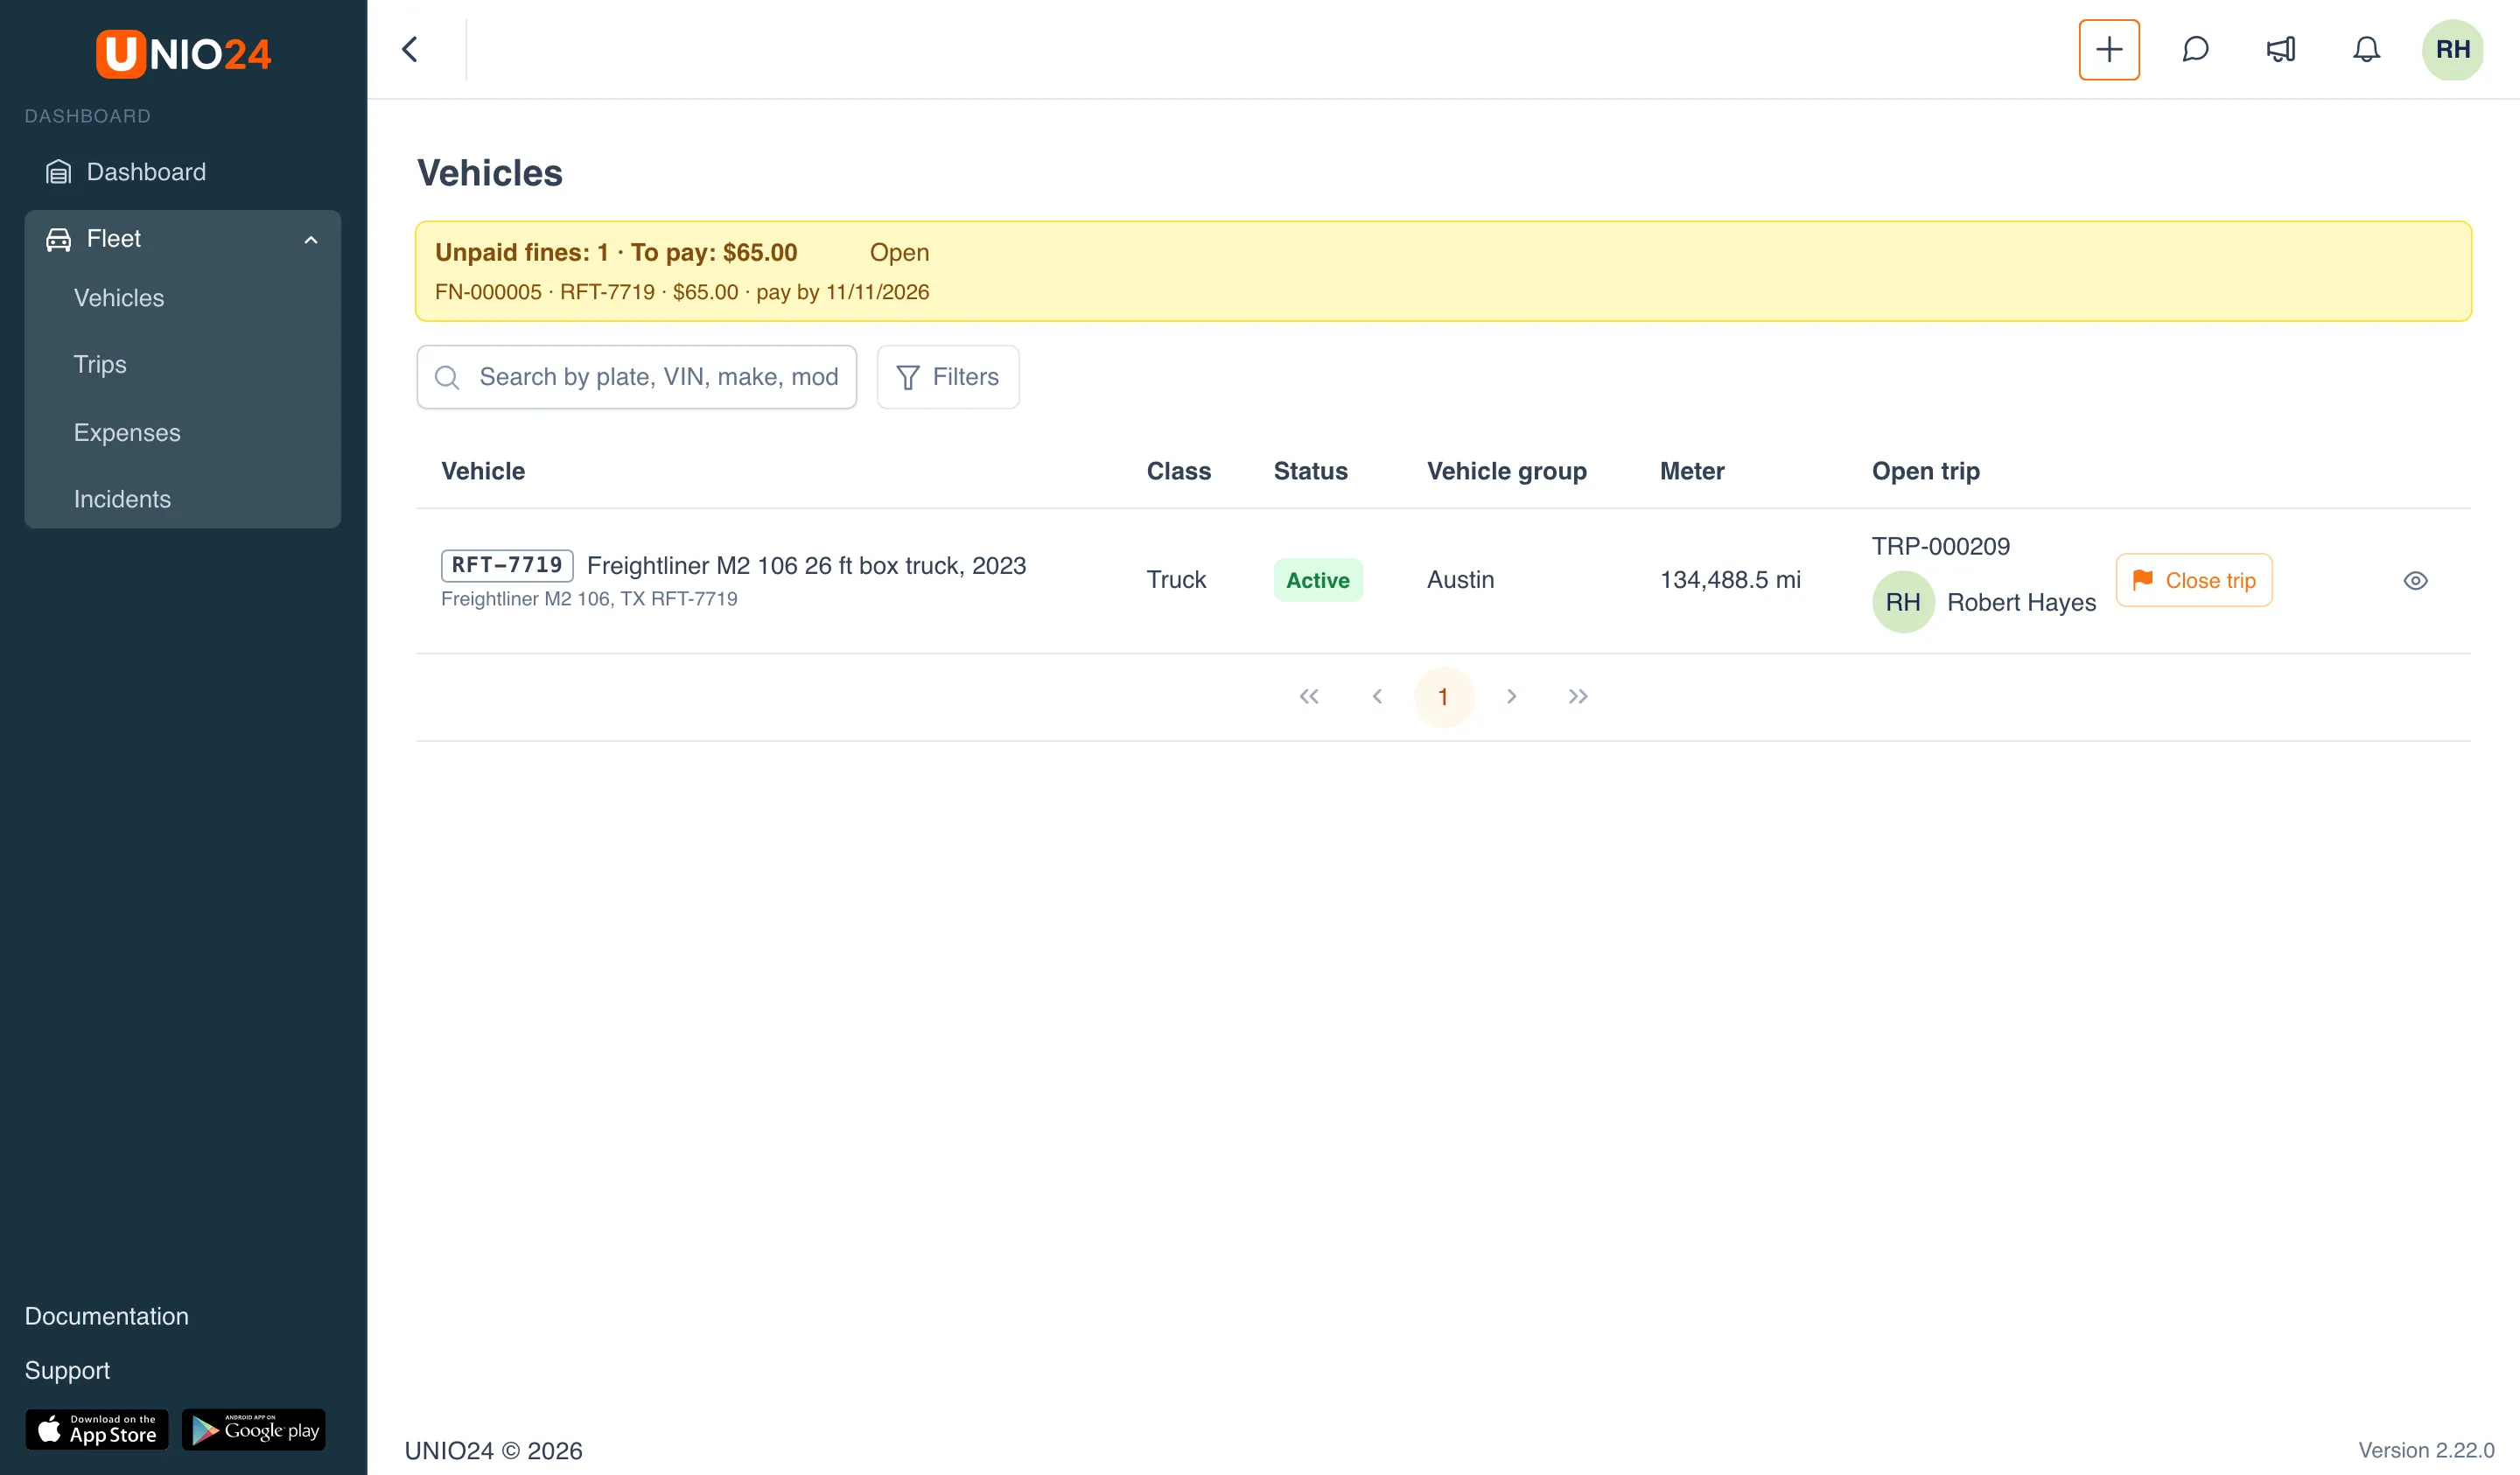
Section titled “What a driver sees”An employee whose only fleet permissions are the driver ones, Log fuel and trips and Report incidents, sees only the items they need in the Fleet menu. The Vehicles page shows only their own vehicles: those checked out to them, taken on their booking, and those with their open trip. Above the list is a reminder about unpaid fines where they are the driver, with the amount to pay and an Open link. A driver sees their own incidents and fines without any separate view permission.
A driver doesn’t need the View fines permission: it opens the fines of all drivers and adds the Deadlines item to the menu.
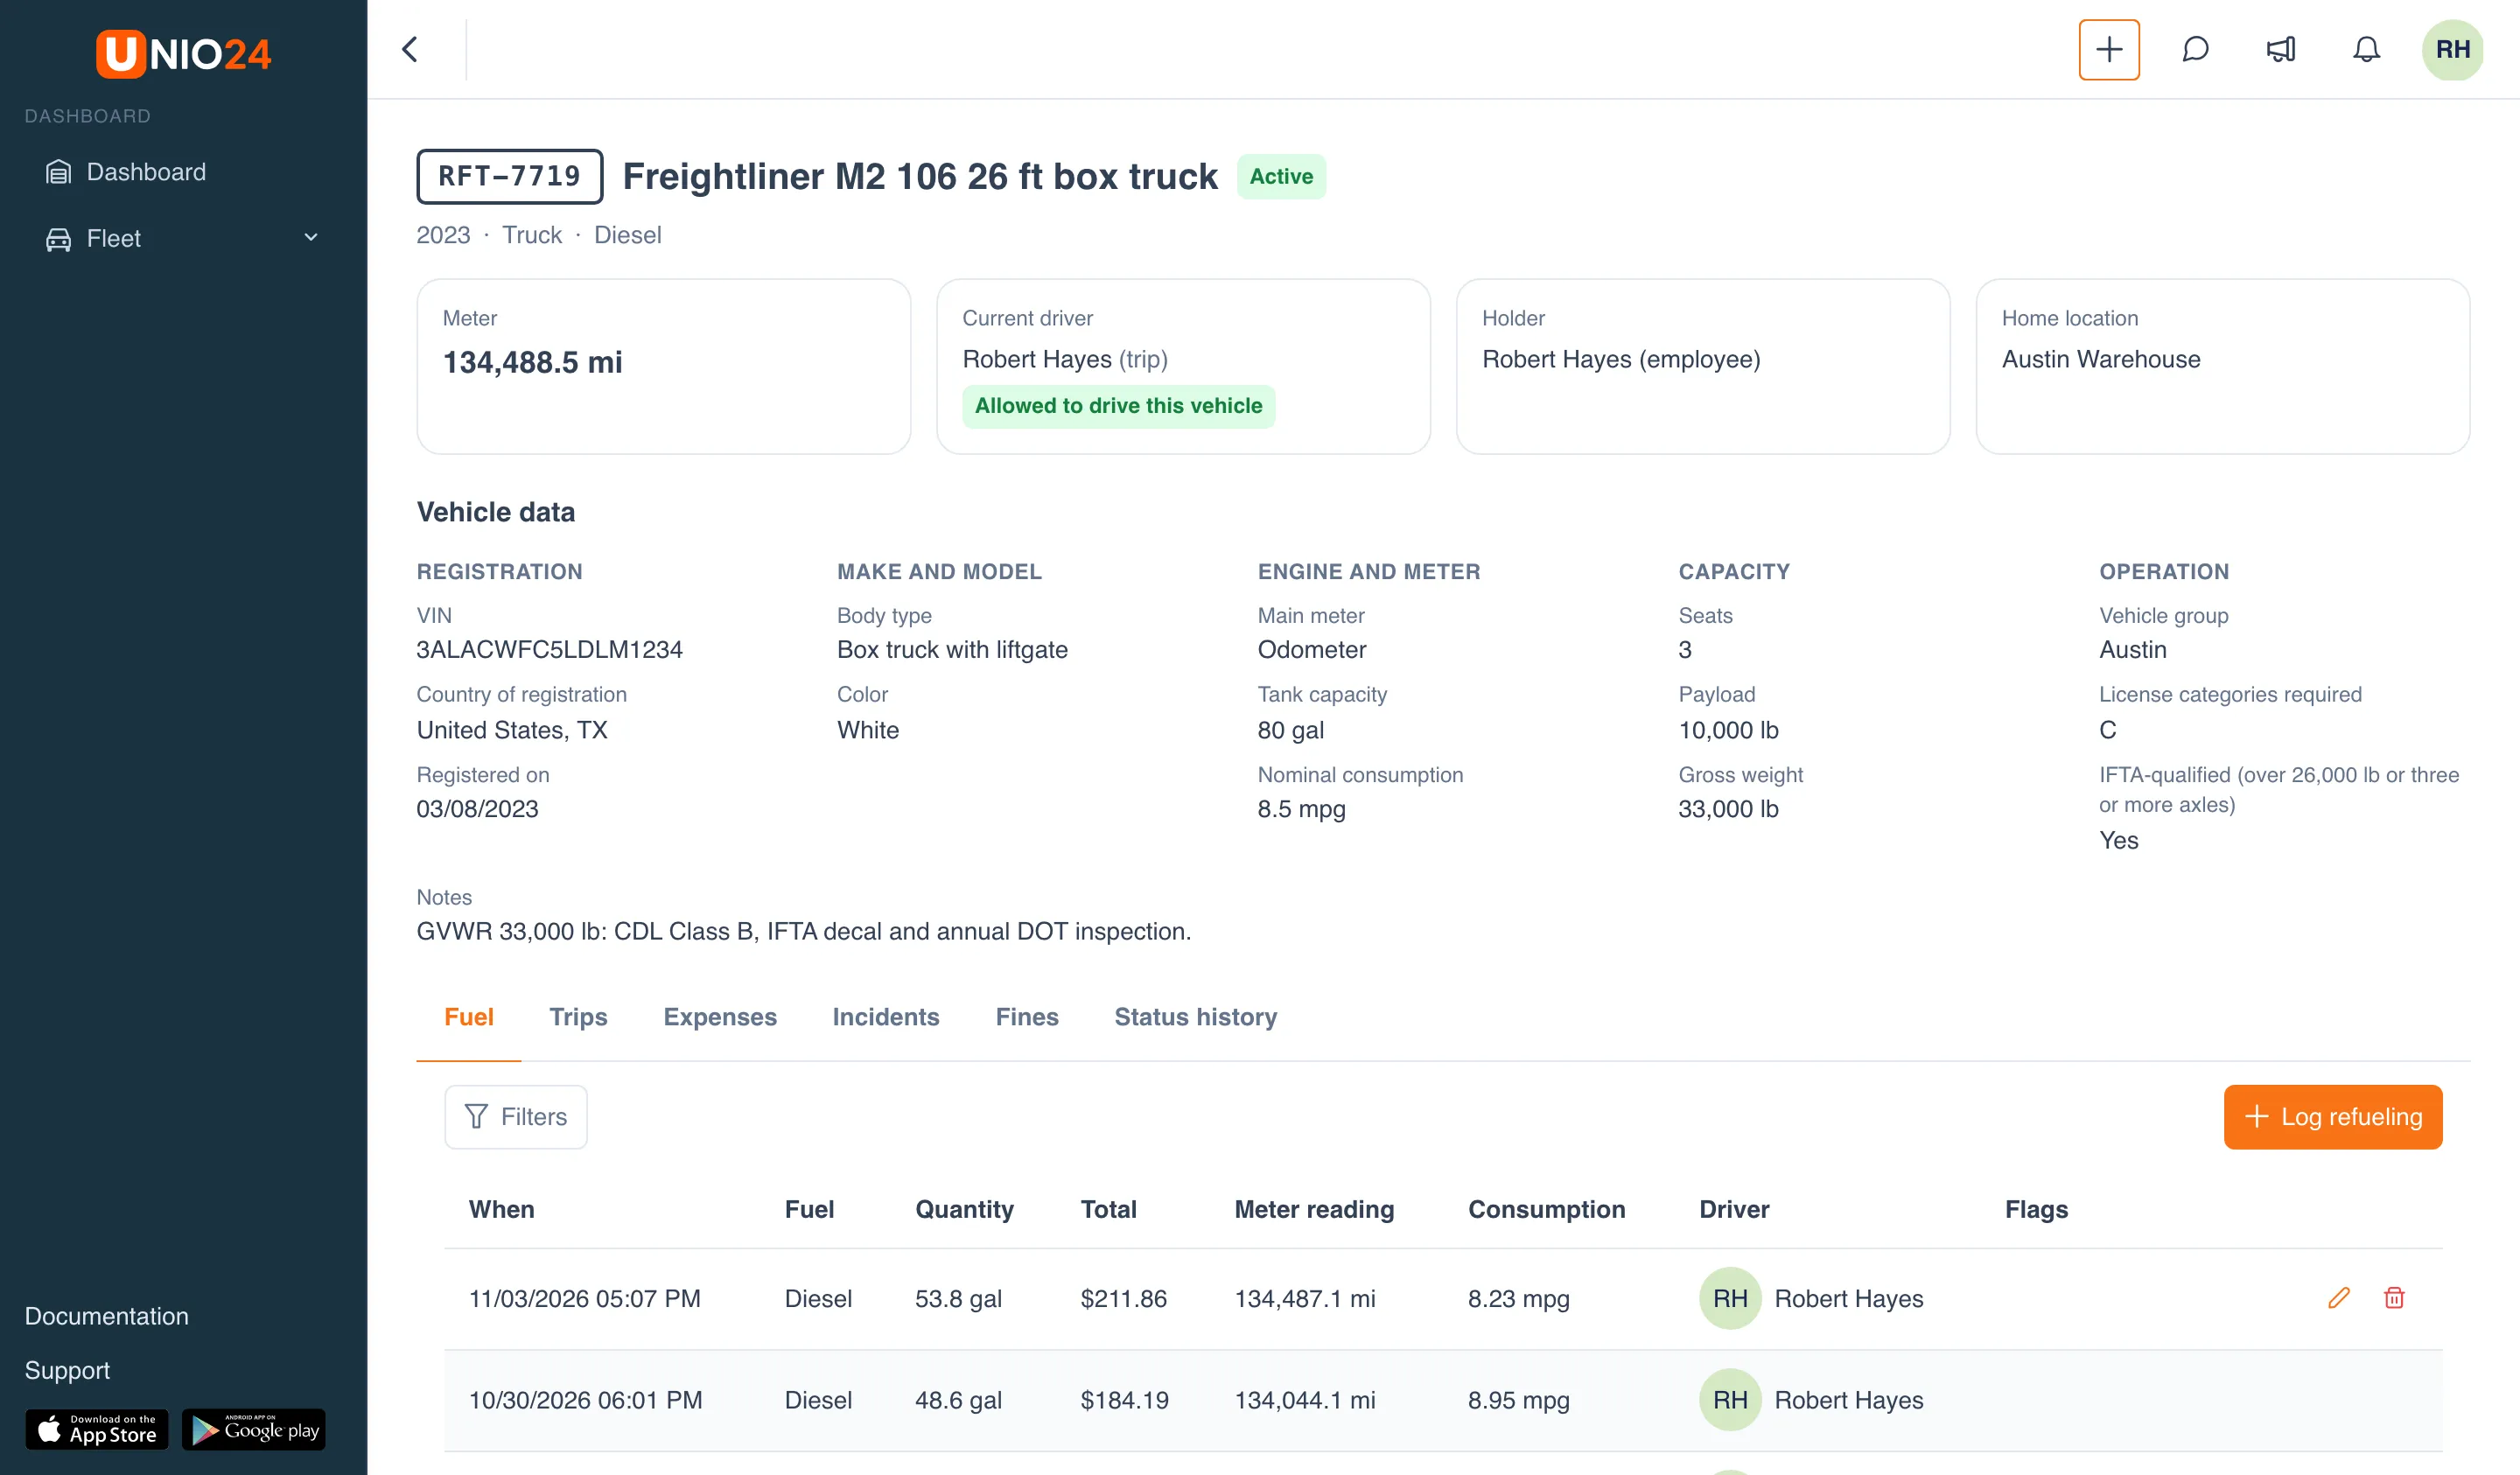
On the card of their own vehicle, a driver sees the vehicle data, whether they’re allowed to drive it, and the logs. They can Log refueling, start and close a trip, add an expense, and report an incident. They can edit their own entry within 24 hours. They don’t have the Edit, Take out of use, Correct odometer, and Waybill buttons or the Costs tab.
Useful links
Section titled “Useful links”- Fleet — how statuses, the driver check, and the module menu work
- Fuel, trips and expenses — fuel entries, trips, the waybill, expenses, and fuel cards
- Incidents and fines — accidents, breakdowns, and fines
- Configure fleet — vehicle types, vehicle groups, the driver check mode, and permissions
- Fleet reference — fields, statuses, the reasons a driver isn’t allowed, and notifications
- Asset transactions — checking assets out and in