

Incidents and fines
This page explains how to track incidents with vehicles (accidents, breakdowns, theft, vandalism, and damage) and fines for traffic and parking violations.
Incidents
Section titled “Incidents”An incident keeps what happened, the driver, the other party, witnesses, photos, and the insurance claim. From an incident you can open a work order or send the vehicle for repair. Incidents aren’t deleted: they are closed with a status, so the history stays.
Open Fleet → Incidents. The incidents of one vehicle are also on its card, on the Incidents tab.
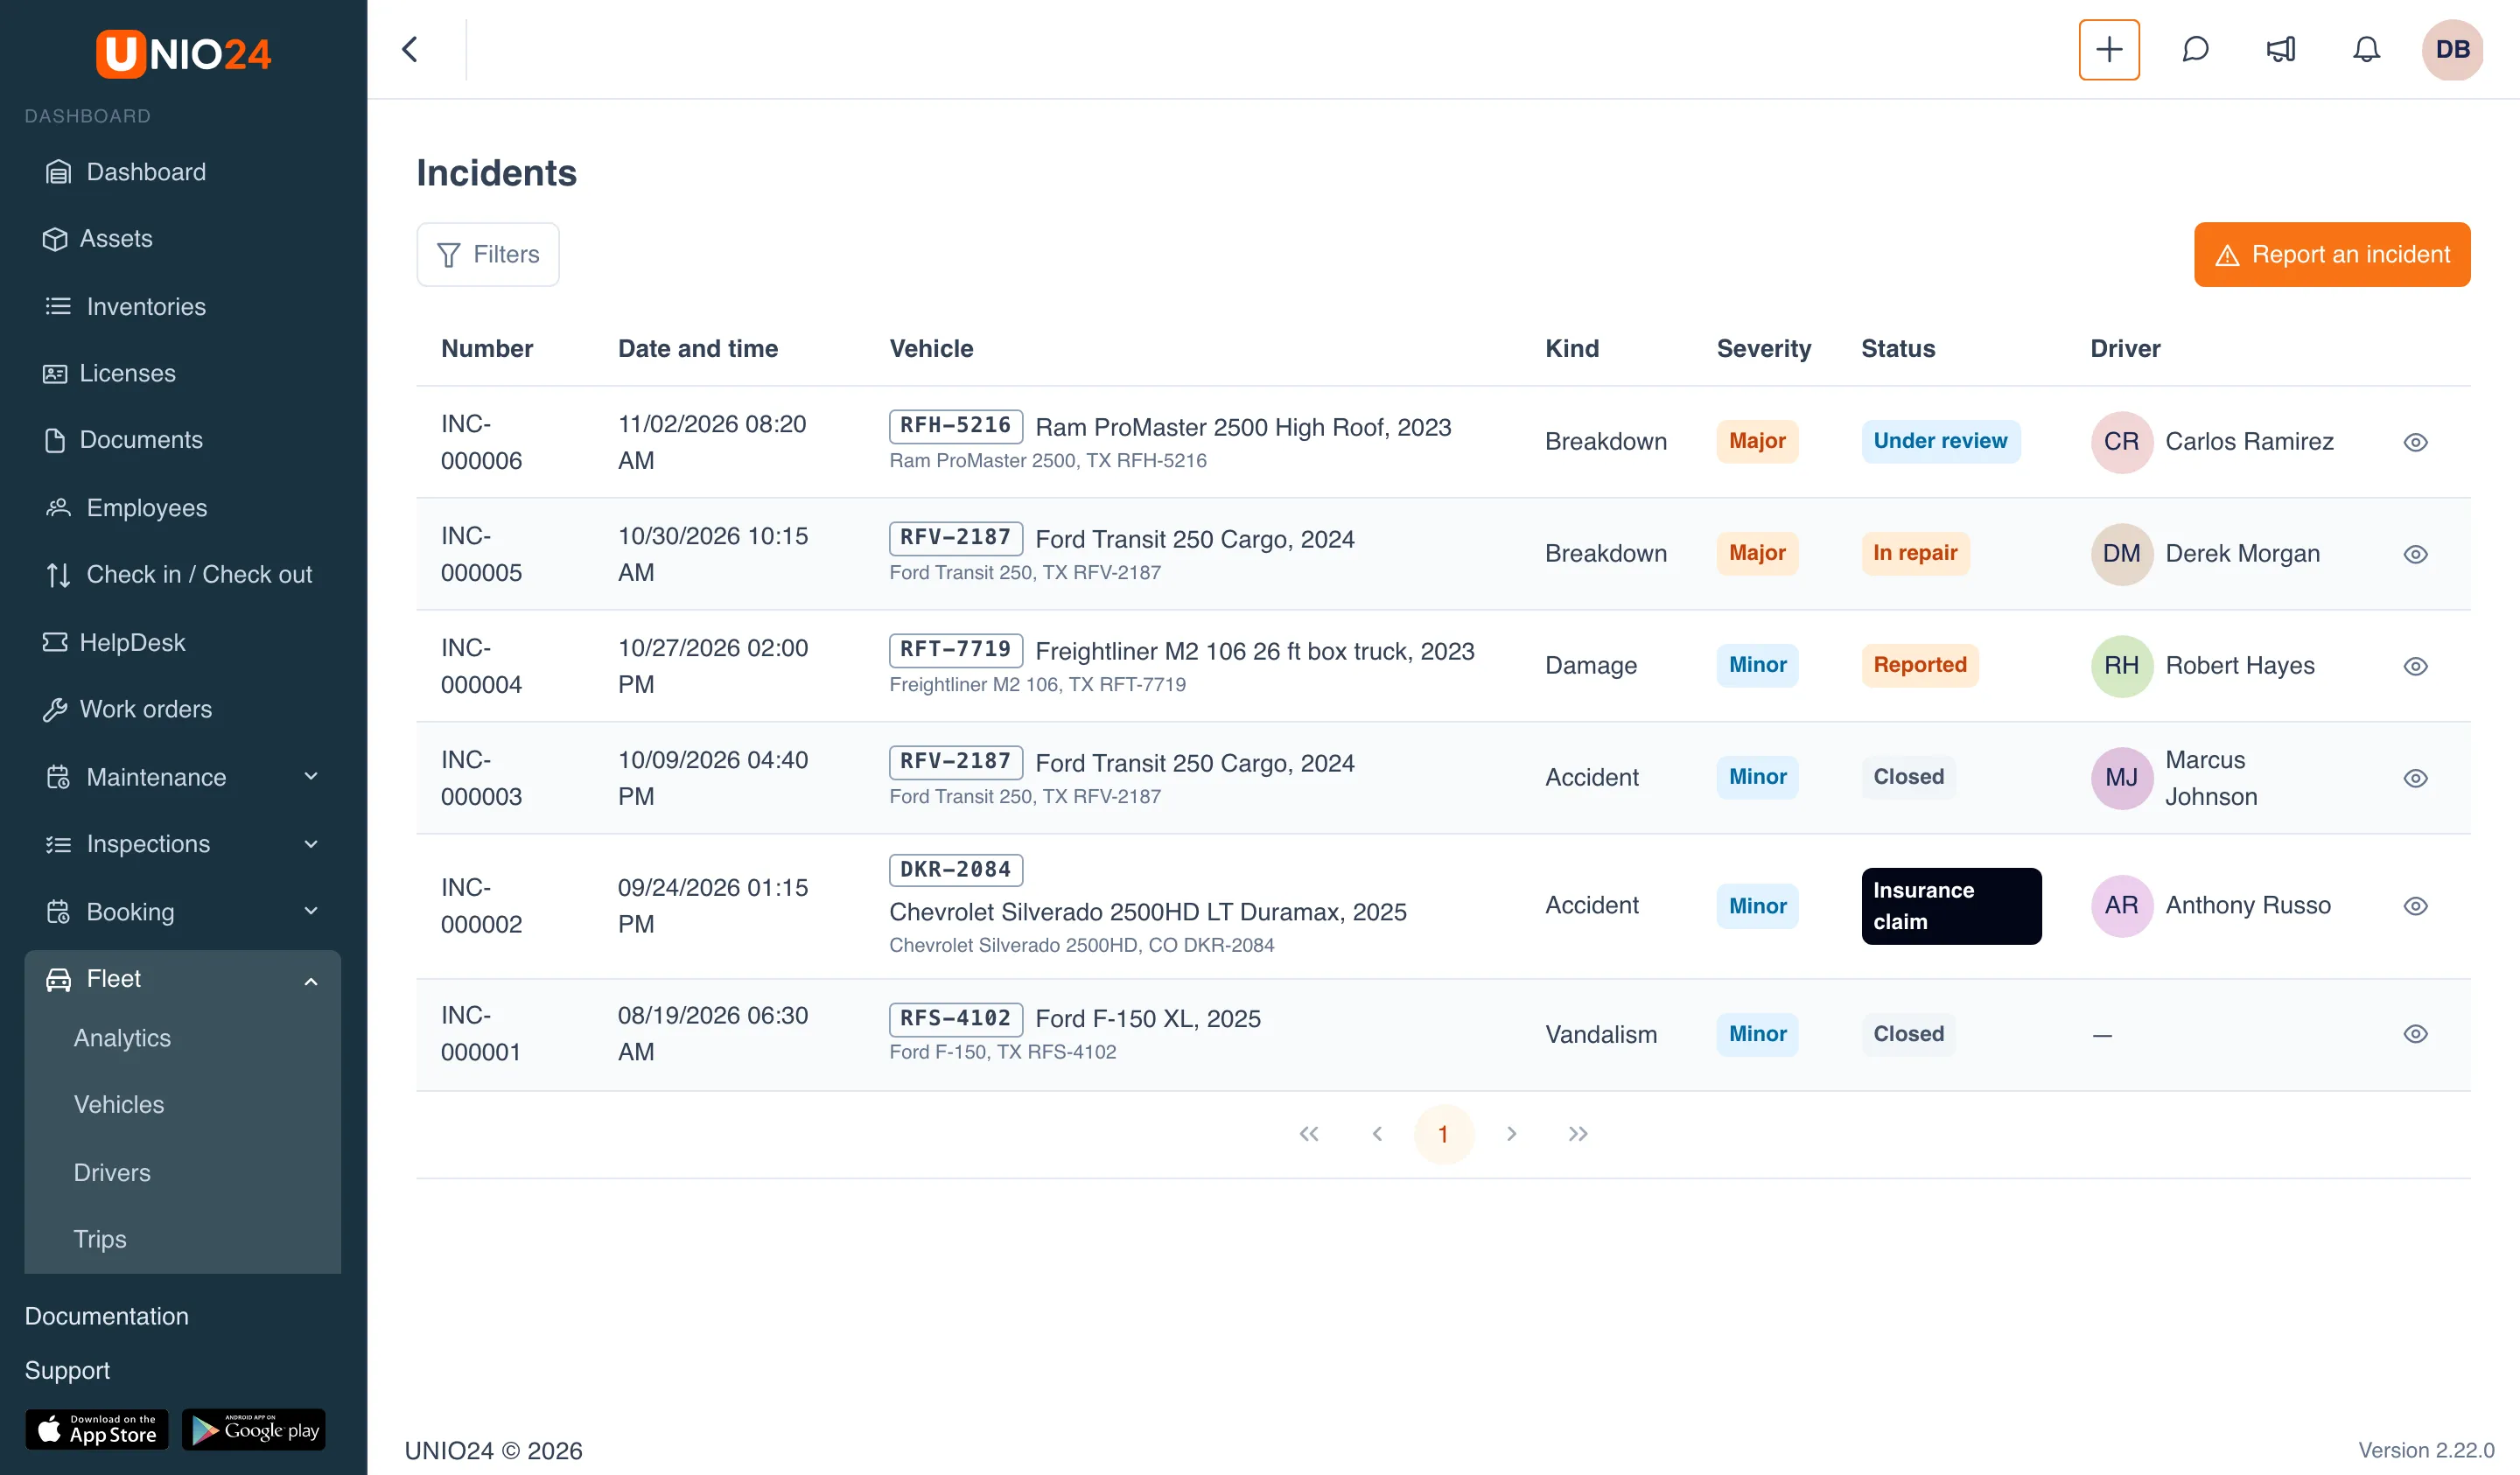
To open an incident, click Open the incident in its row.
Report an incident
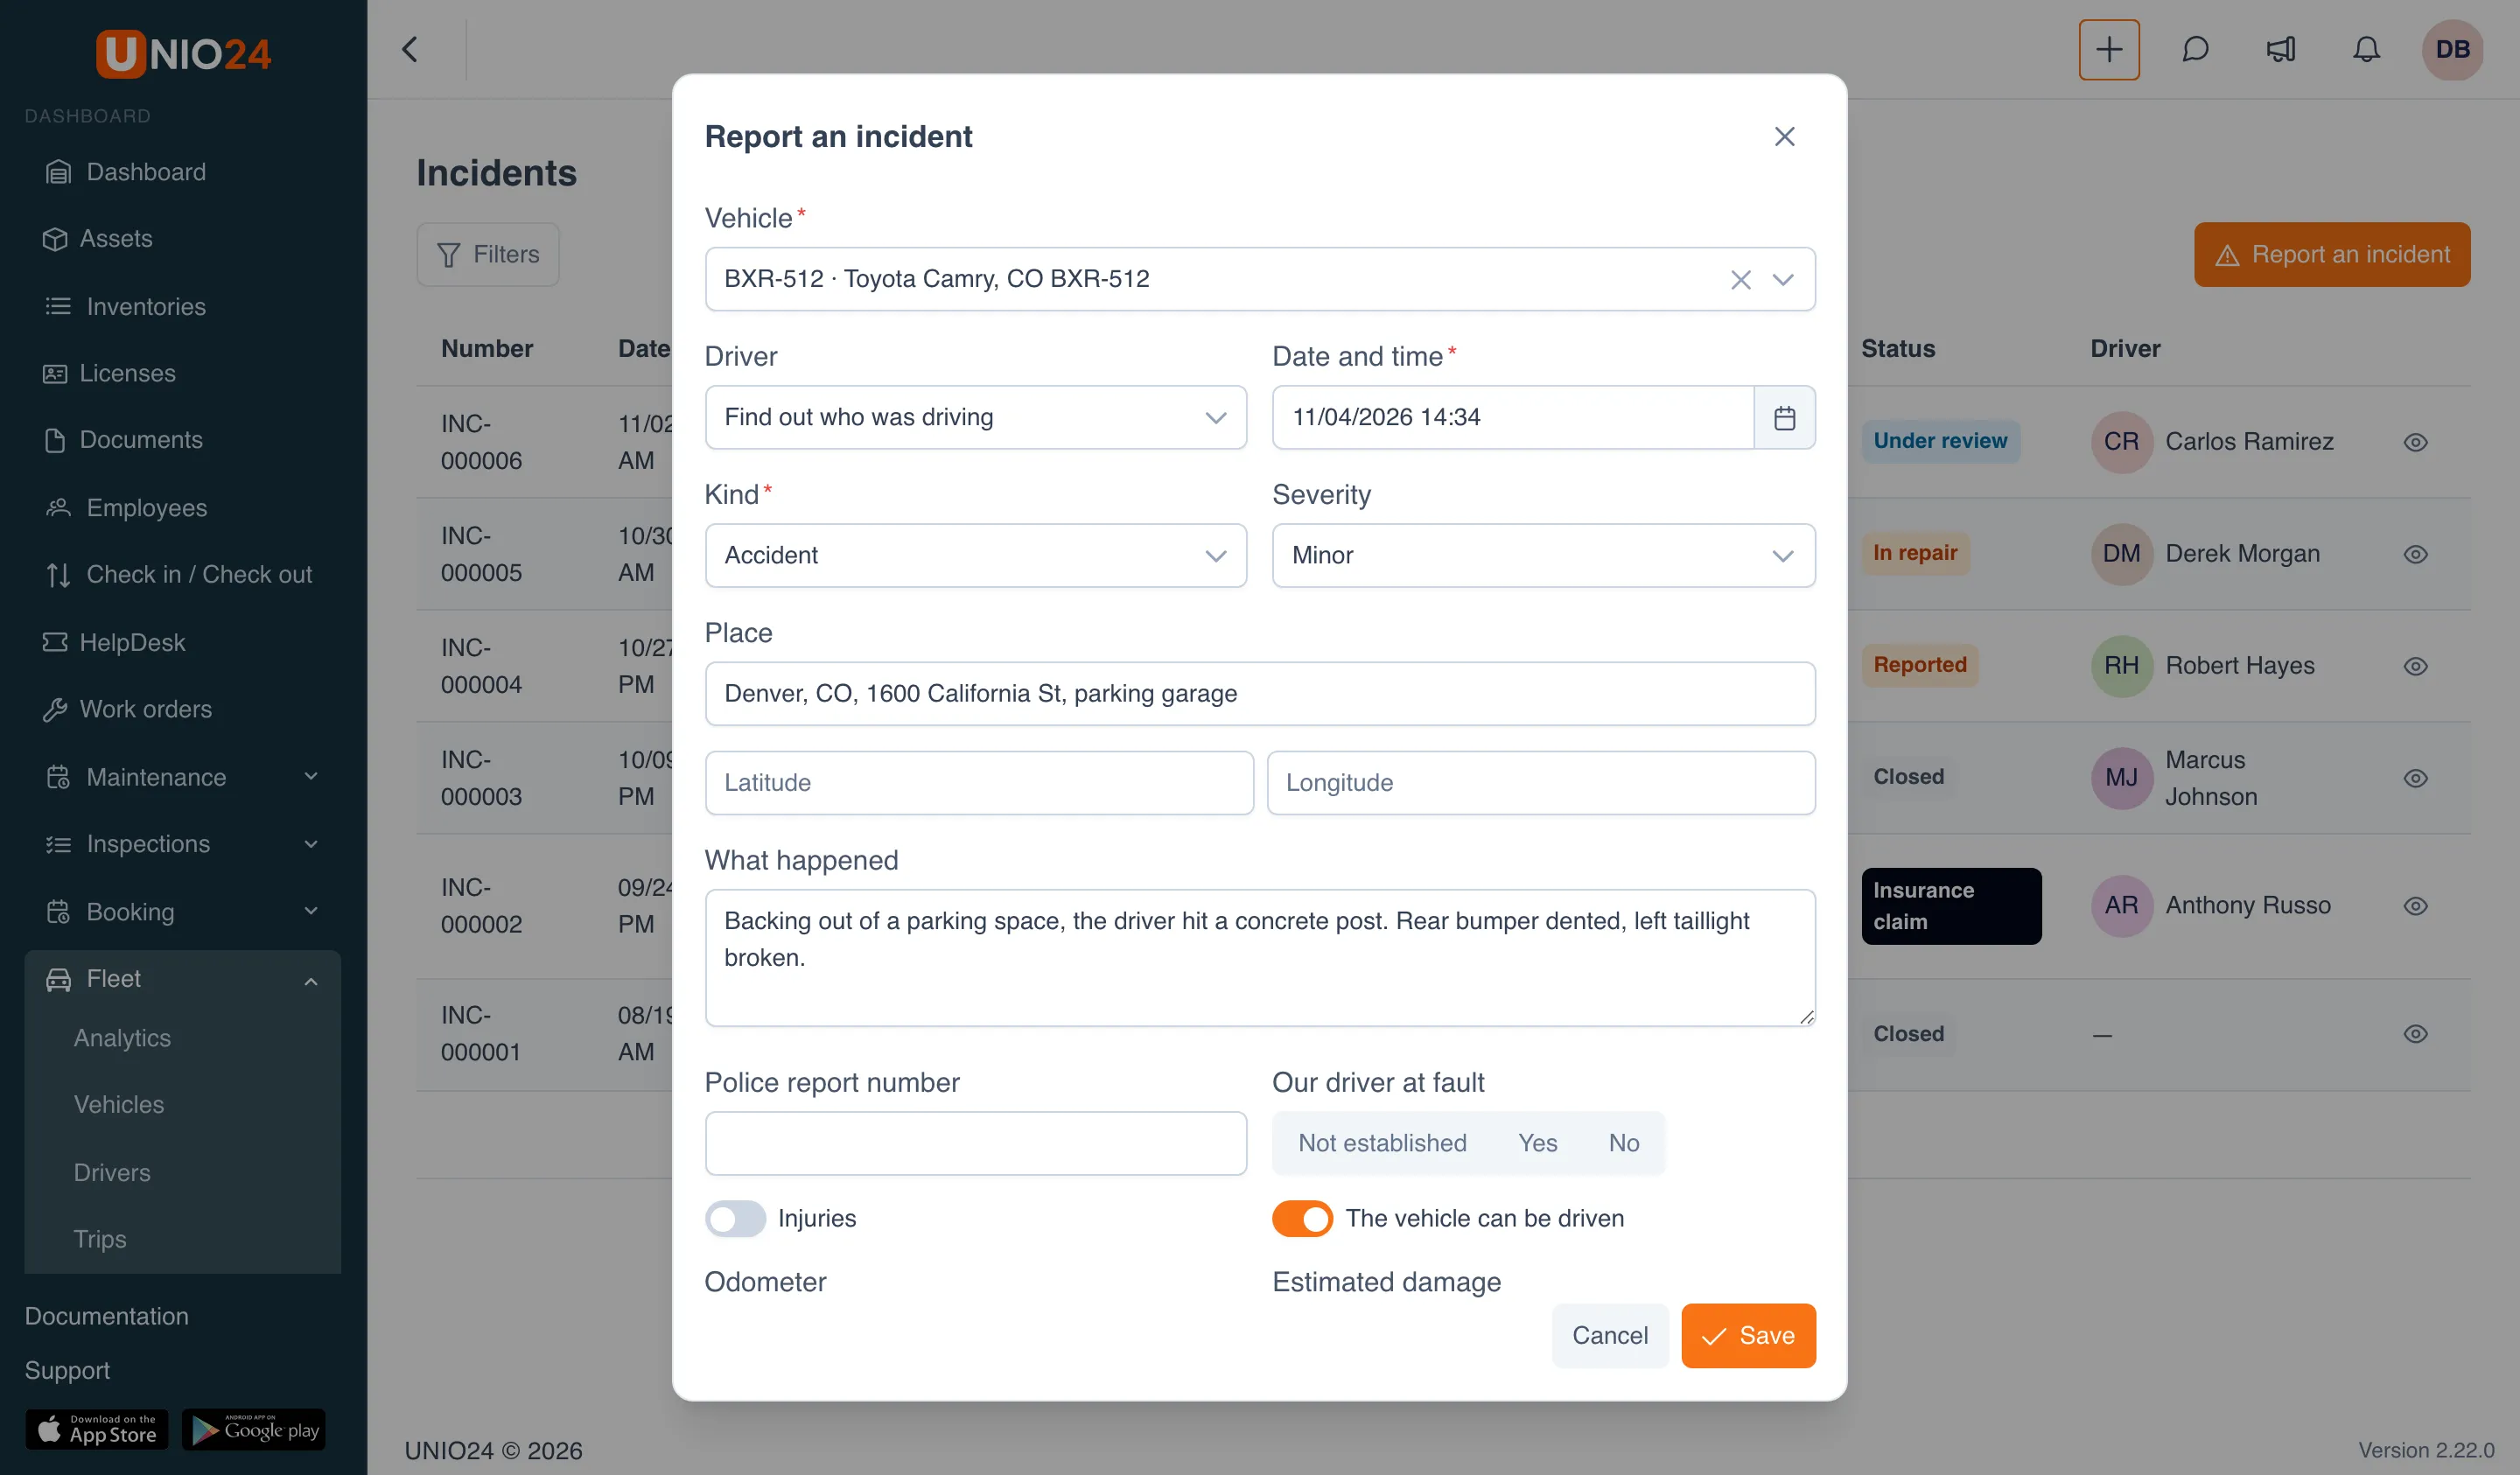
Section titled “Report an incident”- Click Report an incident on the Incidents page or on the Incidents tab of the vehicle card.
- Choose the Vehicle.
- In the Driver field, choose one of these:
- Find out who was driving: UNIO24 finds the driver from the trip, booking, or check-out at the time of the incident;
- Nobody was driving: for example, the vehicle was damaged while parked;
- a specific employee.
- Enter the Date and time, the Kind (Accident, Breakdown, Theft, Vandalism, Damage, Other), and the Severity (Minor, Major, Critical).
- Fill in the Place and, if you have them, the Latitude and Longitude.
- Describe What happened.
- Fill in the circumstances: Police report number, Our driver at fault (Not established, Yes, No), the Injuries and The vehicle can be driven switches, Odometer, and Estimated damage.
- If another party was involved, fill in the Other party block: Name, Contact, Vehicle plate, Insurer, Policy number.
- To record witnesses, click Add a witness and enter the Name, Contact, and Statement.
- Click Save.
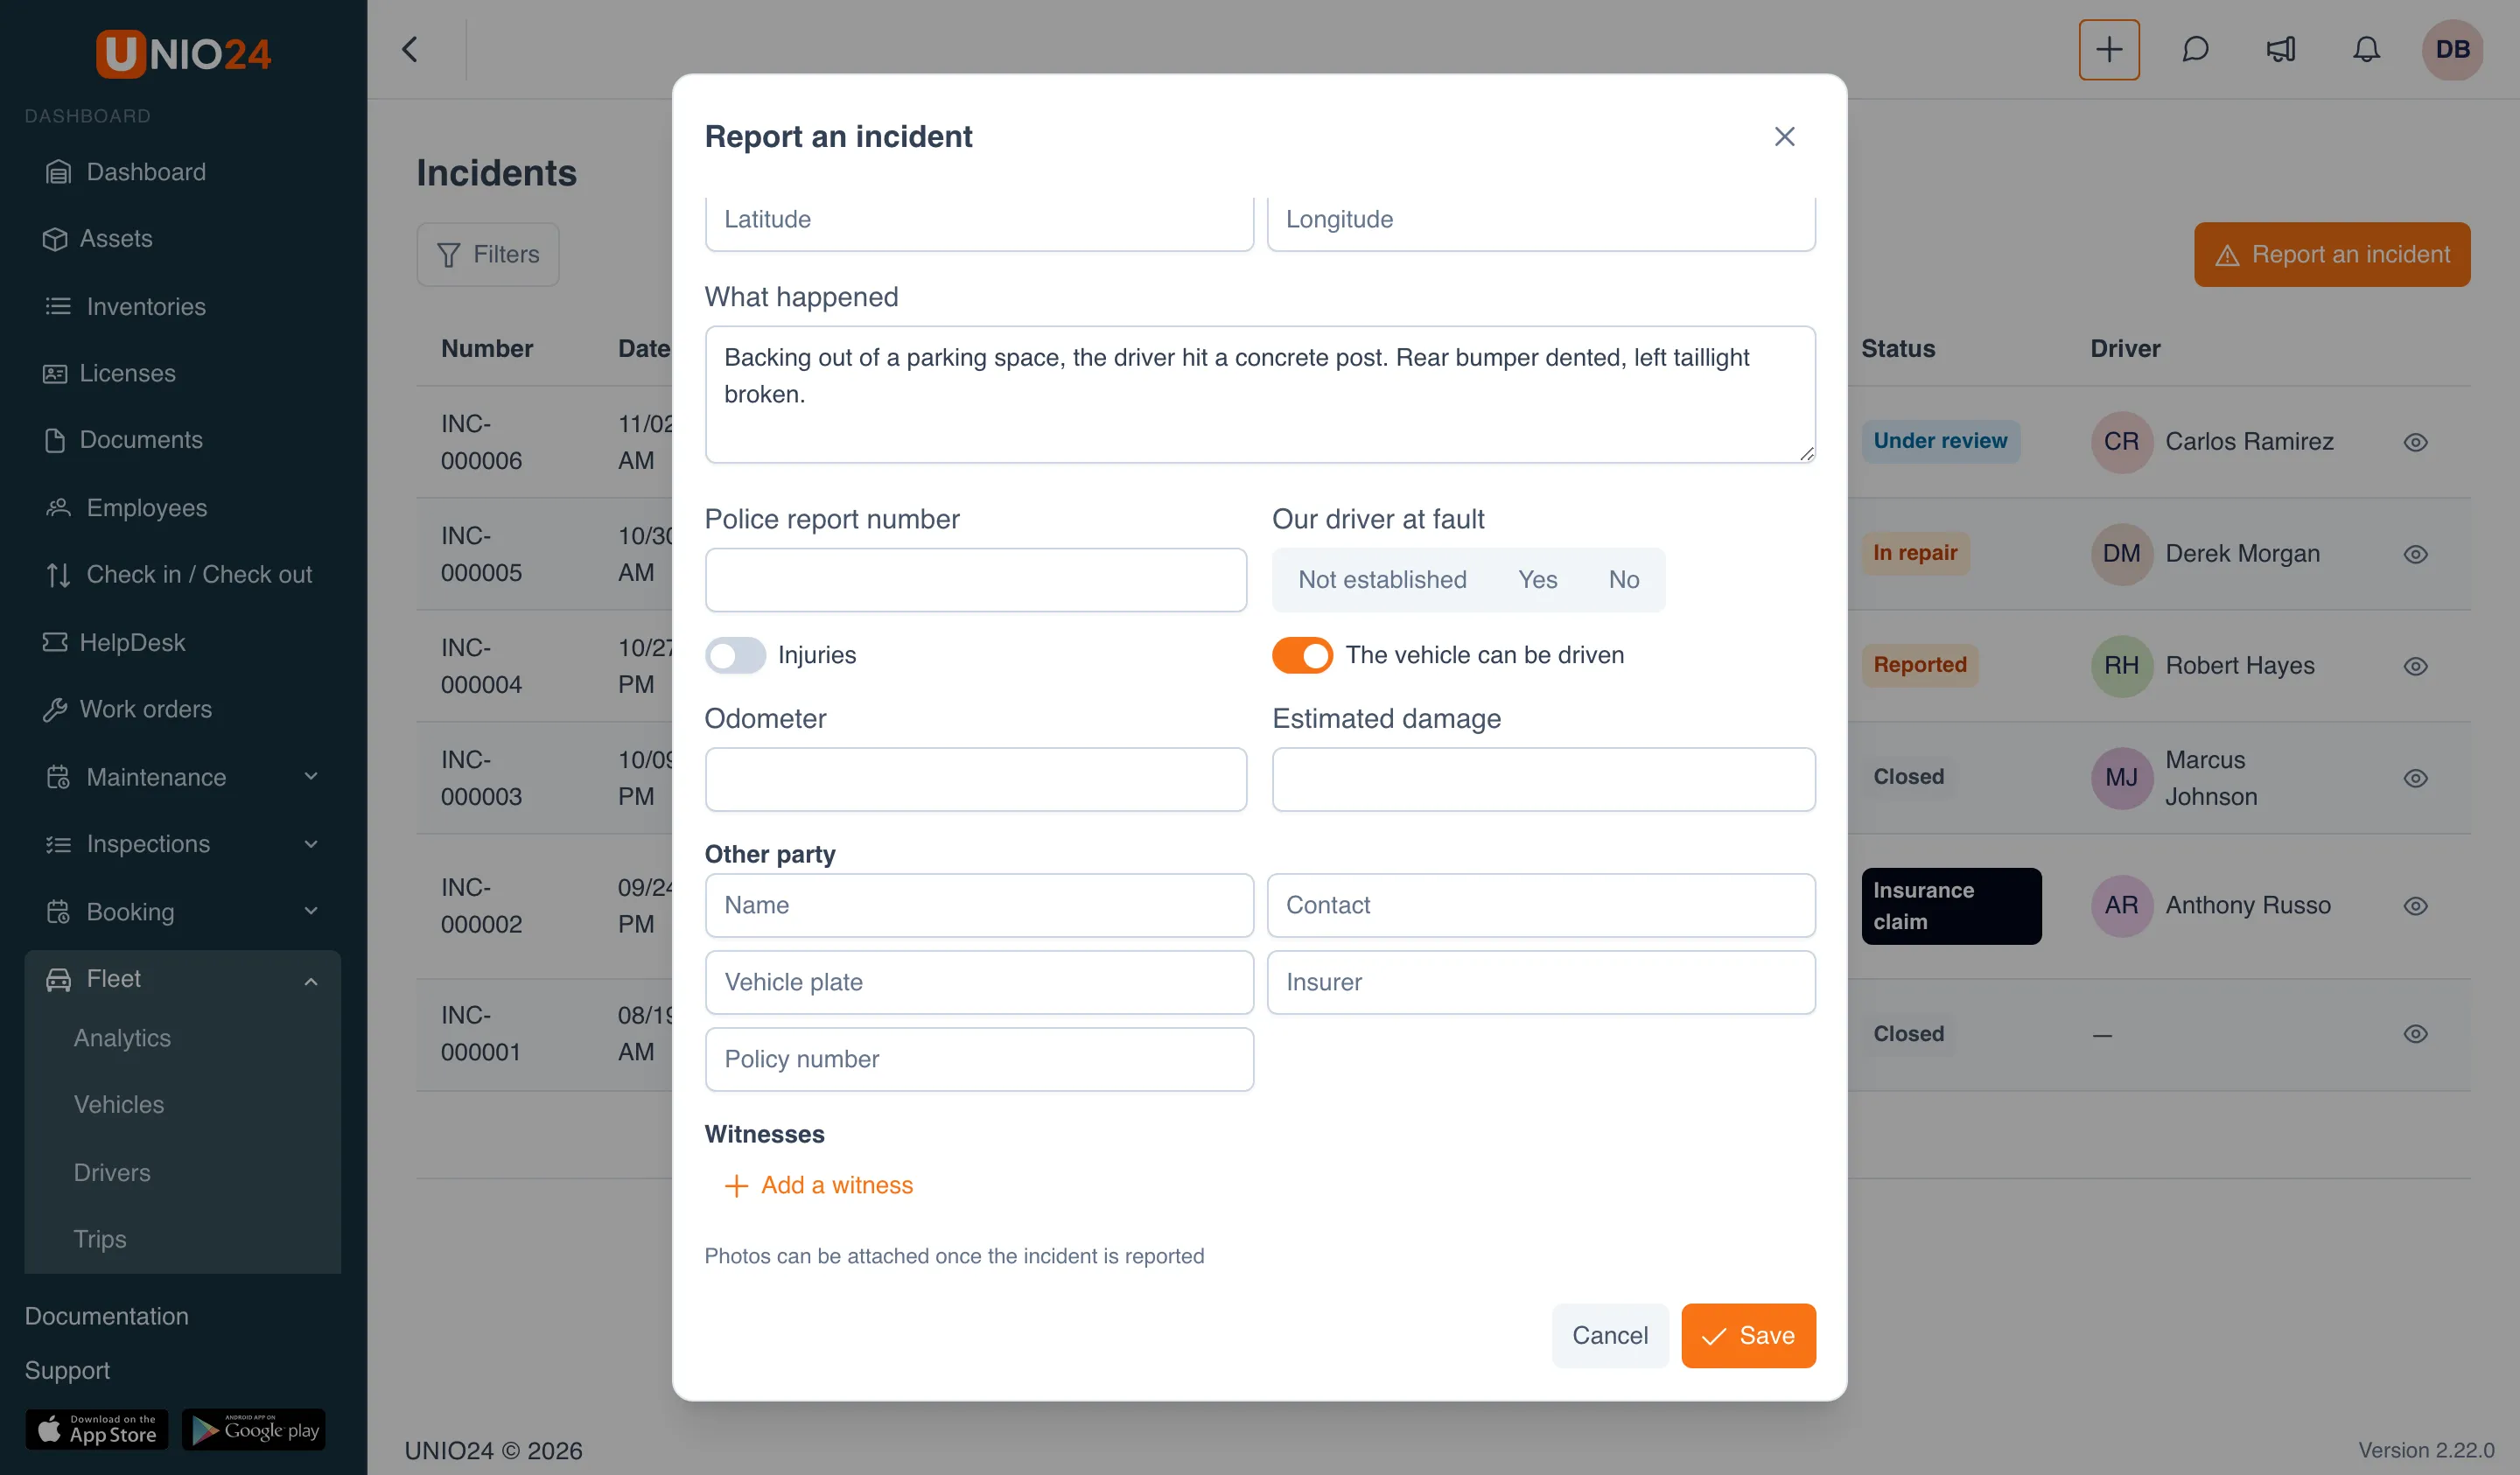
Photos are attached to a saved incident: on its card, on the Photos tab. If the odometer reading is the most recent one, it also goes into the vehicle’s meter.
Fleet managers get a notification about a new incident. A driver can report an incident only with their own vehicle and sees only the incidents they reported or where they were the driver.
When a vehicle goes out of service
Section titled “When a vehicle goes out of service”While an incident is open and the vehicle can’t be driven (the The vehicle can be driven switch is off), or its severity is Critical, the vehicle gets the Out of service status. When the incident is closed, the status returns on its own; if the incident is reopened, the vehicle goes out of service again. You can also end this reason by hand on the vehicle card; see Vehicles and drivers.
The incident card
Section titled “The incident card”At the top of the card are the number, status, and severity, and under them the kind, time, and place. Below are the Vehicle, Driver, Estimated damage (with the actual cost), and Claim status tiles, the What happened description, and the Circumstances, Other party, Witnesses, and Work and repair sections. At the bottom are the Journal and Photos tabs.
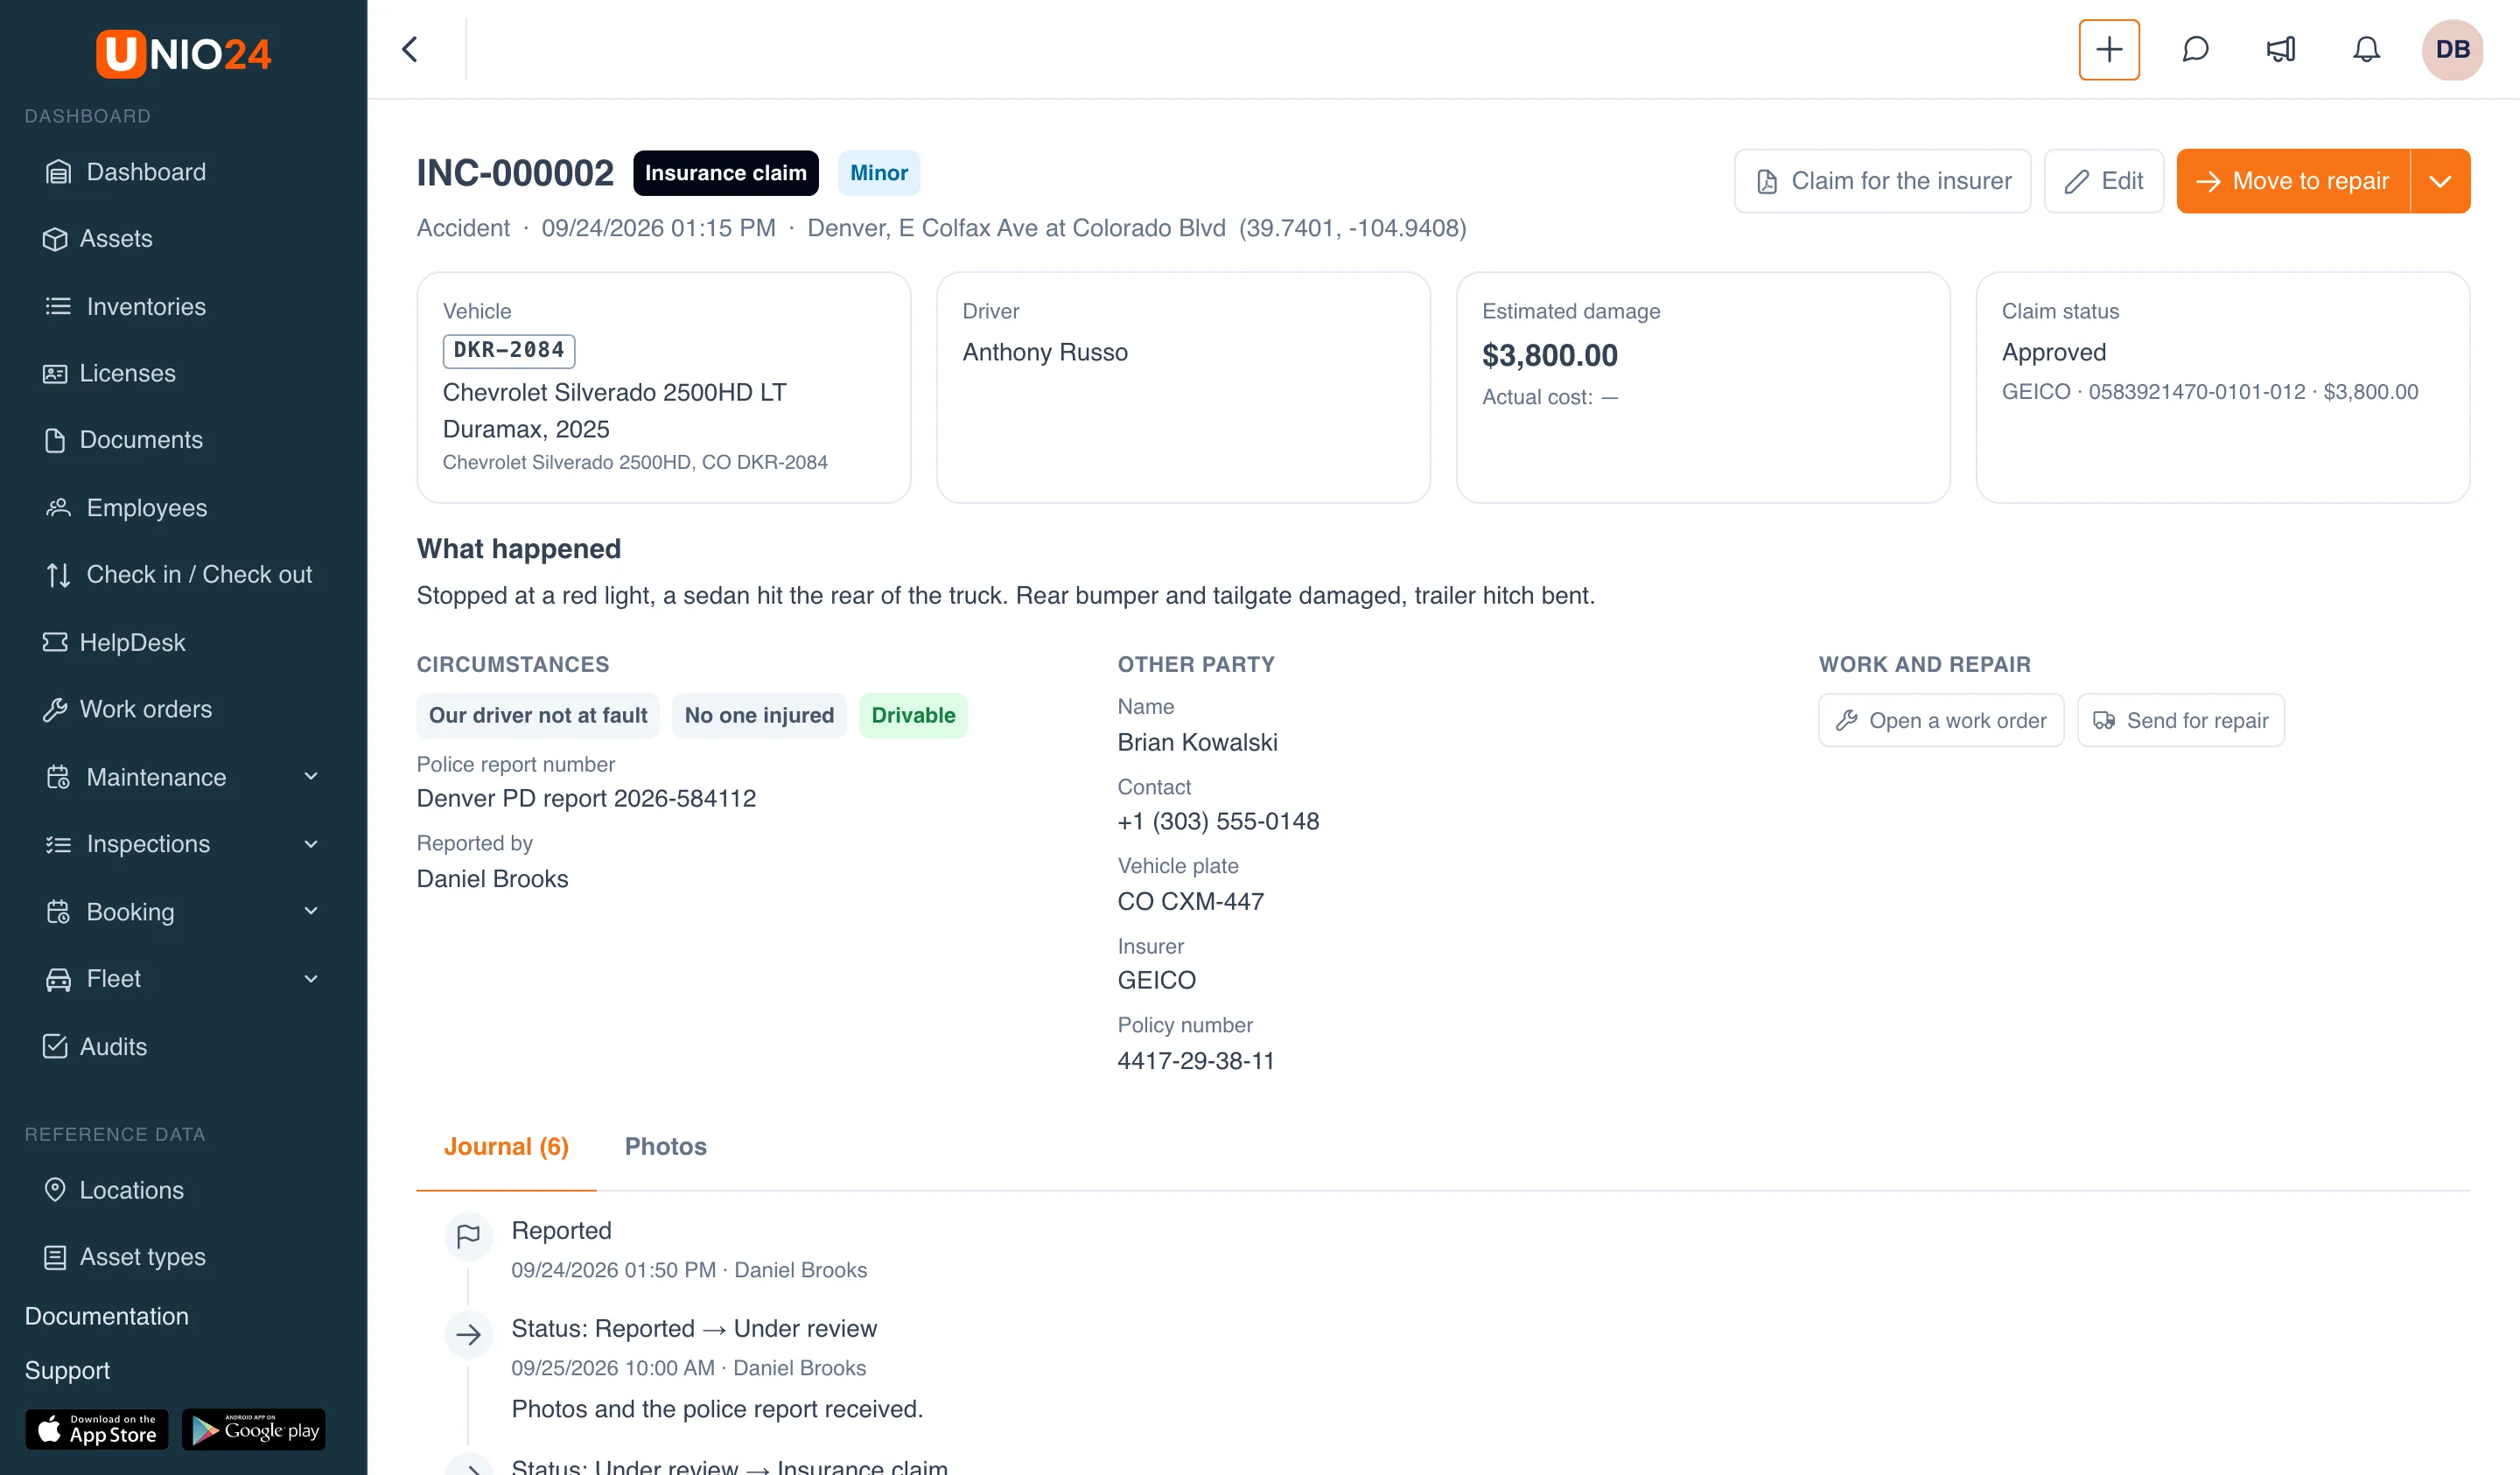
Move an incident through its statuses
Section titled “Move an incident through its statuses”An incident goes through the statuses Reported → Under review → Insurance claim → In repair → Closed. Steps can be skipped: an incident can be closed from any status, and from repair it can go back to an insurance claim.
- On the incident card, click the main button at the top right. It is named after the step it suggests: Take under review, File an insurance claim, Move to repair, Close, or, for a closed incident, Reopen.
- The other available transitions are in the Change status menu next to the main button.
- In the transition dialog, write a Note if needed: up to 2000 characters, it goes to the journal.
- Click Save.
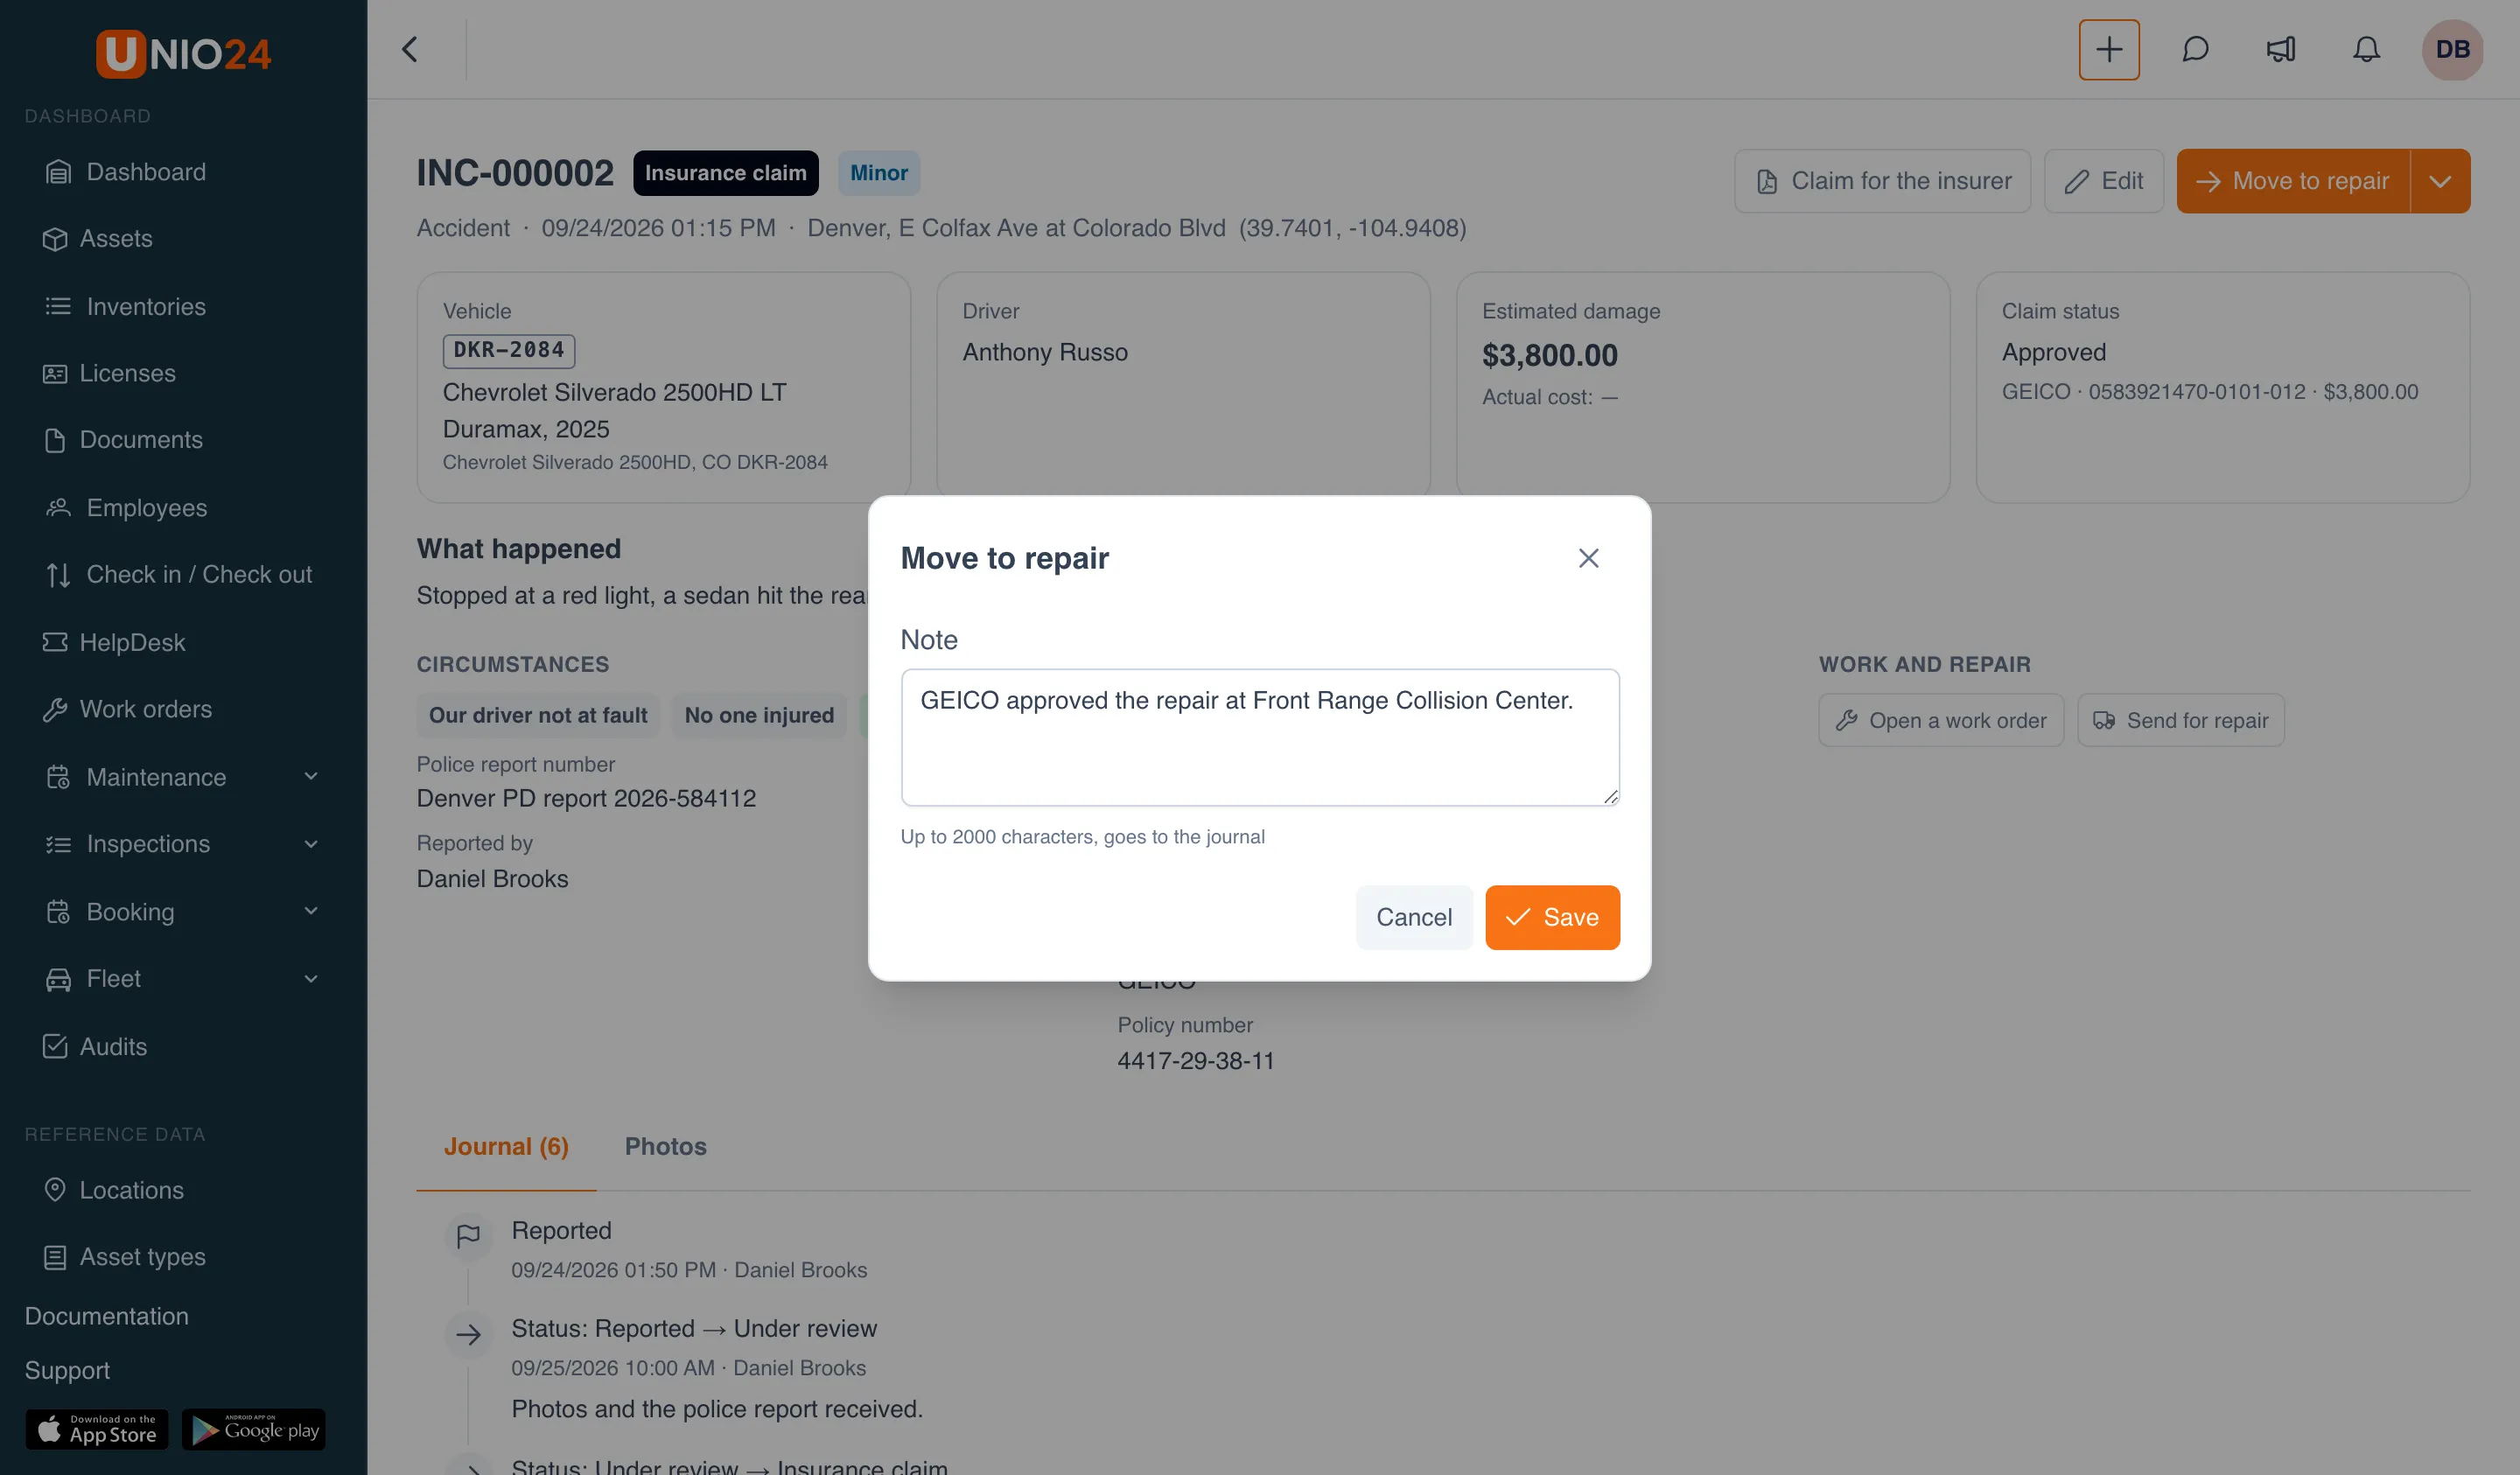
A closed incident is reopened with the Reopen button; it goes back to Under review.
Insurance claim
Section titled “Insurance claim”The insurance claim is filled in from the incident’s edit dialog.
- Move the incident to the Insurance claim status with the File an insurance claim button.
- Click Edit. The Correct the incident dialog opens.
- In the Insurance claim block, fill in the Insurer, Claim number, and Claim amount, and choose the Claim status: No claim, Filed, Approved, Rejected, or Paid. The claim status changes only while the incident has the Insurance claim status.
- When the repair is paid, enter the Actual cost.
- Click Save.
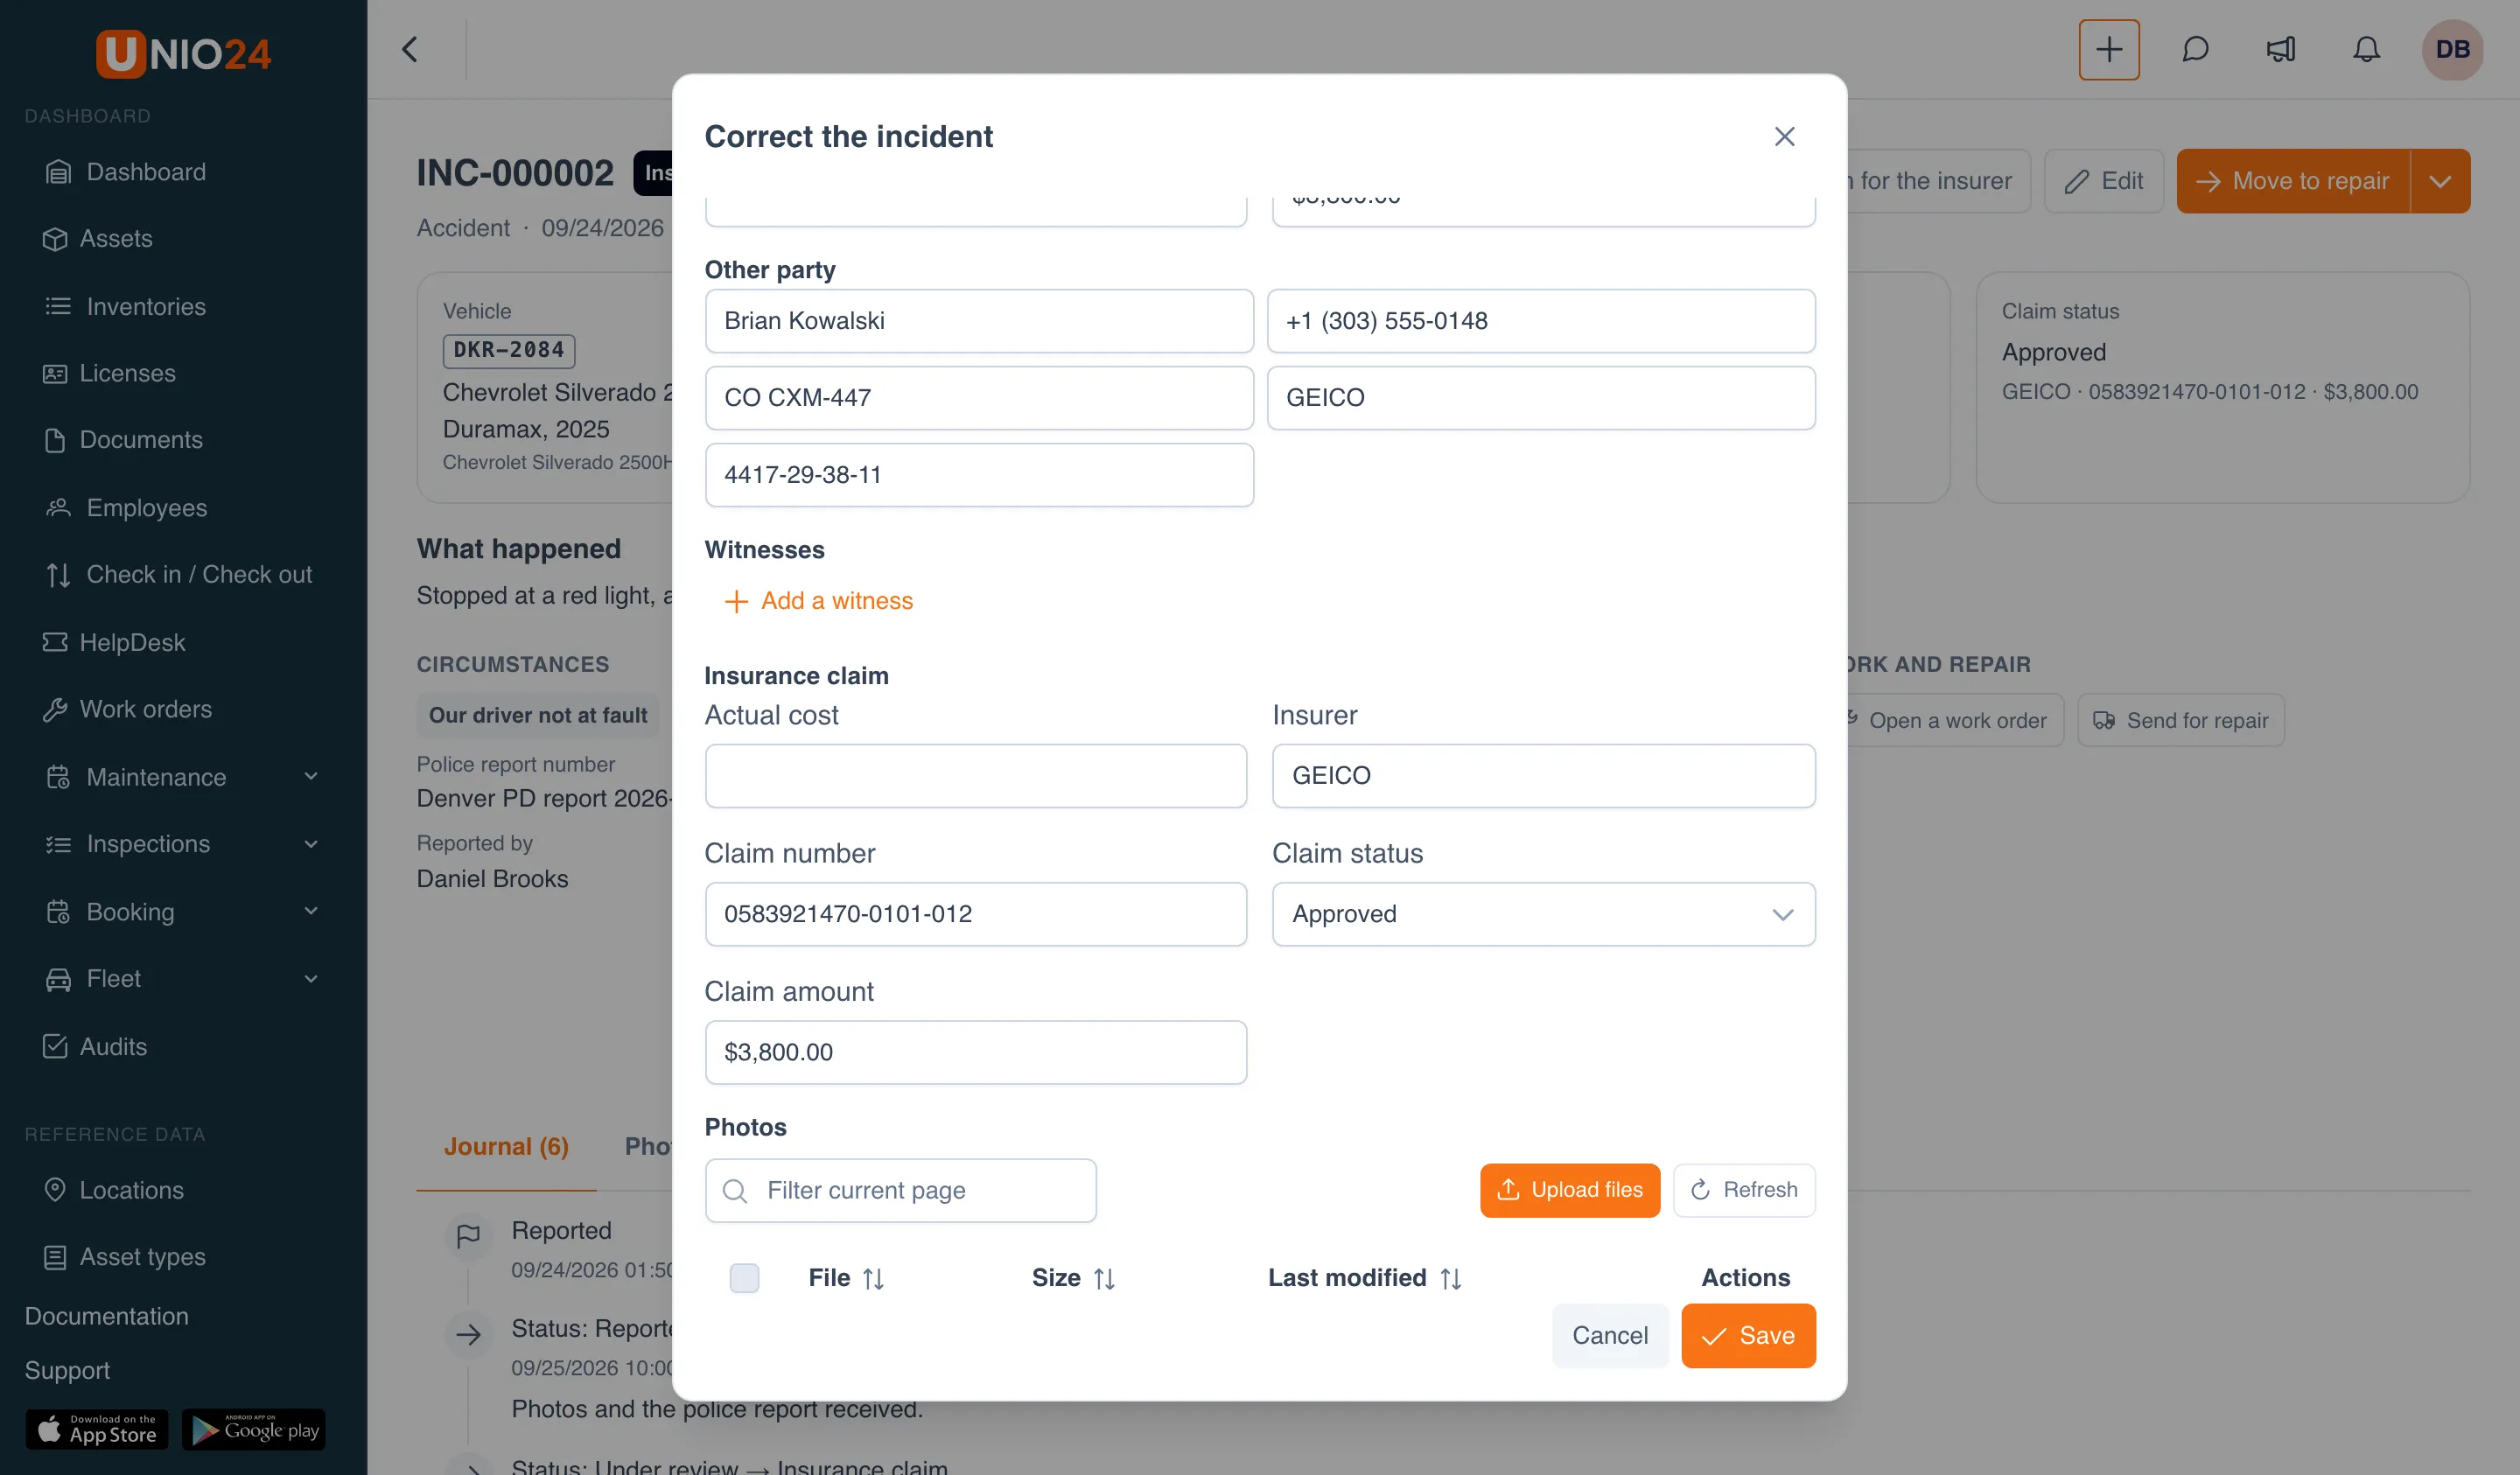
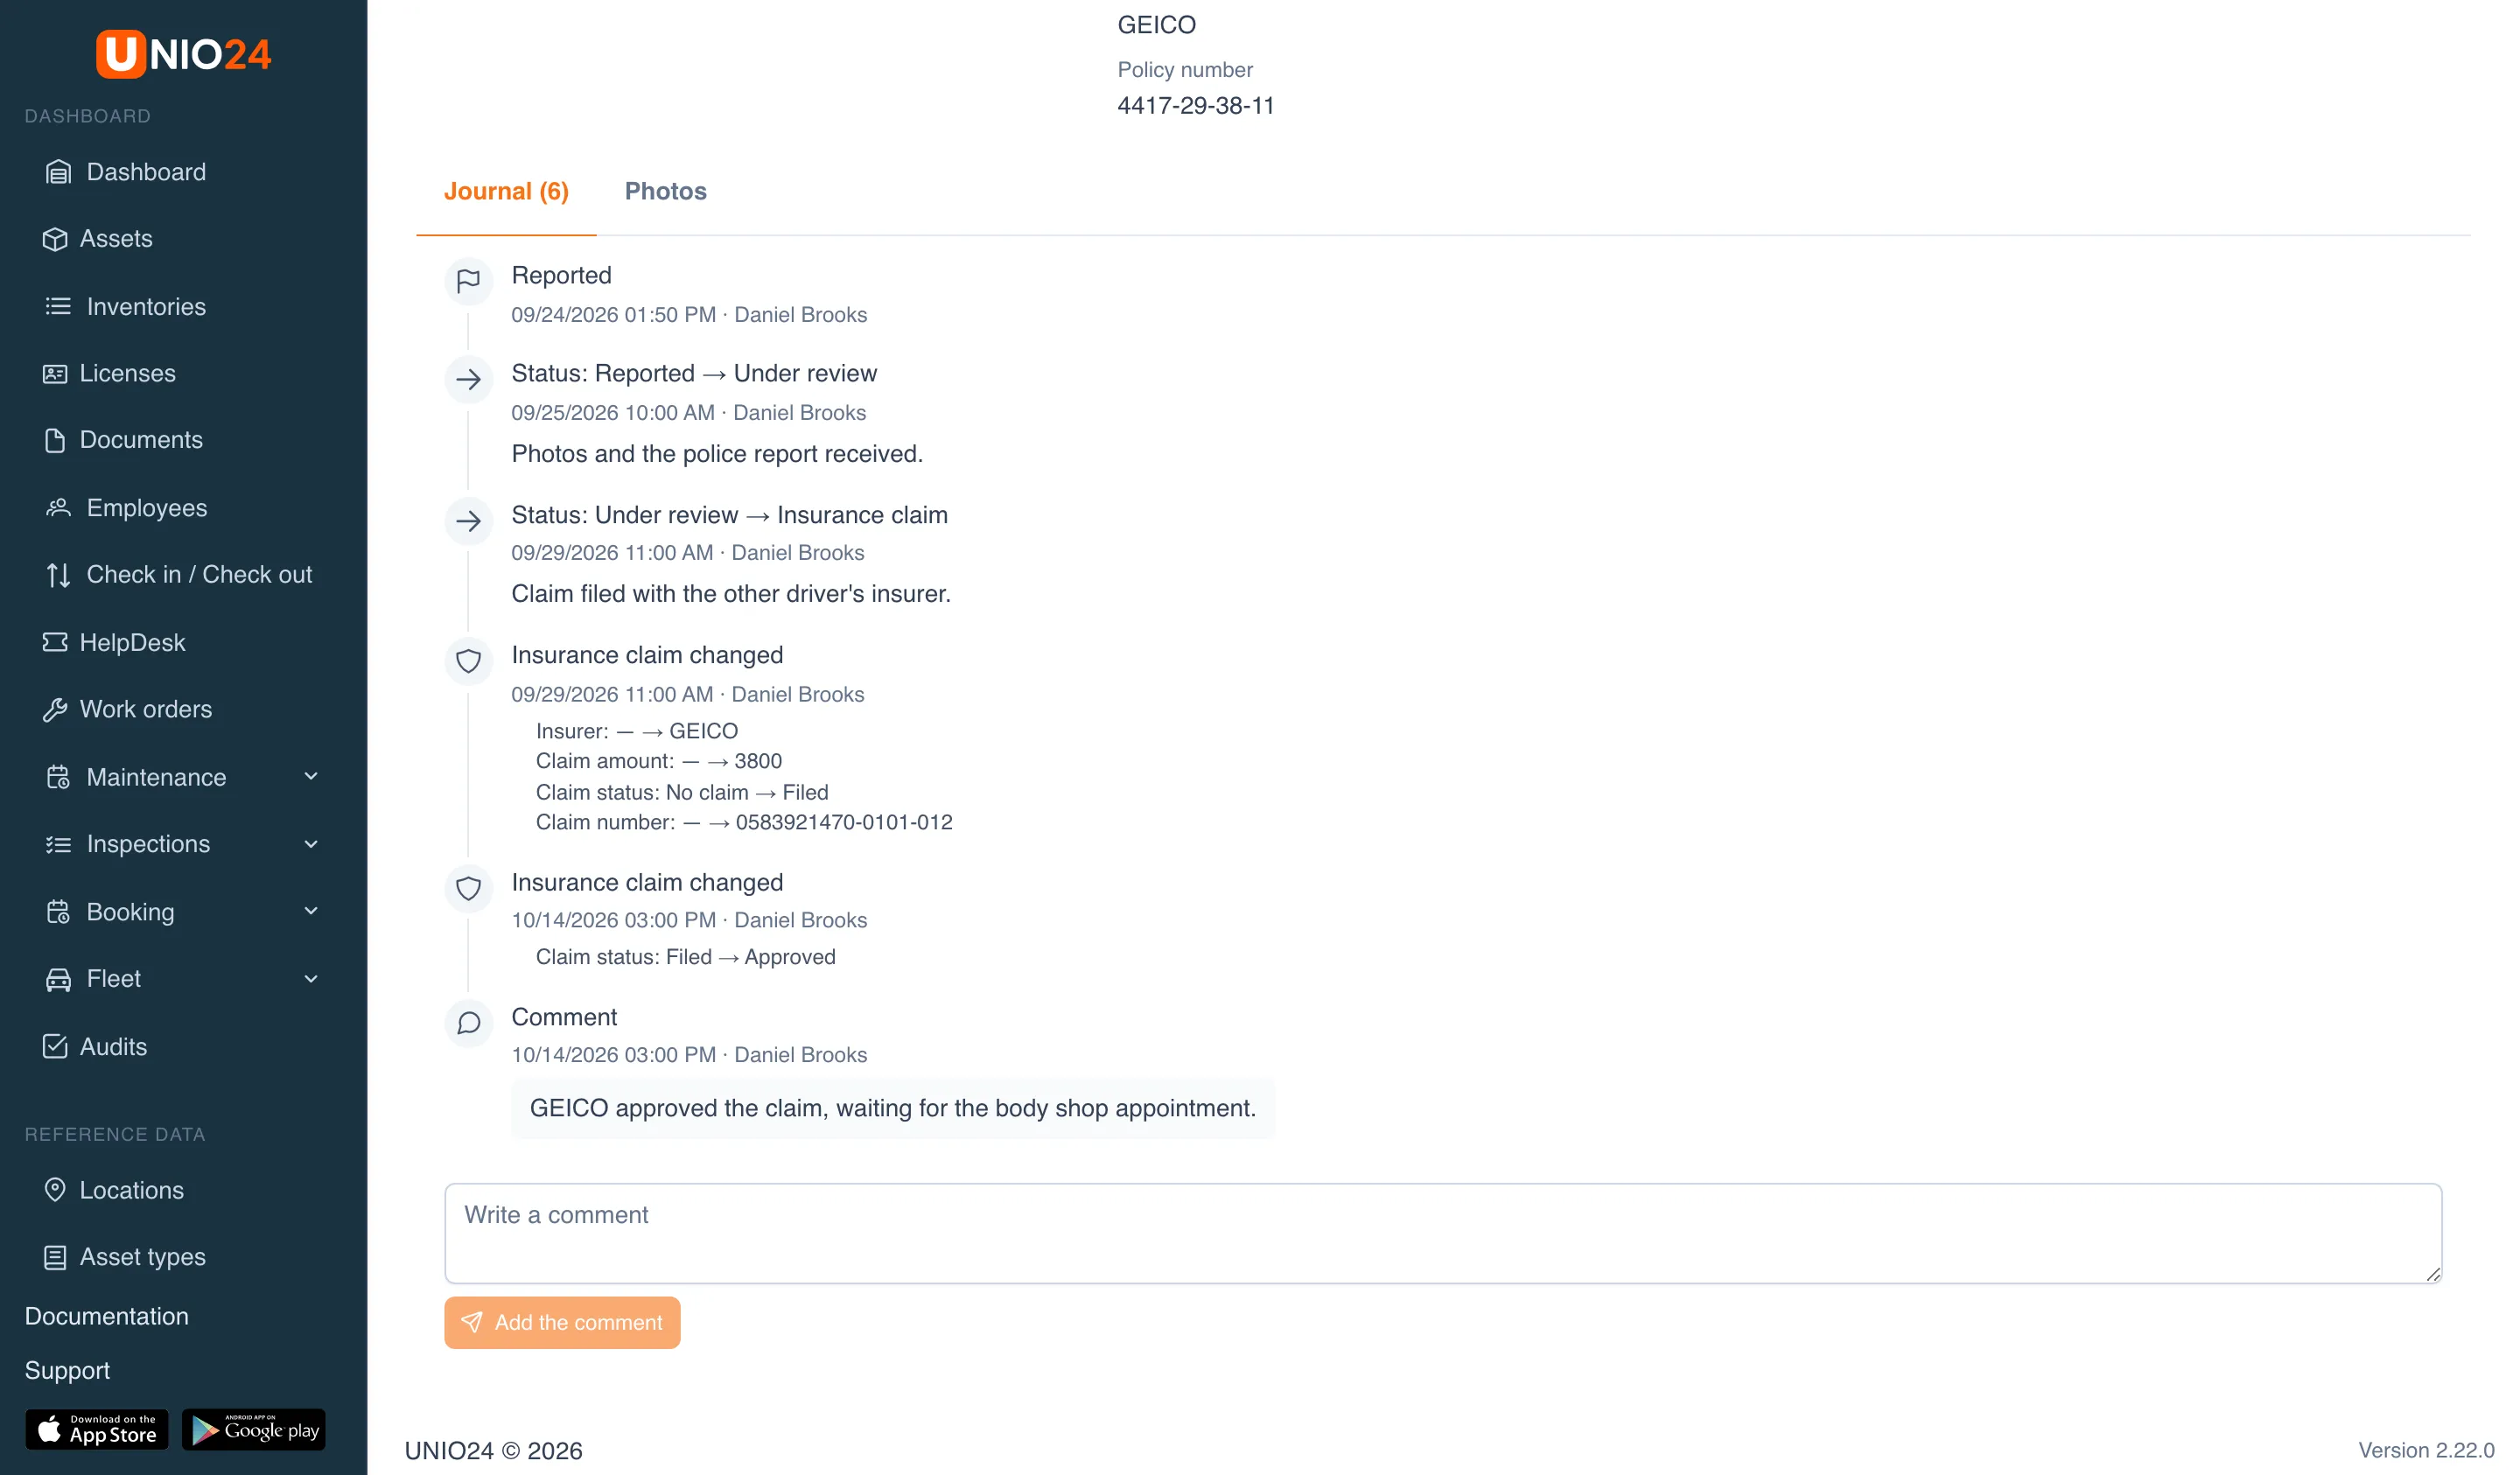
Every change to the claim goes to the journal as an “Insurance claim changed” entry, showing what it was and what it became.
When an incident with an actual cost is closed and no repair is linked to it, a Repair and maintenance expense appears on its own in the vehicle’s expenses; see Fuel, trips and expenses. If a repair is linked to the incident, the cost comes from the repair and no second expense is created.
Open a work order or send for repair
Section titled “Open a work order or send for repair”From an incident you can open a work order right away or send the vehicle for repair to a service center; the incident is linked to them.
Work order:
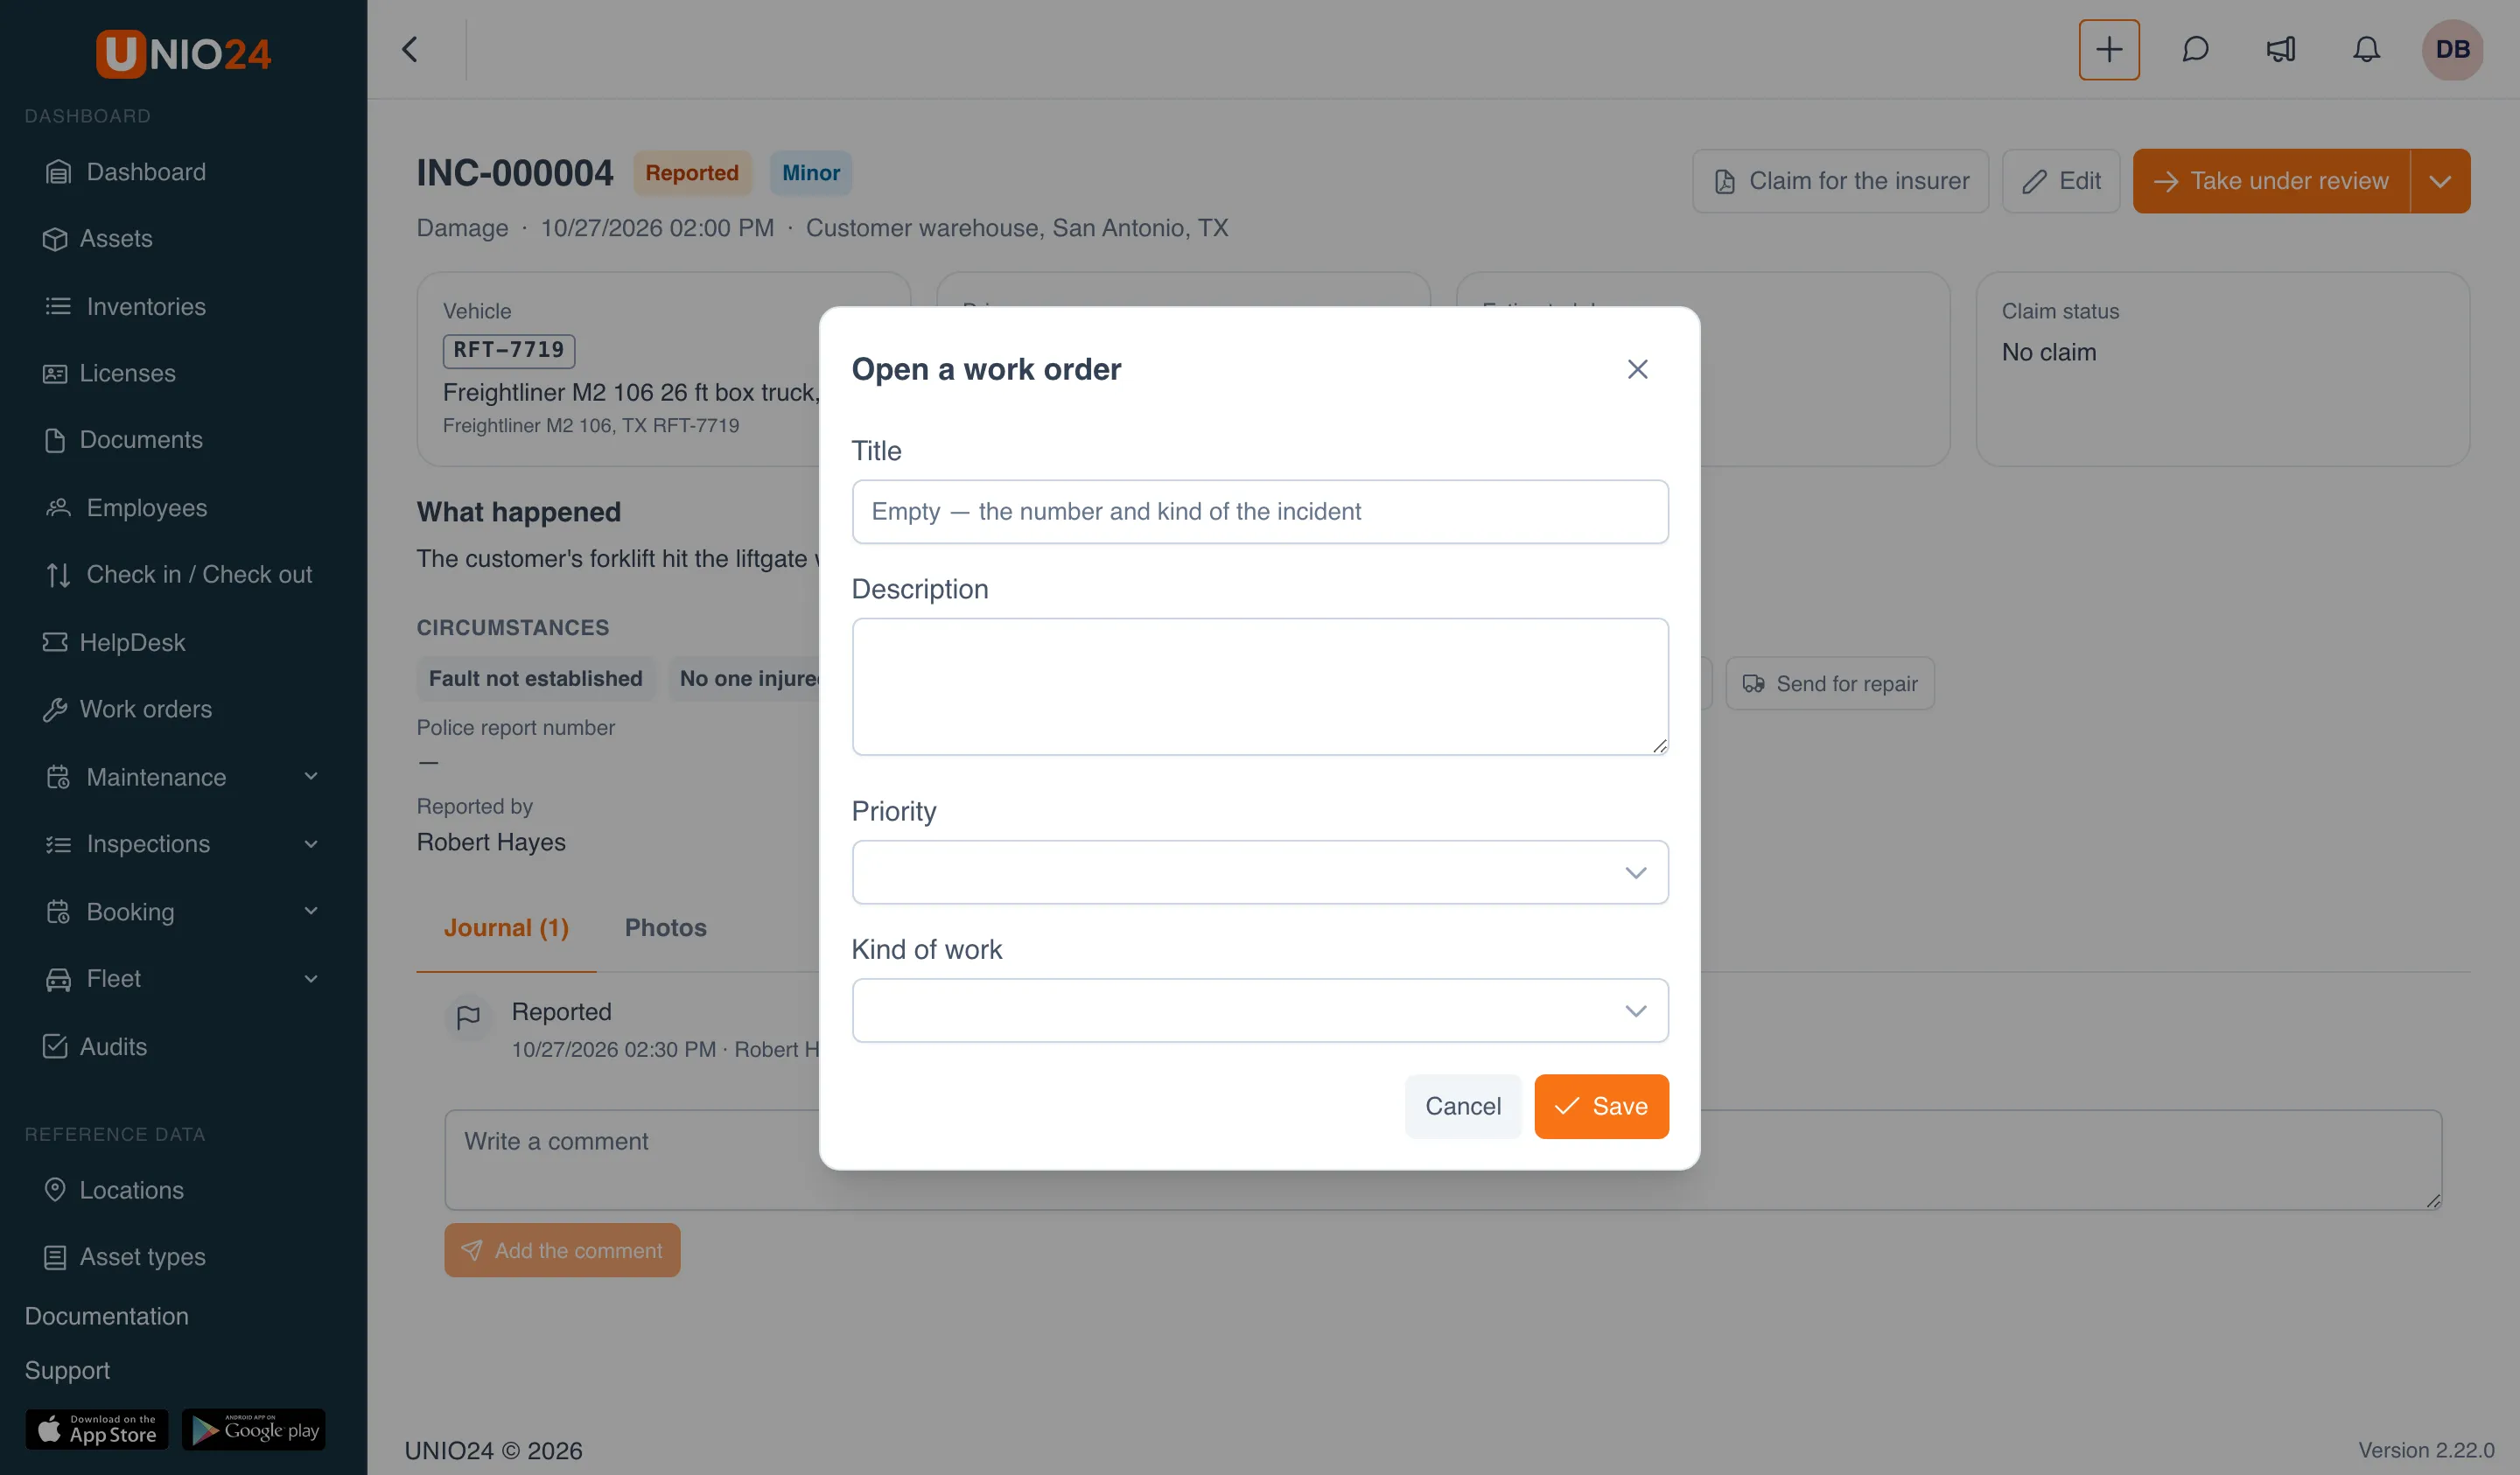
- In the Work and repair section, click Open a work order.
- Enter the Title. If you leave it empty, the title becomes the number and kind of the incident.
- If needed, fill in the Description and choose the Priority and Kind of work. If you don’t choose them, UNIO24 picks them by the incident’s severity.
- Click Save.
Repair:
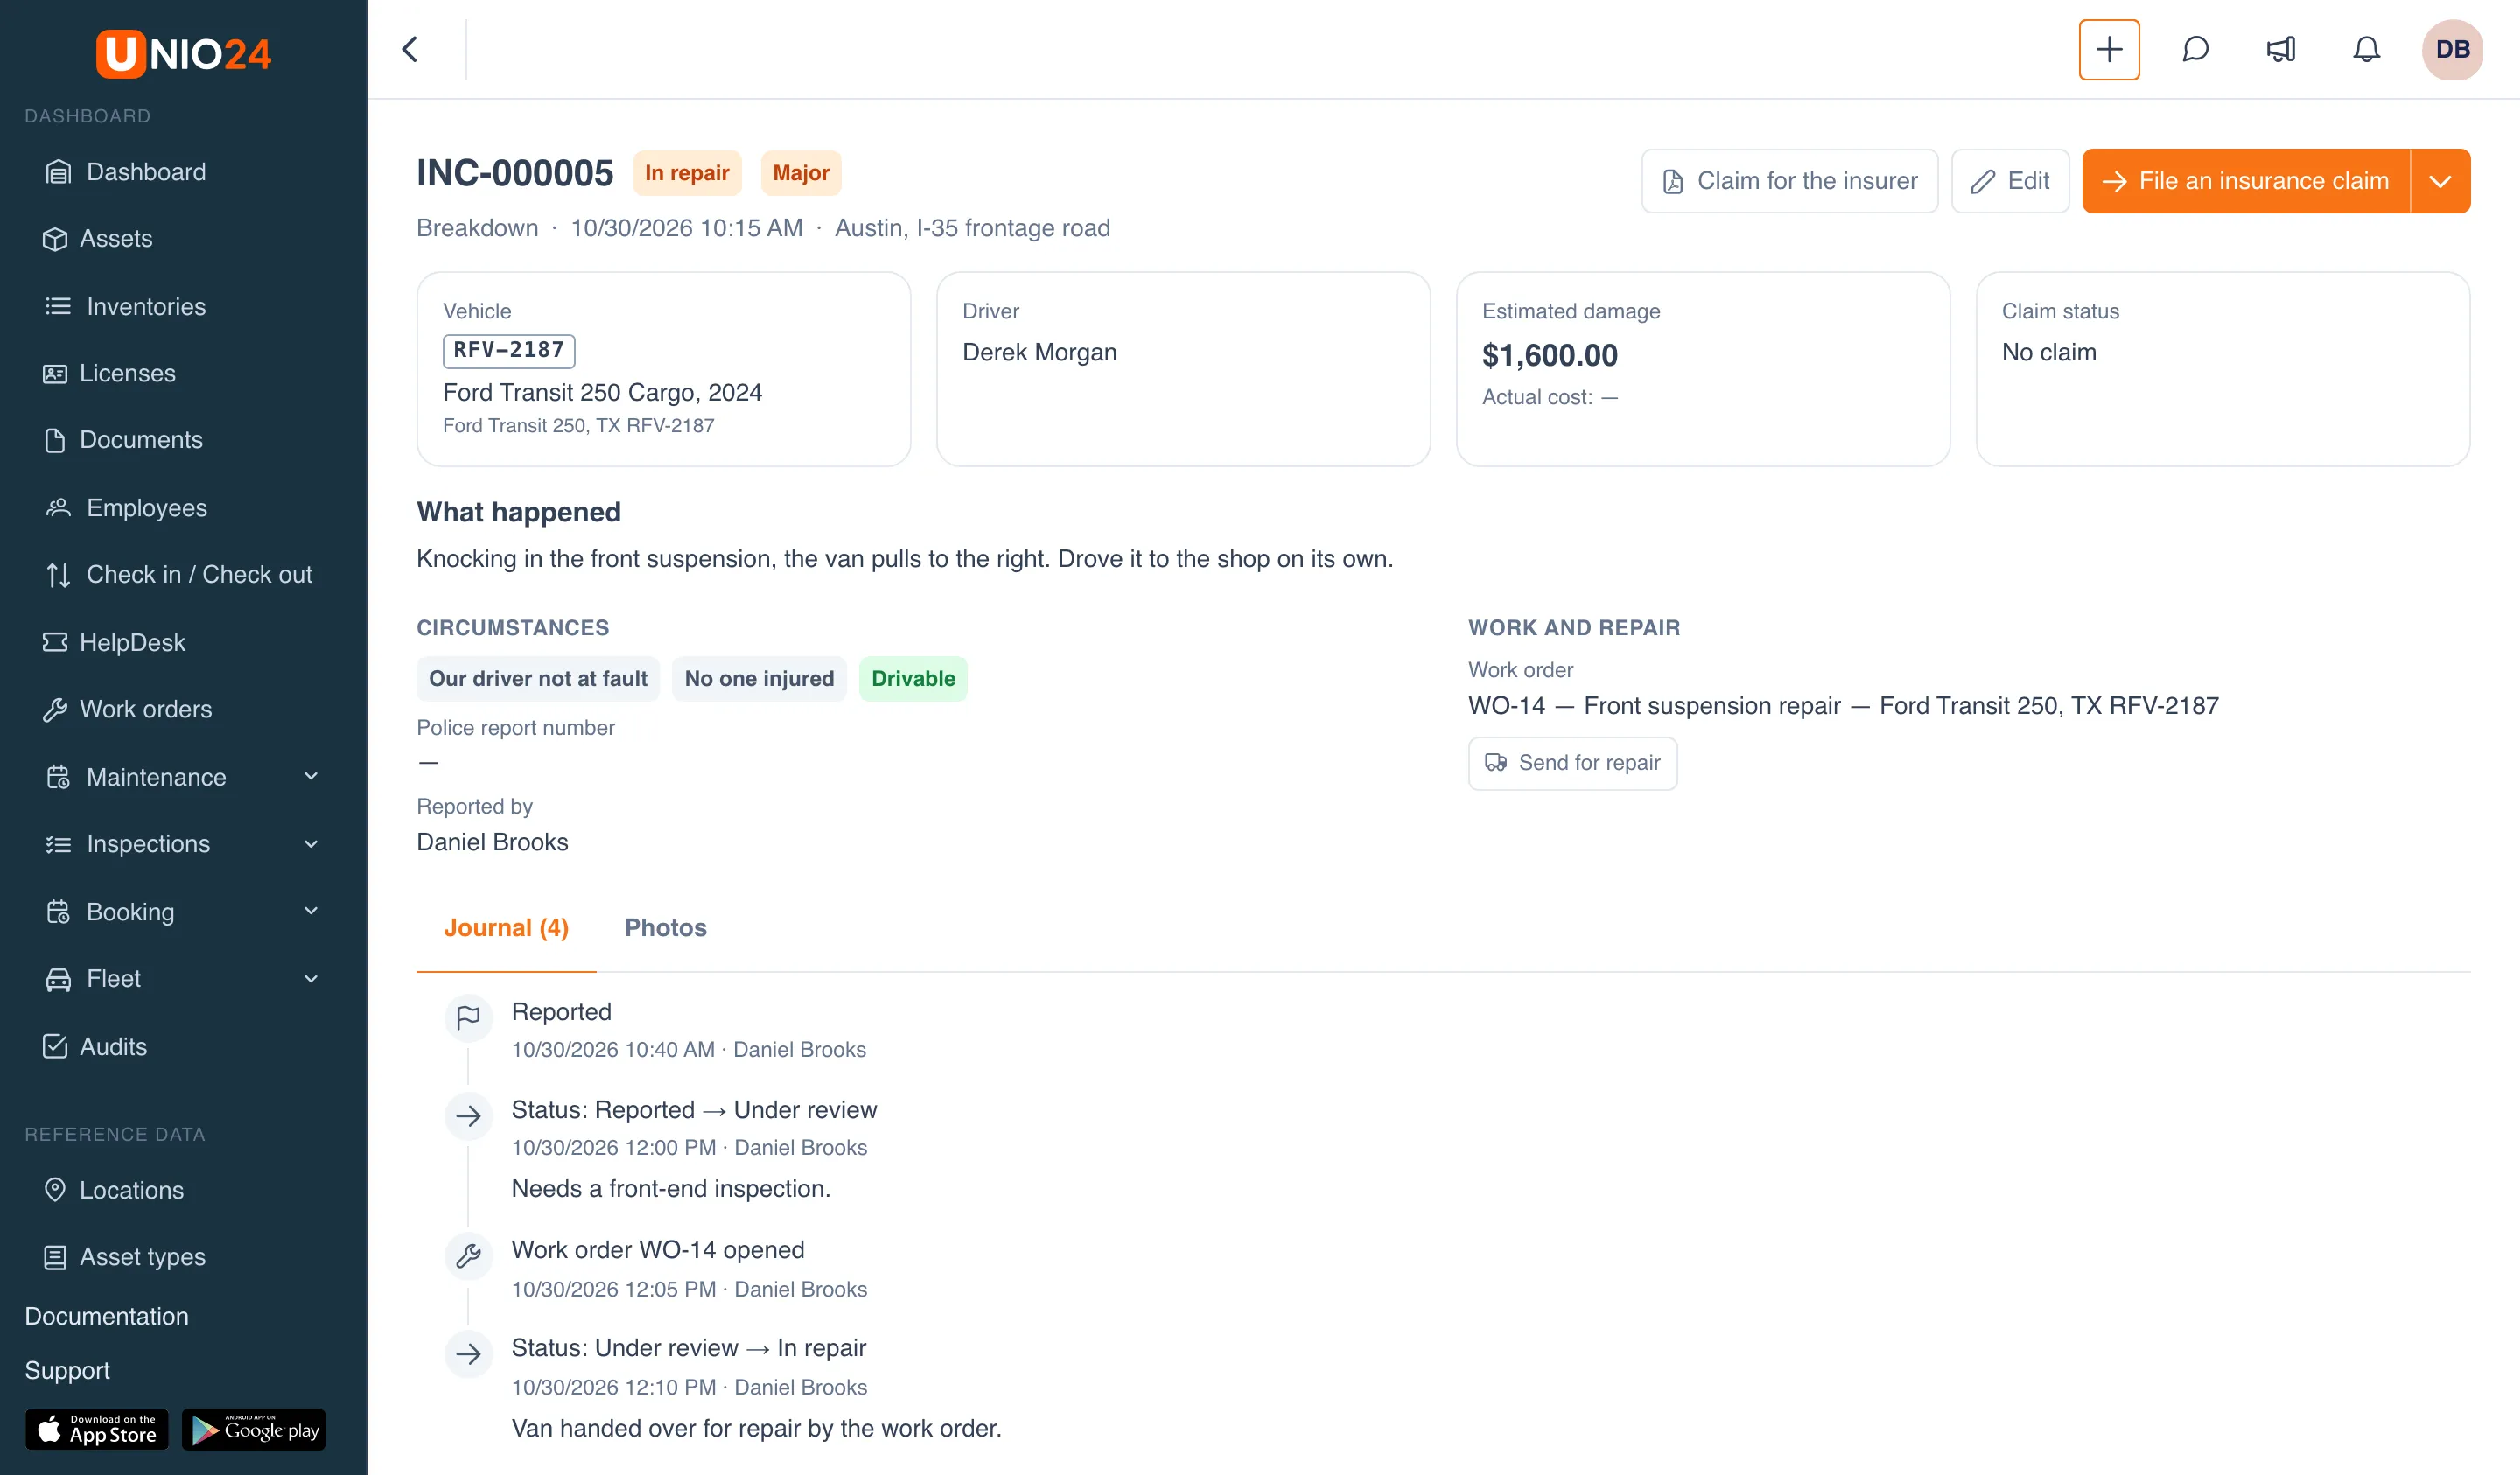
- In the Work and repair section, click Send for repair.
- Choose the Service center, describe What to repair, and enter the Expected back date.
- Click Save.
After that, the Work and repair section shows a link to the work order or repair, and the journal gets a “Work order … opened” or “Sent for repair” entry. One work order and one repair can be linked to an incident. To open a work order, the Work orders module must be on and you need permission to create work orders; to send for repair, you need permission to edit assets. A closed incident can’t get a work order or a repair: reopen it first.
How to work with the work order is covered in Create and handle work orders.
Journal and comments
Section titled “Journal and comments”The Journal tab is a feed of everything that happened to the incident: the report, status changes with notes, insurance claim changes, the work order and repair, and comments. The number in the tab name is how many entries the journal has.
To leave a comment, type it in the Write a comment field under the journal and click Add the comment.
The Photos tab holds the incident’s photos; whoever handles the incident can add or remove them.
Claim for the insurer
Section titled “Claim for the insurer”Click Claim for the insurer on the incident card to download a PDF with everything known about the incident: the vehicle and driver, circumstances, other party, witnesses, damage and insurance claim, the journal, and up to six photos. The PDF is in the company’s language, because it goes out on the company’s behalf.
Fines are kept on the Fines tab of the Fleet → Expenses page. The fines of one vehicle are on the Fines tab of its card, and a driver’s fines are on the driver’s card.
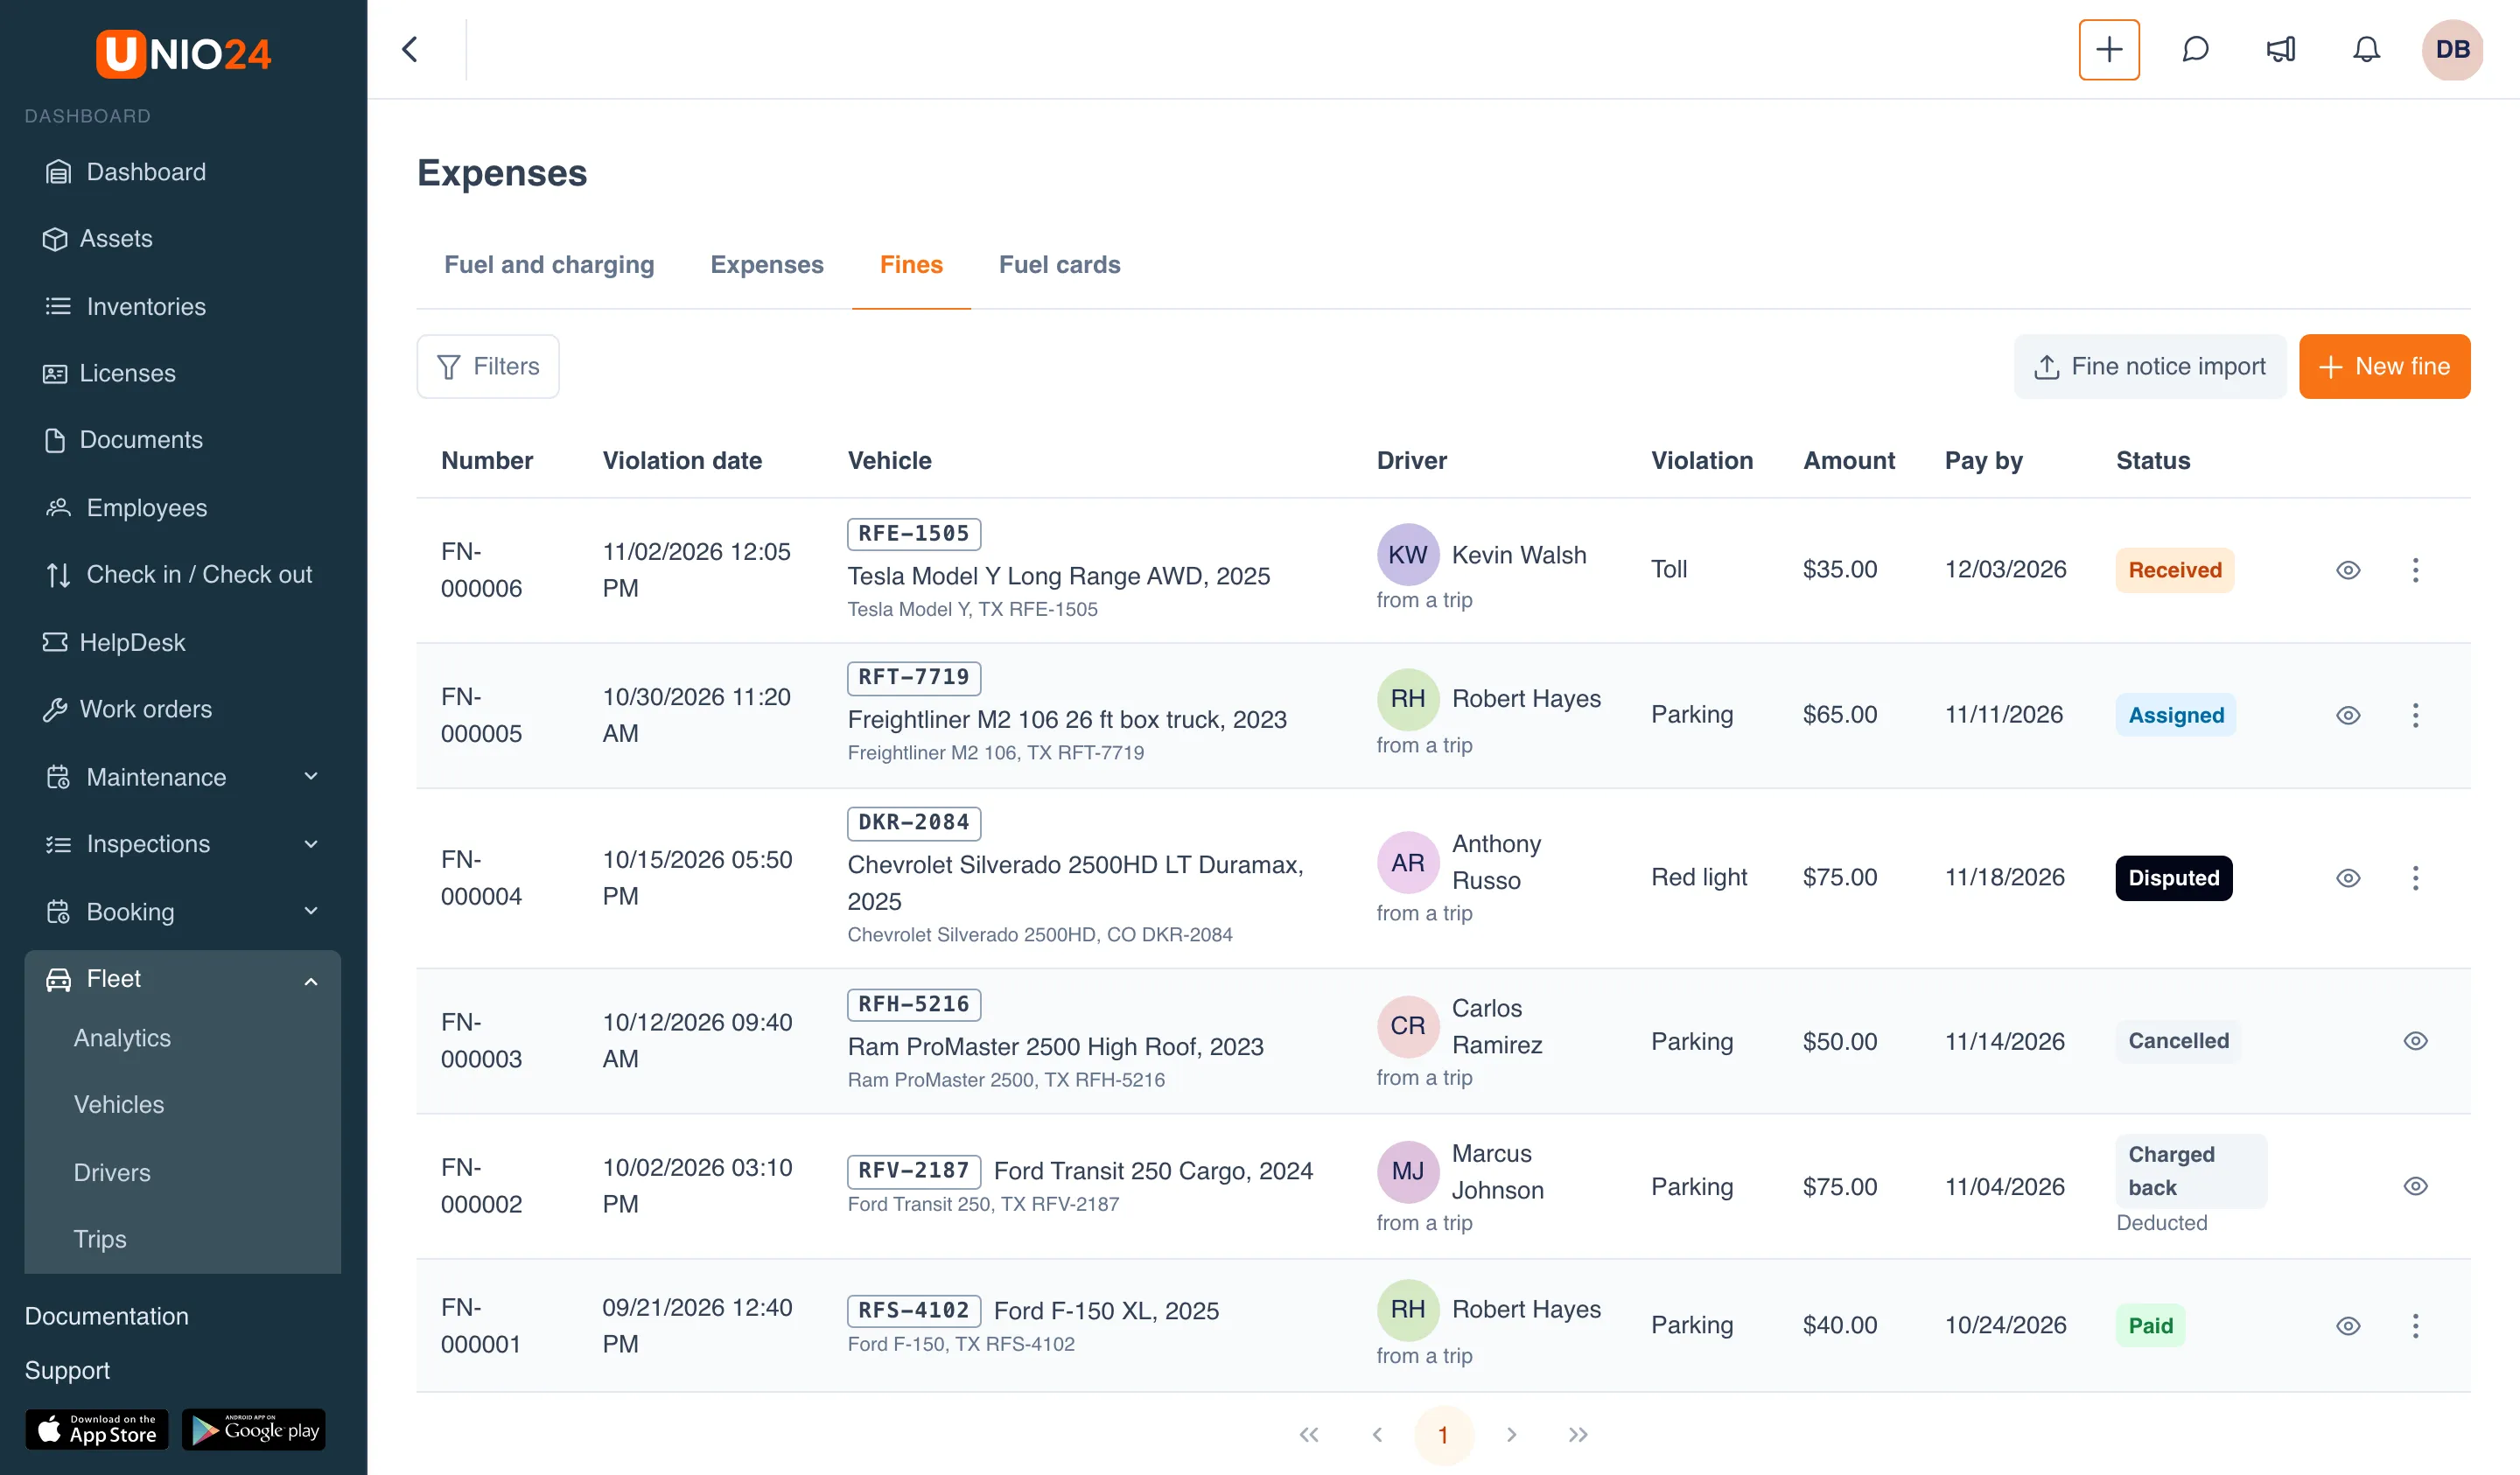
In the Filters panel you can choose the Vehicle, Driver, Status, Violation, Charge back, and Period, and under More check Only unpaid.
Add a fine
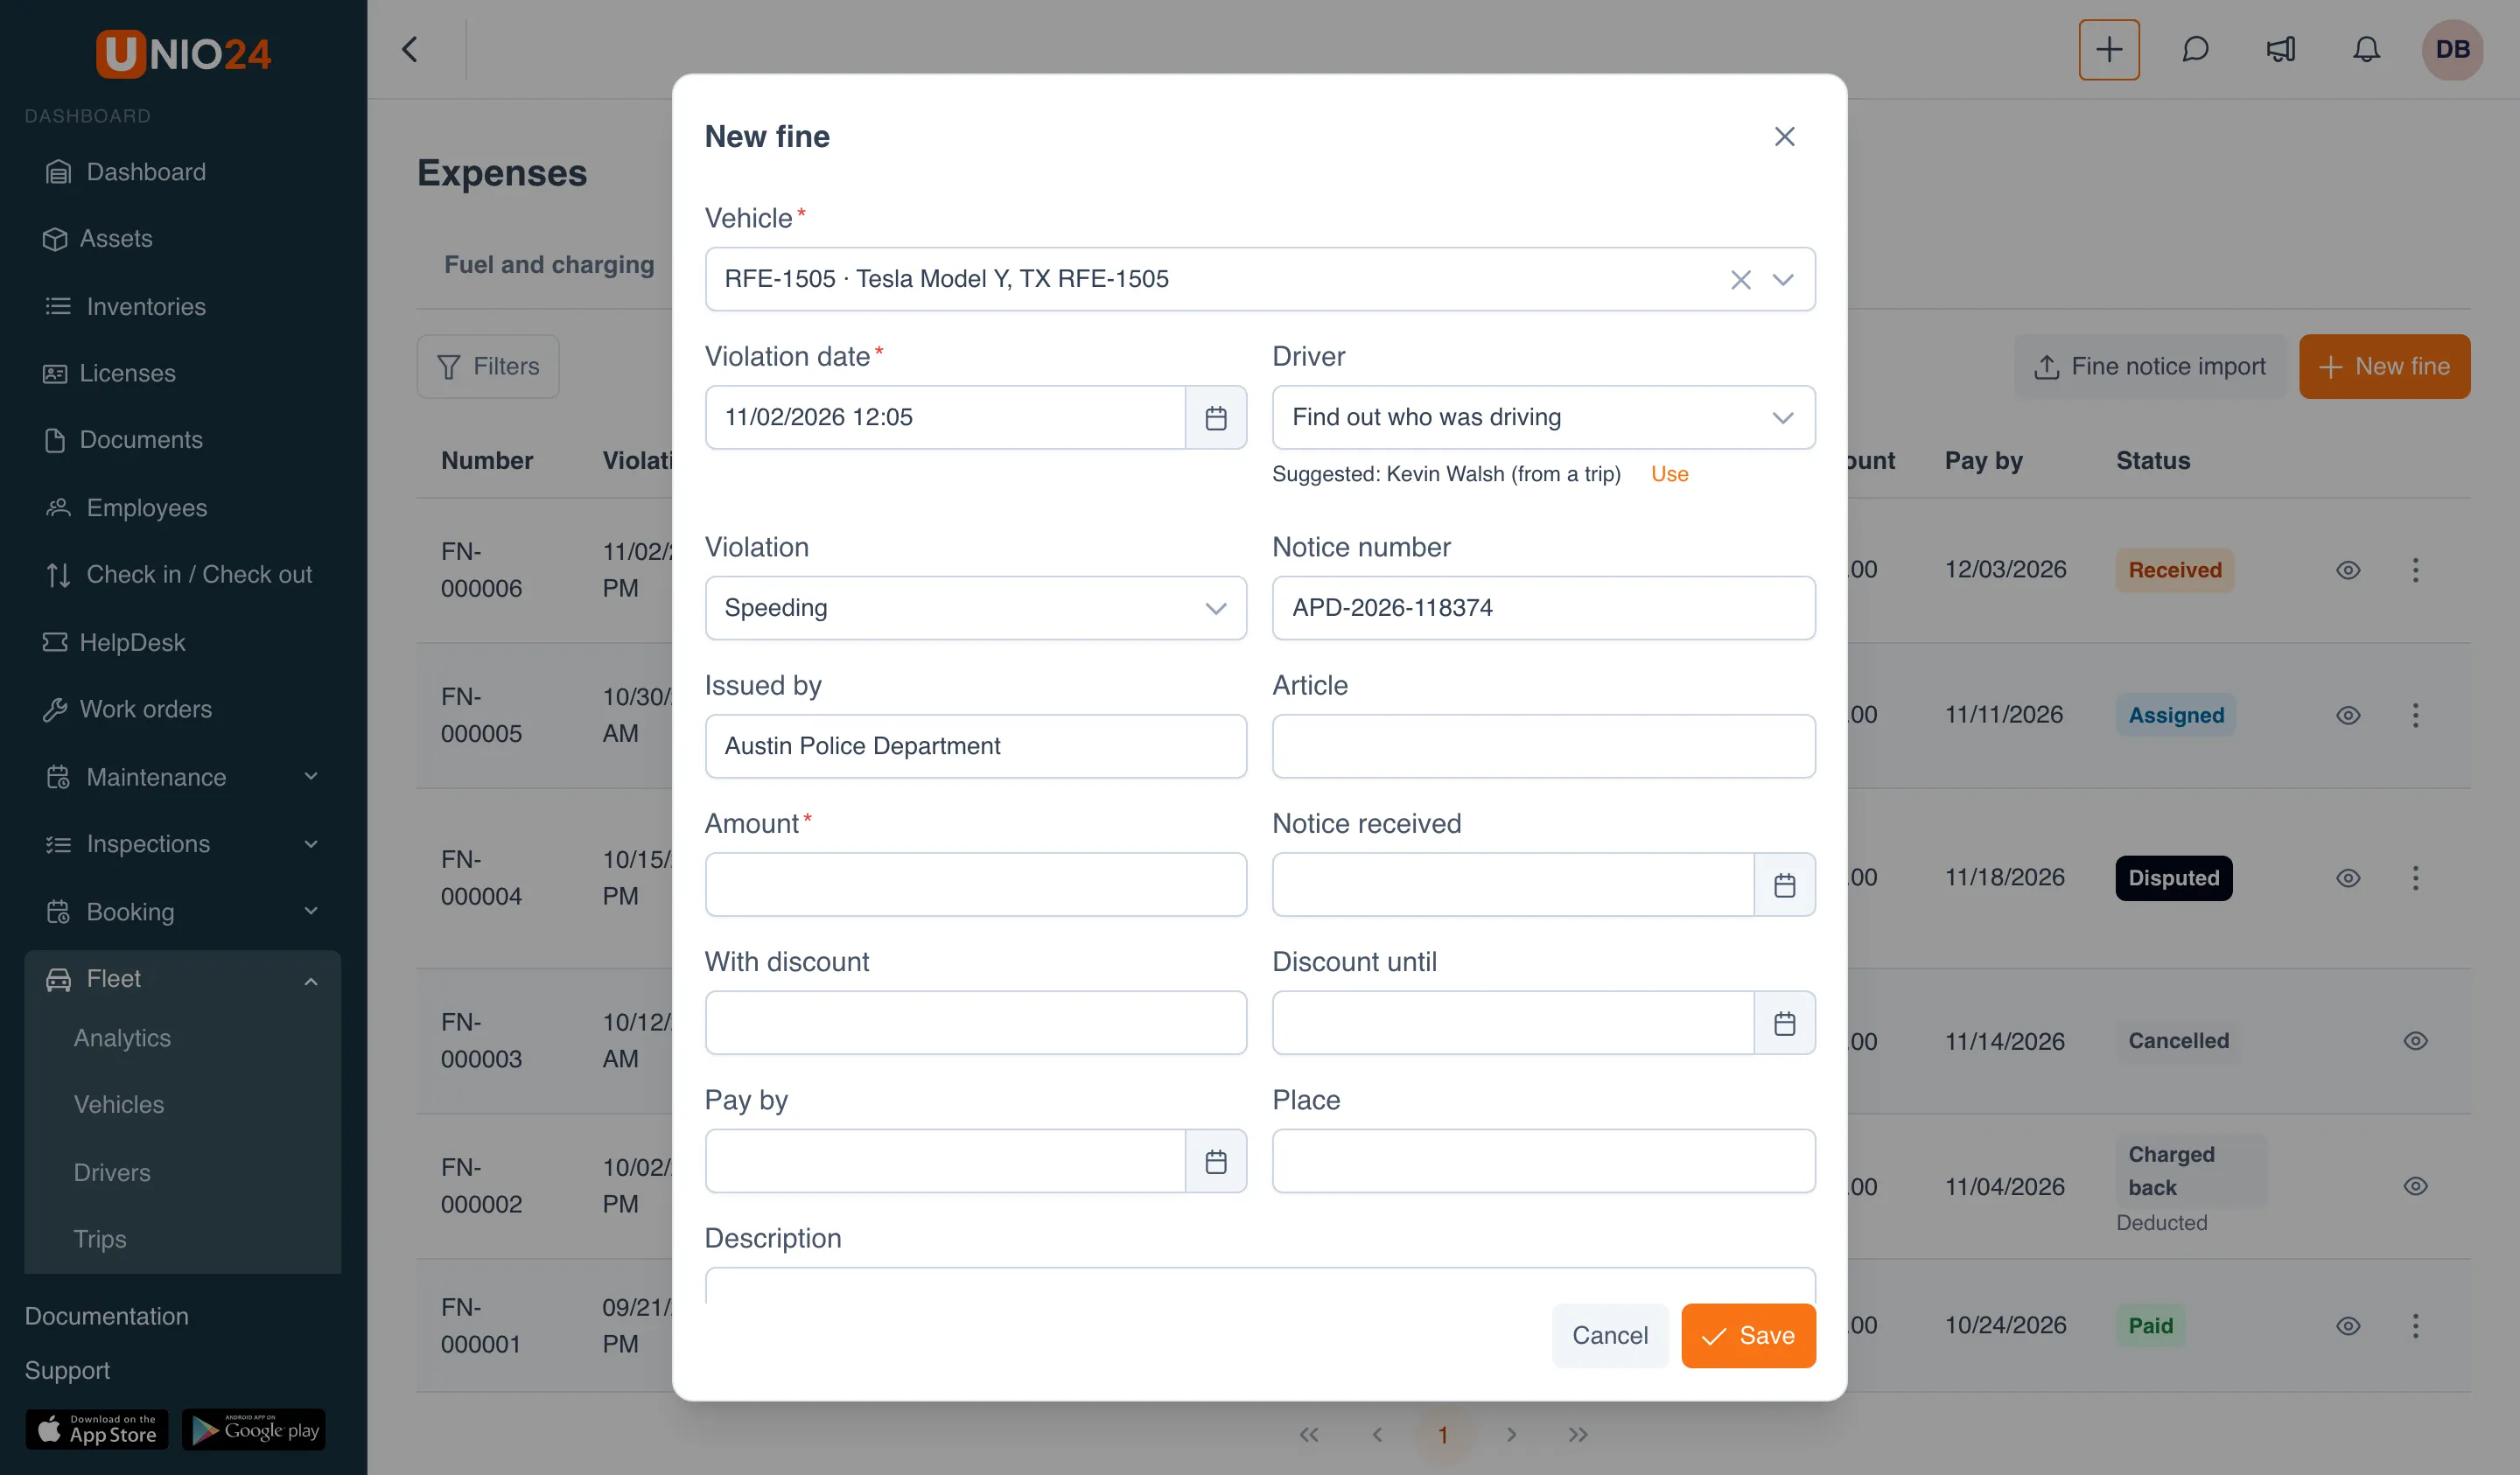
Section titled “Add a fine”- On the Fines tab, click New fine.
- Choose the Vehicle and enter the Violation date.
- Under the Driver field, a suggestion appears: who was driving at the time of the violation, for example “Suggested: Kevin Walsh (from a trip)”. Click Use to fill it in, or pick a driver from the list. If you leave Find out who was driving, UNIO24 sets the suggested driver itself.
- Choose the Violation: Speeding, Parking, Toll, Red light, Overload, Documents, or Other.
- Fill in the notice details: Notice number, Issued by, Article, Notice received.
- Enter the Amount. If the notice offers a lower amount for paying early, enter it in With discount and the last day of the discount in Discount until; otherwise leave both fields empty.
- Enter the payment deadline in Pay by, and the Place, Description, and Note if needed.
- Click Save.
The notice scan is attached to a saved fine: open the fine and upload the files in the Notice scans section.
Where the suggested driver comes from
Section titled “Where the suggested driver comes from”UNIO24 looks at who was responsible for the vehicle at the time of the violation: first a trip, then a booking, then a check-out. Under the driver’s name in the fines list you can see how they were found: from a trip, from a booking, from a check-out, chosen by hand, or unknown. If the records show nobody driving, the dialog says “Nobody was driving at that time, as far as the records show”; choose the driver yourself.
Fine actions
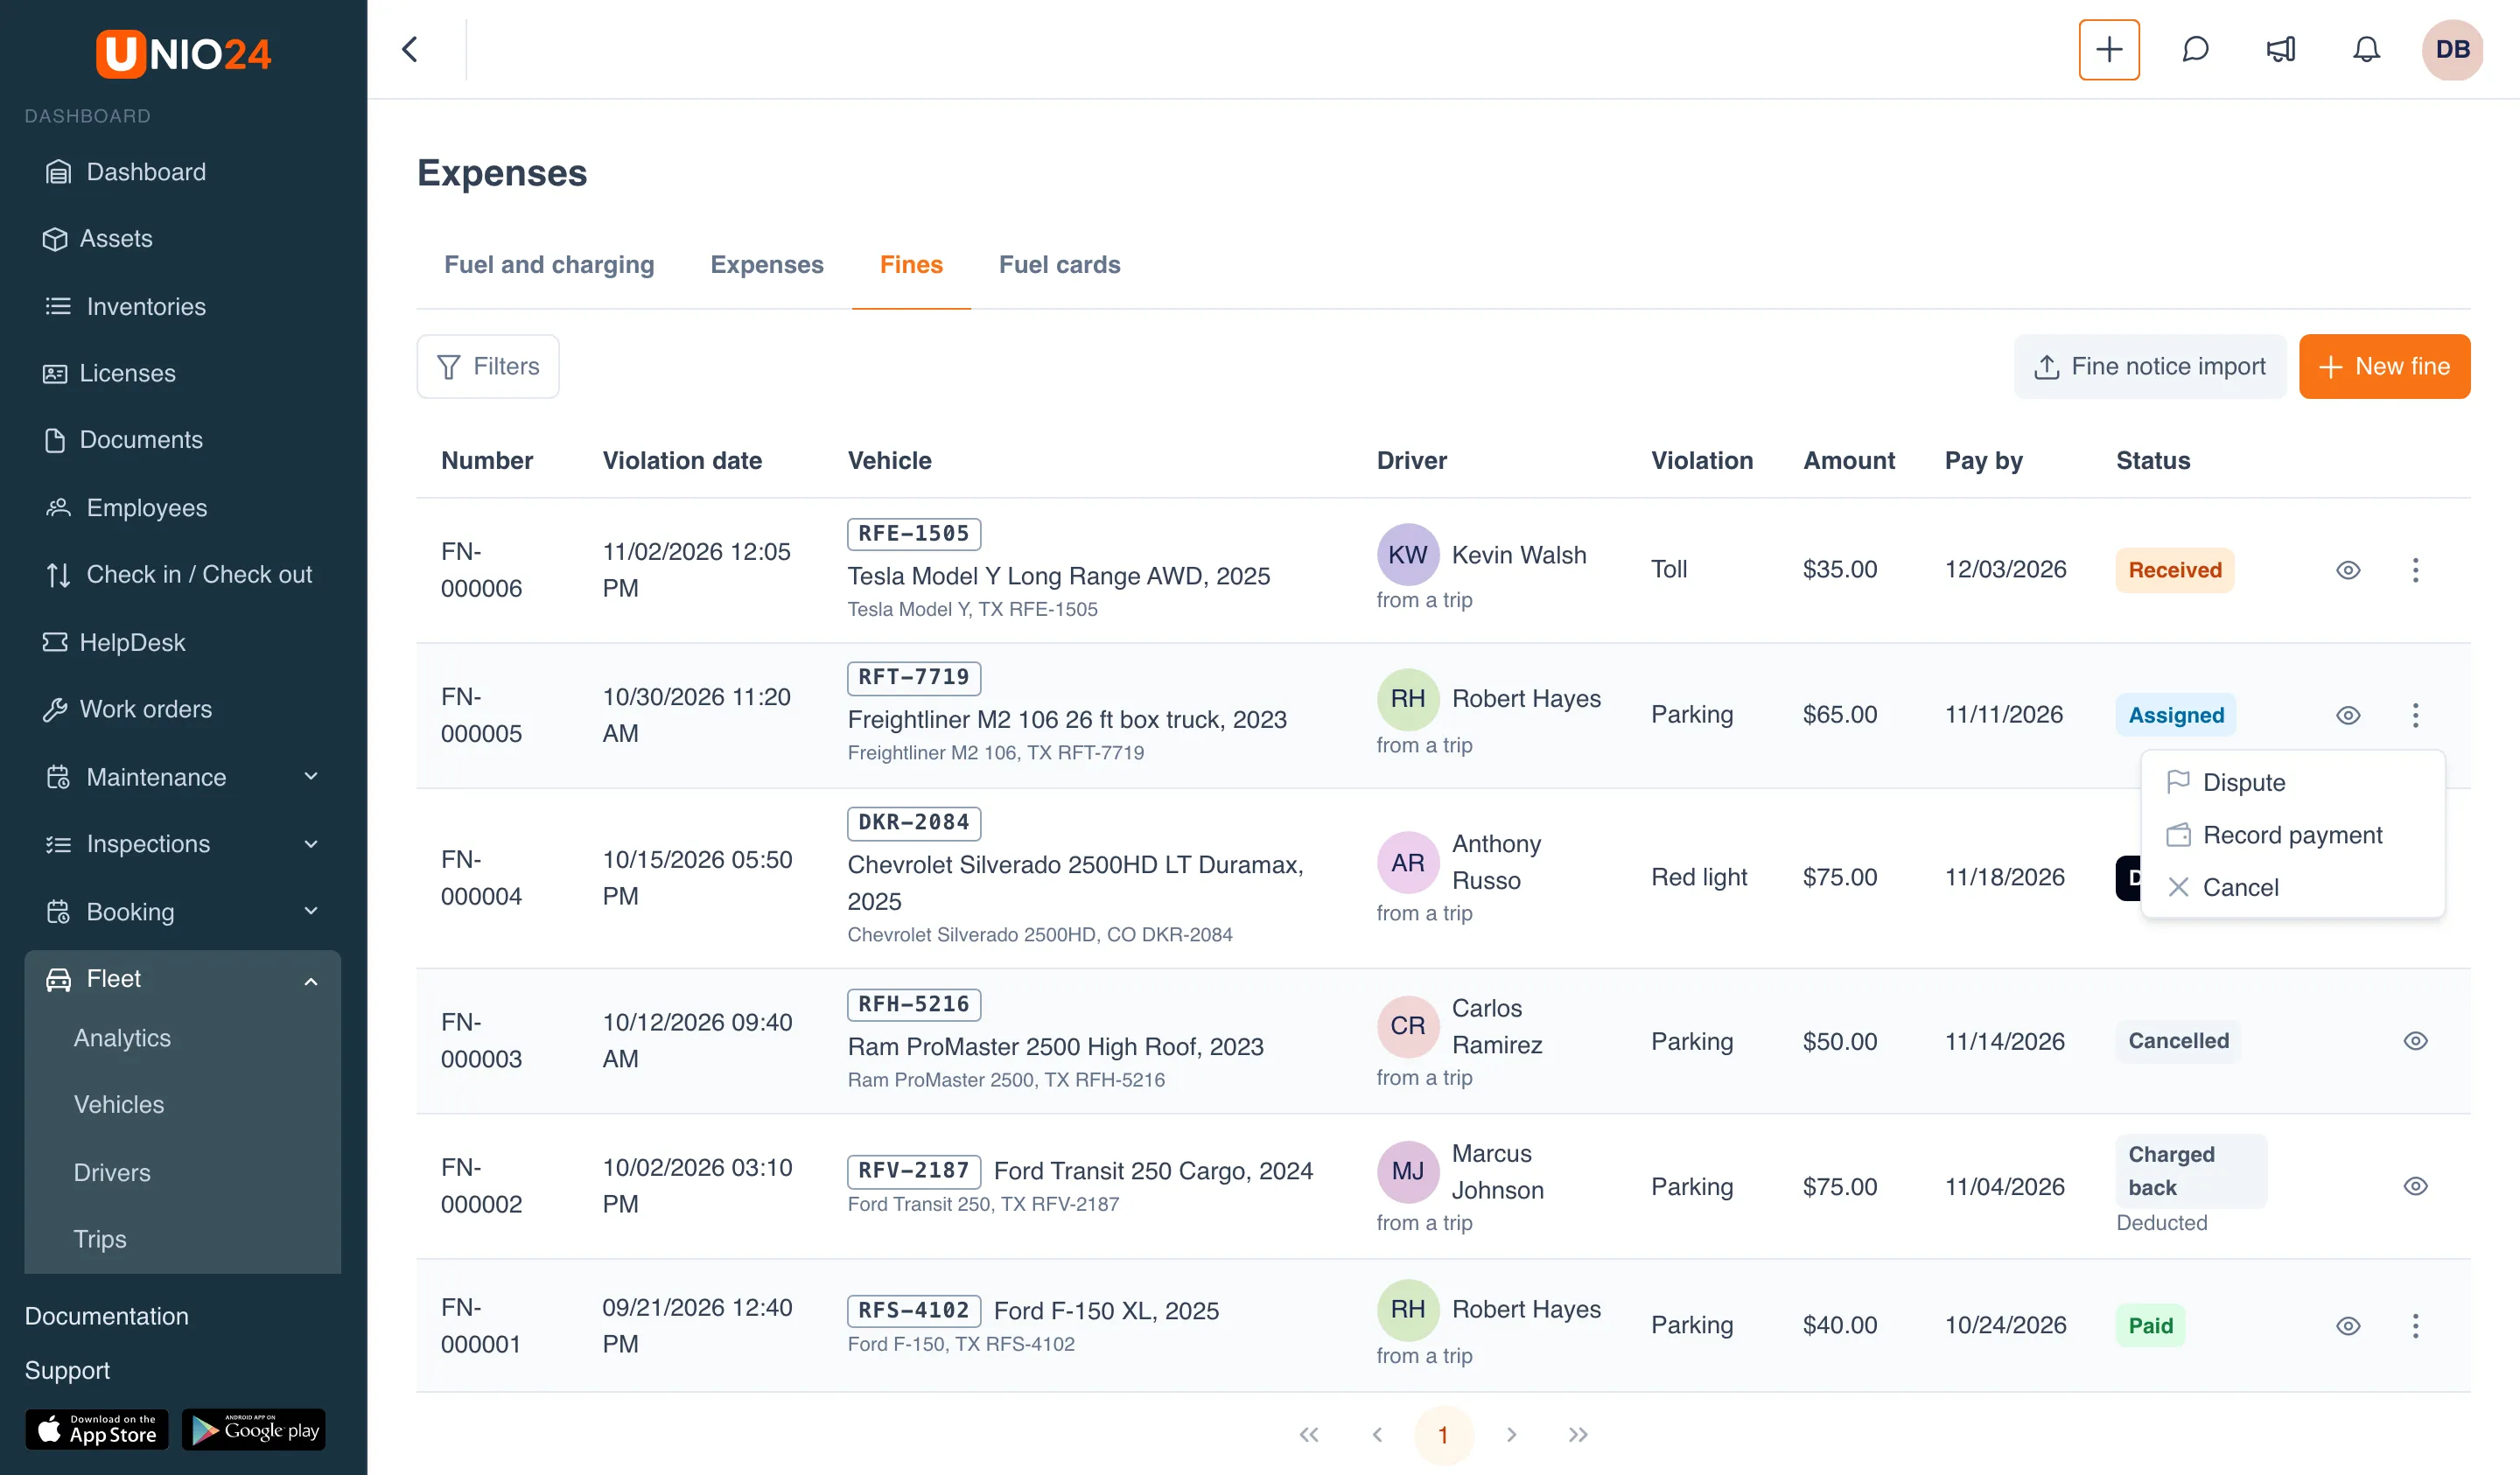
Section titled “Fine actions”The first button in a fine’s row opens the fine dialog, where you can correct its details; its tooltip is the fine number, for example Fine FN-000005. The other actions are in the Actions menu (three dots), and which ones you see depends on the status:
- Assign to the driver: for a received fine;
- Dispute: for a received or assigned fine;
- Record payment: while the fine isn’t paid or cancelled;
- Cancel: while the fine isn’t paid;
- Charge back to the driver: for a fine paid by the company;
- Close the charge back: when an amount is waiting to be deducted from the driver.
Every action dialog has a Note field: up to 2000 characters.
Assign to the driver
Section titled “Assign to the driver”- In the fine’s Actions menu, choose Assign to the driver.
- Check or choose the Driver; the fine’s driver is filled in by default.
- Click Save.
The fine gets the Assigned status, and the driver gets a notification about it.
Dispute
Section titled “Dispute”If a fine was issued by mistake, choose Dispute and explain why in the note. The fine gets the Disputed status; once there is a decision, record the payment or cancel the fine.
Record payment
Section titled “Record payment”- In the Actions menu, choose Record payment.
- In Paid by, choose The company or The driver.
- Enter the Payment date: not in the future and not earlier than the violation.
- Click Save.
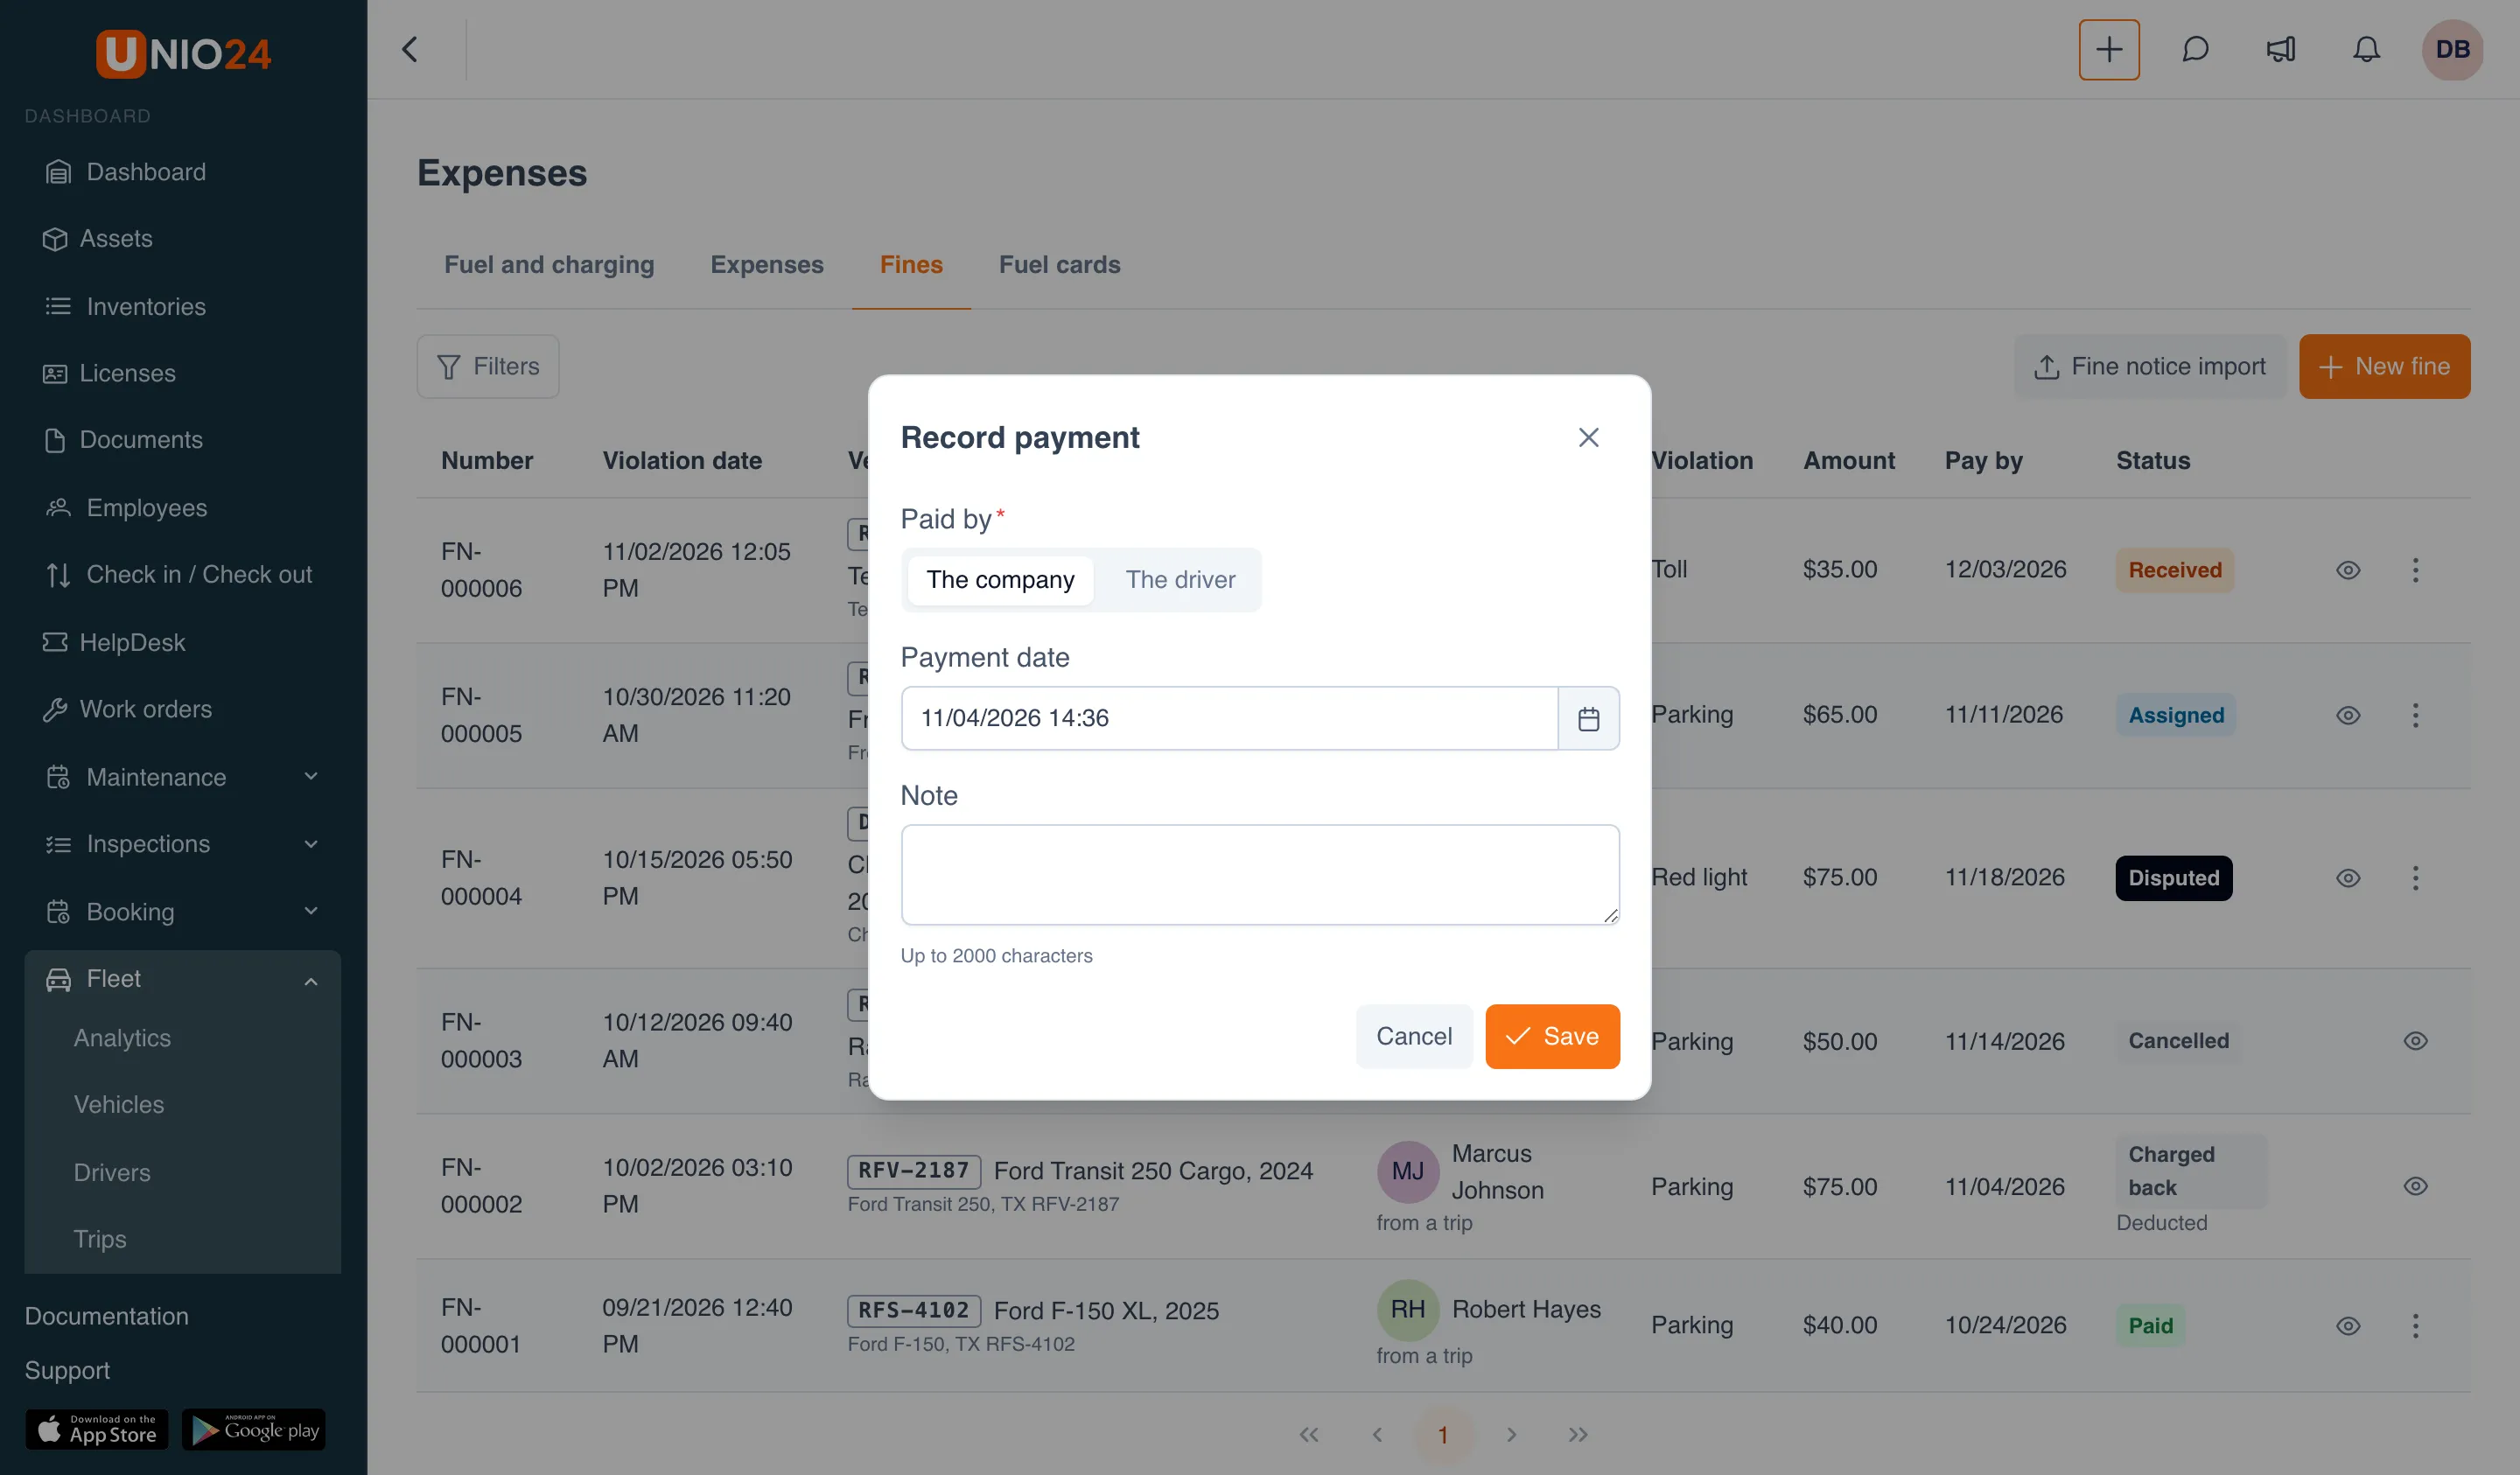
If the fine has a discount and the payment falls on or before the Discount until day (by the company’s calendar), the fine counts as paid with the discount. If the company paid, a Fines expense appears in the vehicle’s expenses; a fine paid by the driver doesn’t go into the company’s expenses.
After payment, the amount, dates, vehicle, and driver can’t be changed. A payment recorded by mistake is corrected in the fine dialog, in the Payment section, while the fine has the Paid status; the expense follows on its own.
Charge back to the driver
Section titled “Charge back to the driver”If the company paid a fine that the driver should pay, the amount can be charged back to the driver.
- For a fine paid by the company, choose Charge back to the driver in the Actions menu.
- If the fine has no driver yet, choose one.
- Check the amount in Charged back. By default it equals the paid amount and can’t be higher. The paid amount is shown under the field.
- Click Save.
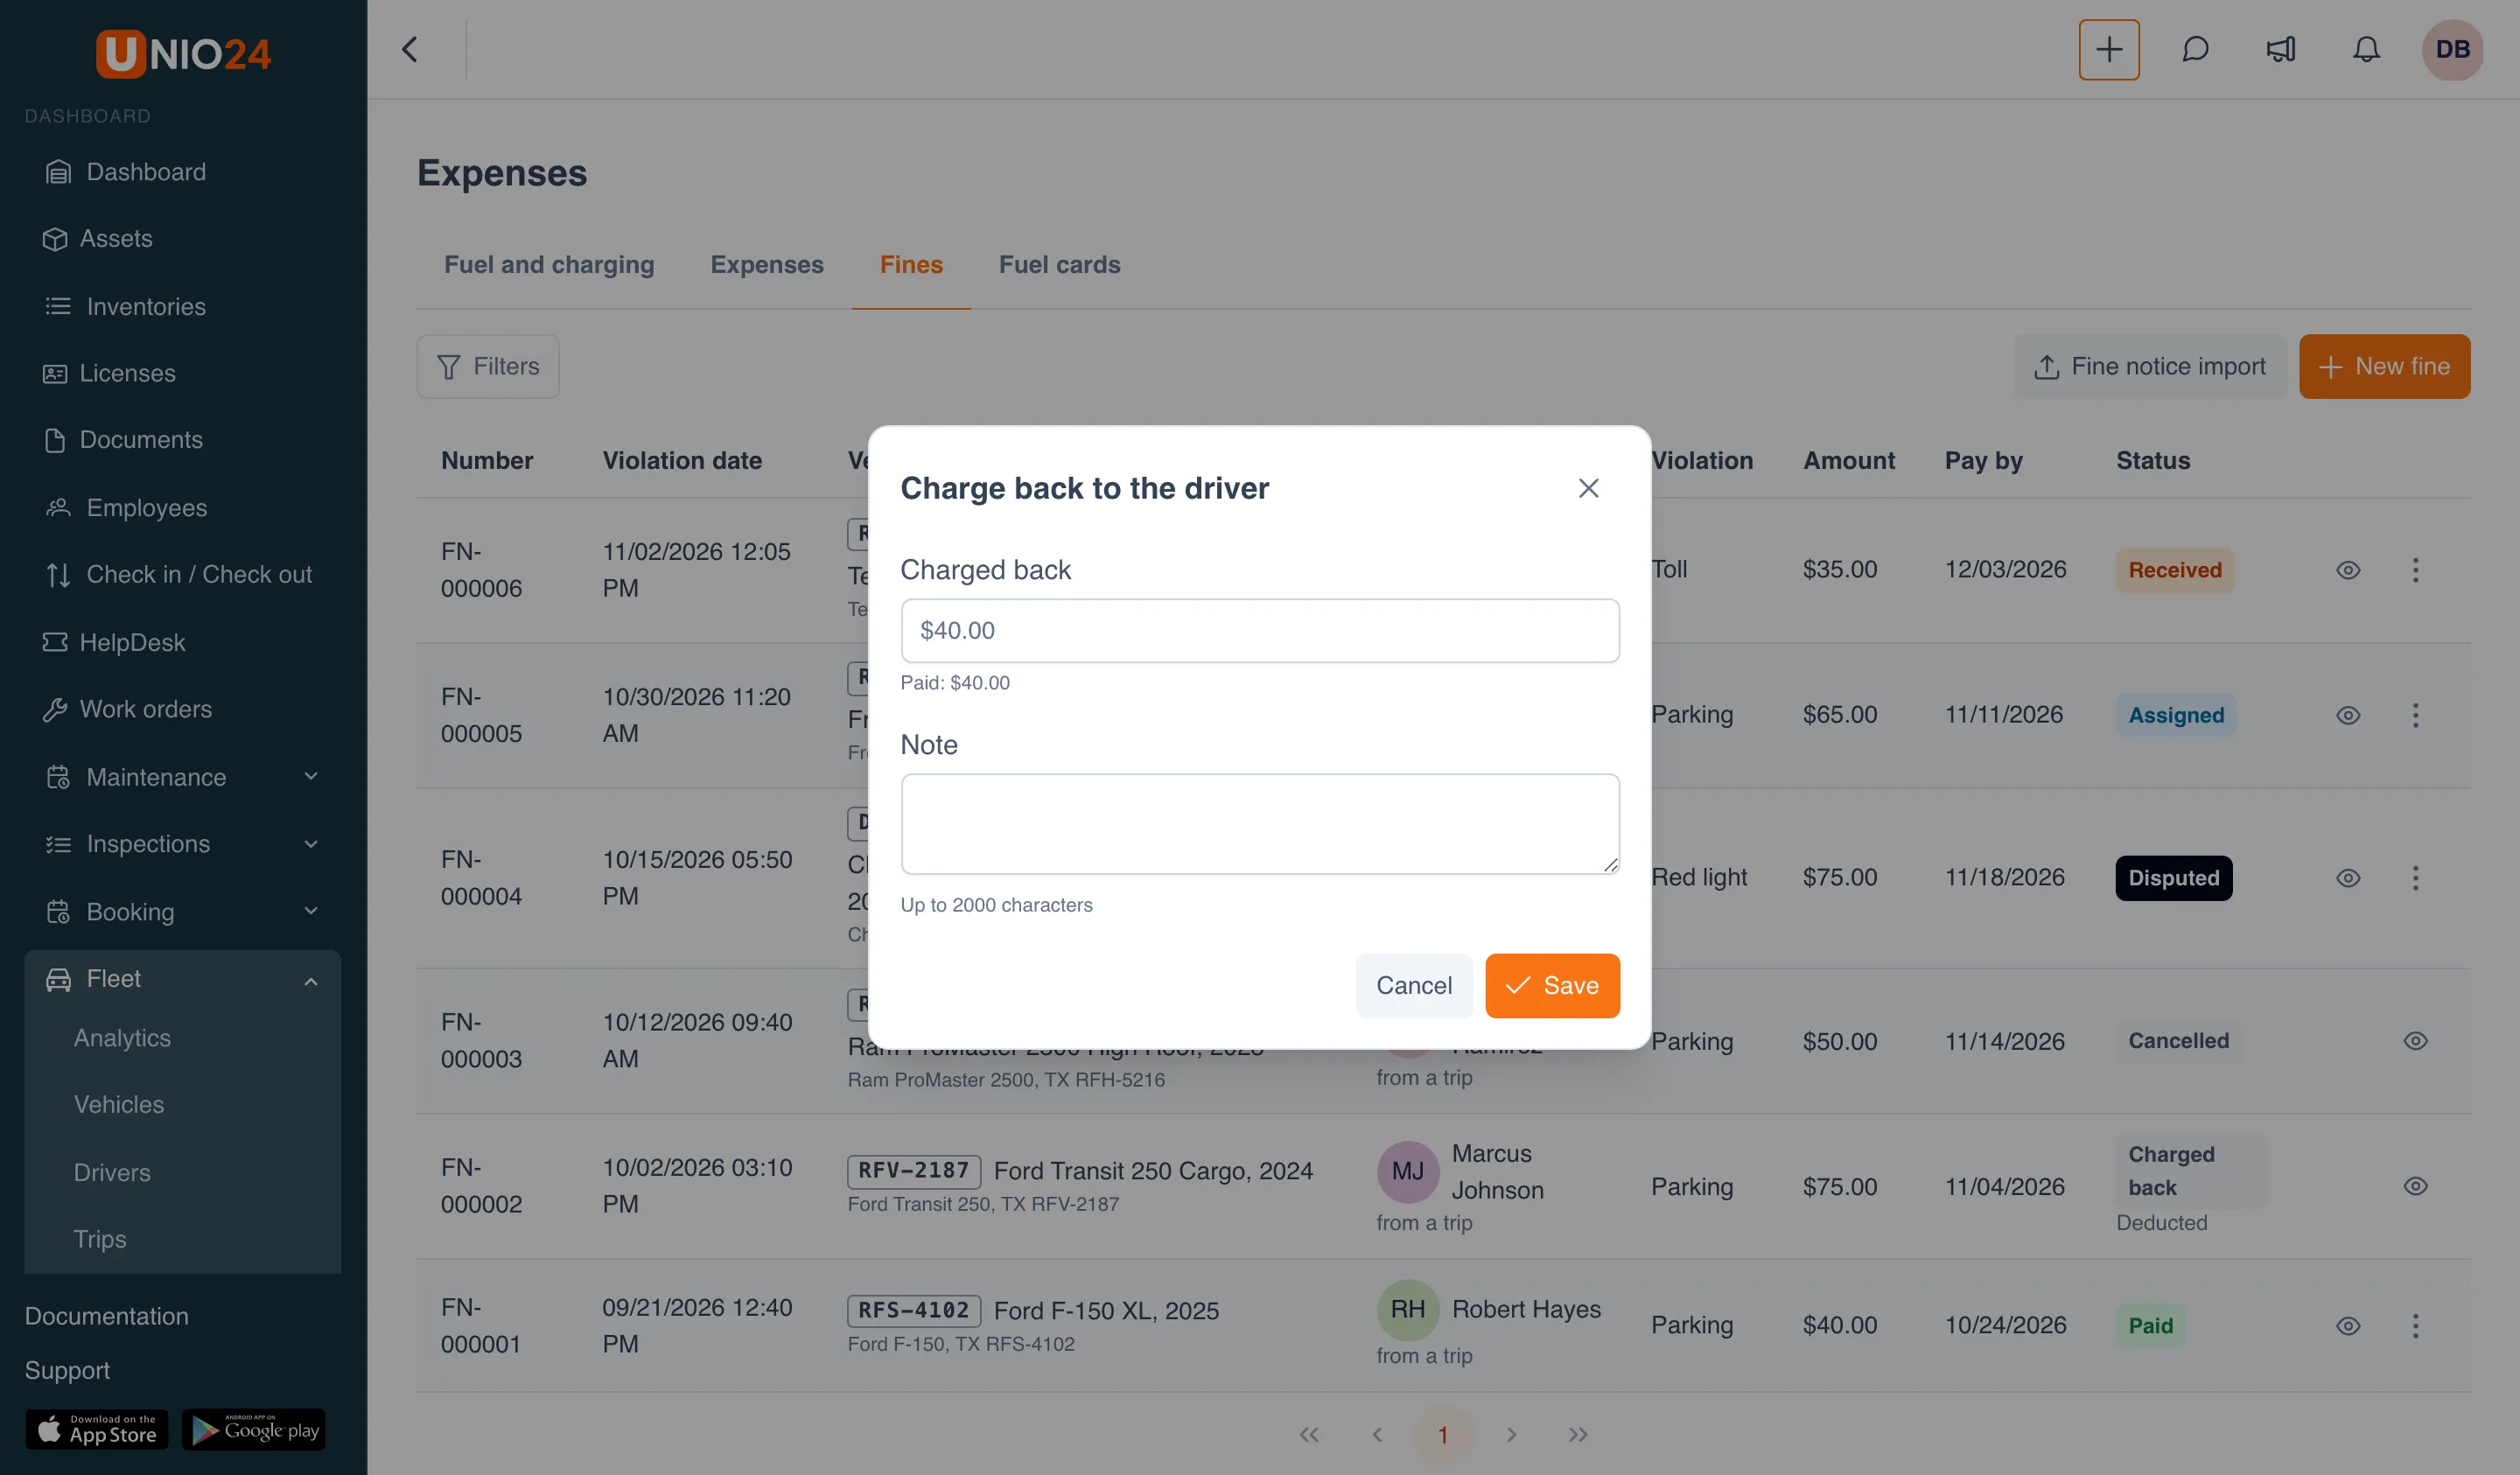
The fine gets the Charged back status, and the charge back gets the To deduct state. When it’s settled, choose Close the charge back in the menu and click Deducted from pay or Waived.
Cancel
Section titled “Cancel”If a fine is cancelled (for example, after a successful dispute), choose Cancel in the menu. A paid fine can’t be cancelled.
What a driver sees
Section titled “What a driver sees”A driver sees only their own fines in the fines log, with no actions. On the Fleet → Vehicles page they see a banner with their unpaid fines: how many there are, the total To pay (the discounted amount while a discount applies), and a line for each fine with its number, vehicle, amount, and payment deadline. The Open button leads to the fines log.
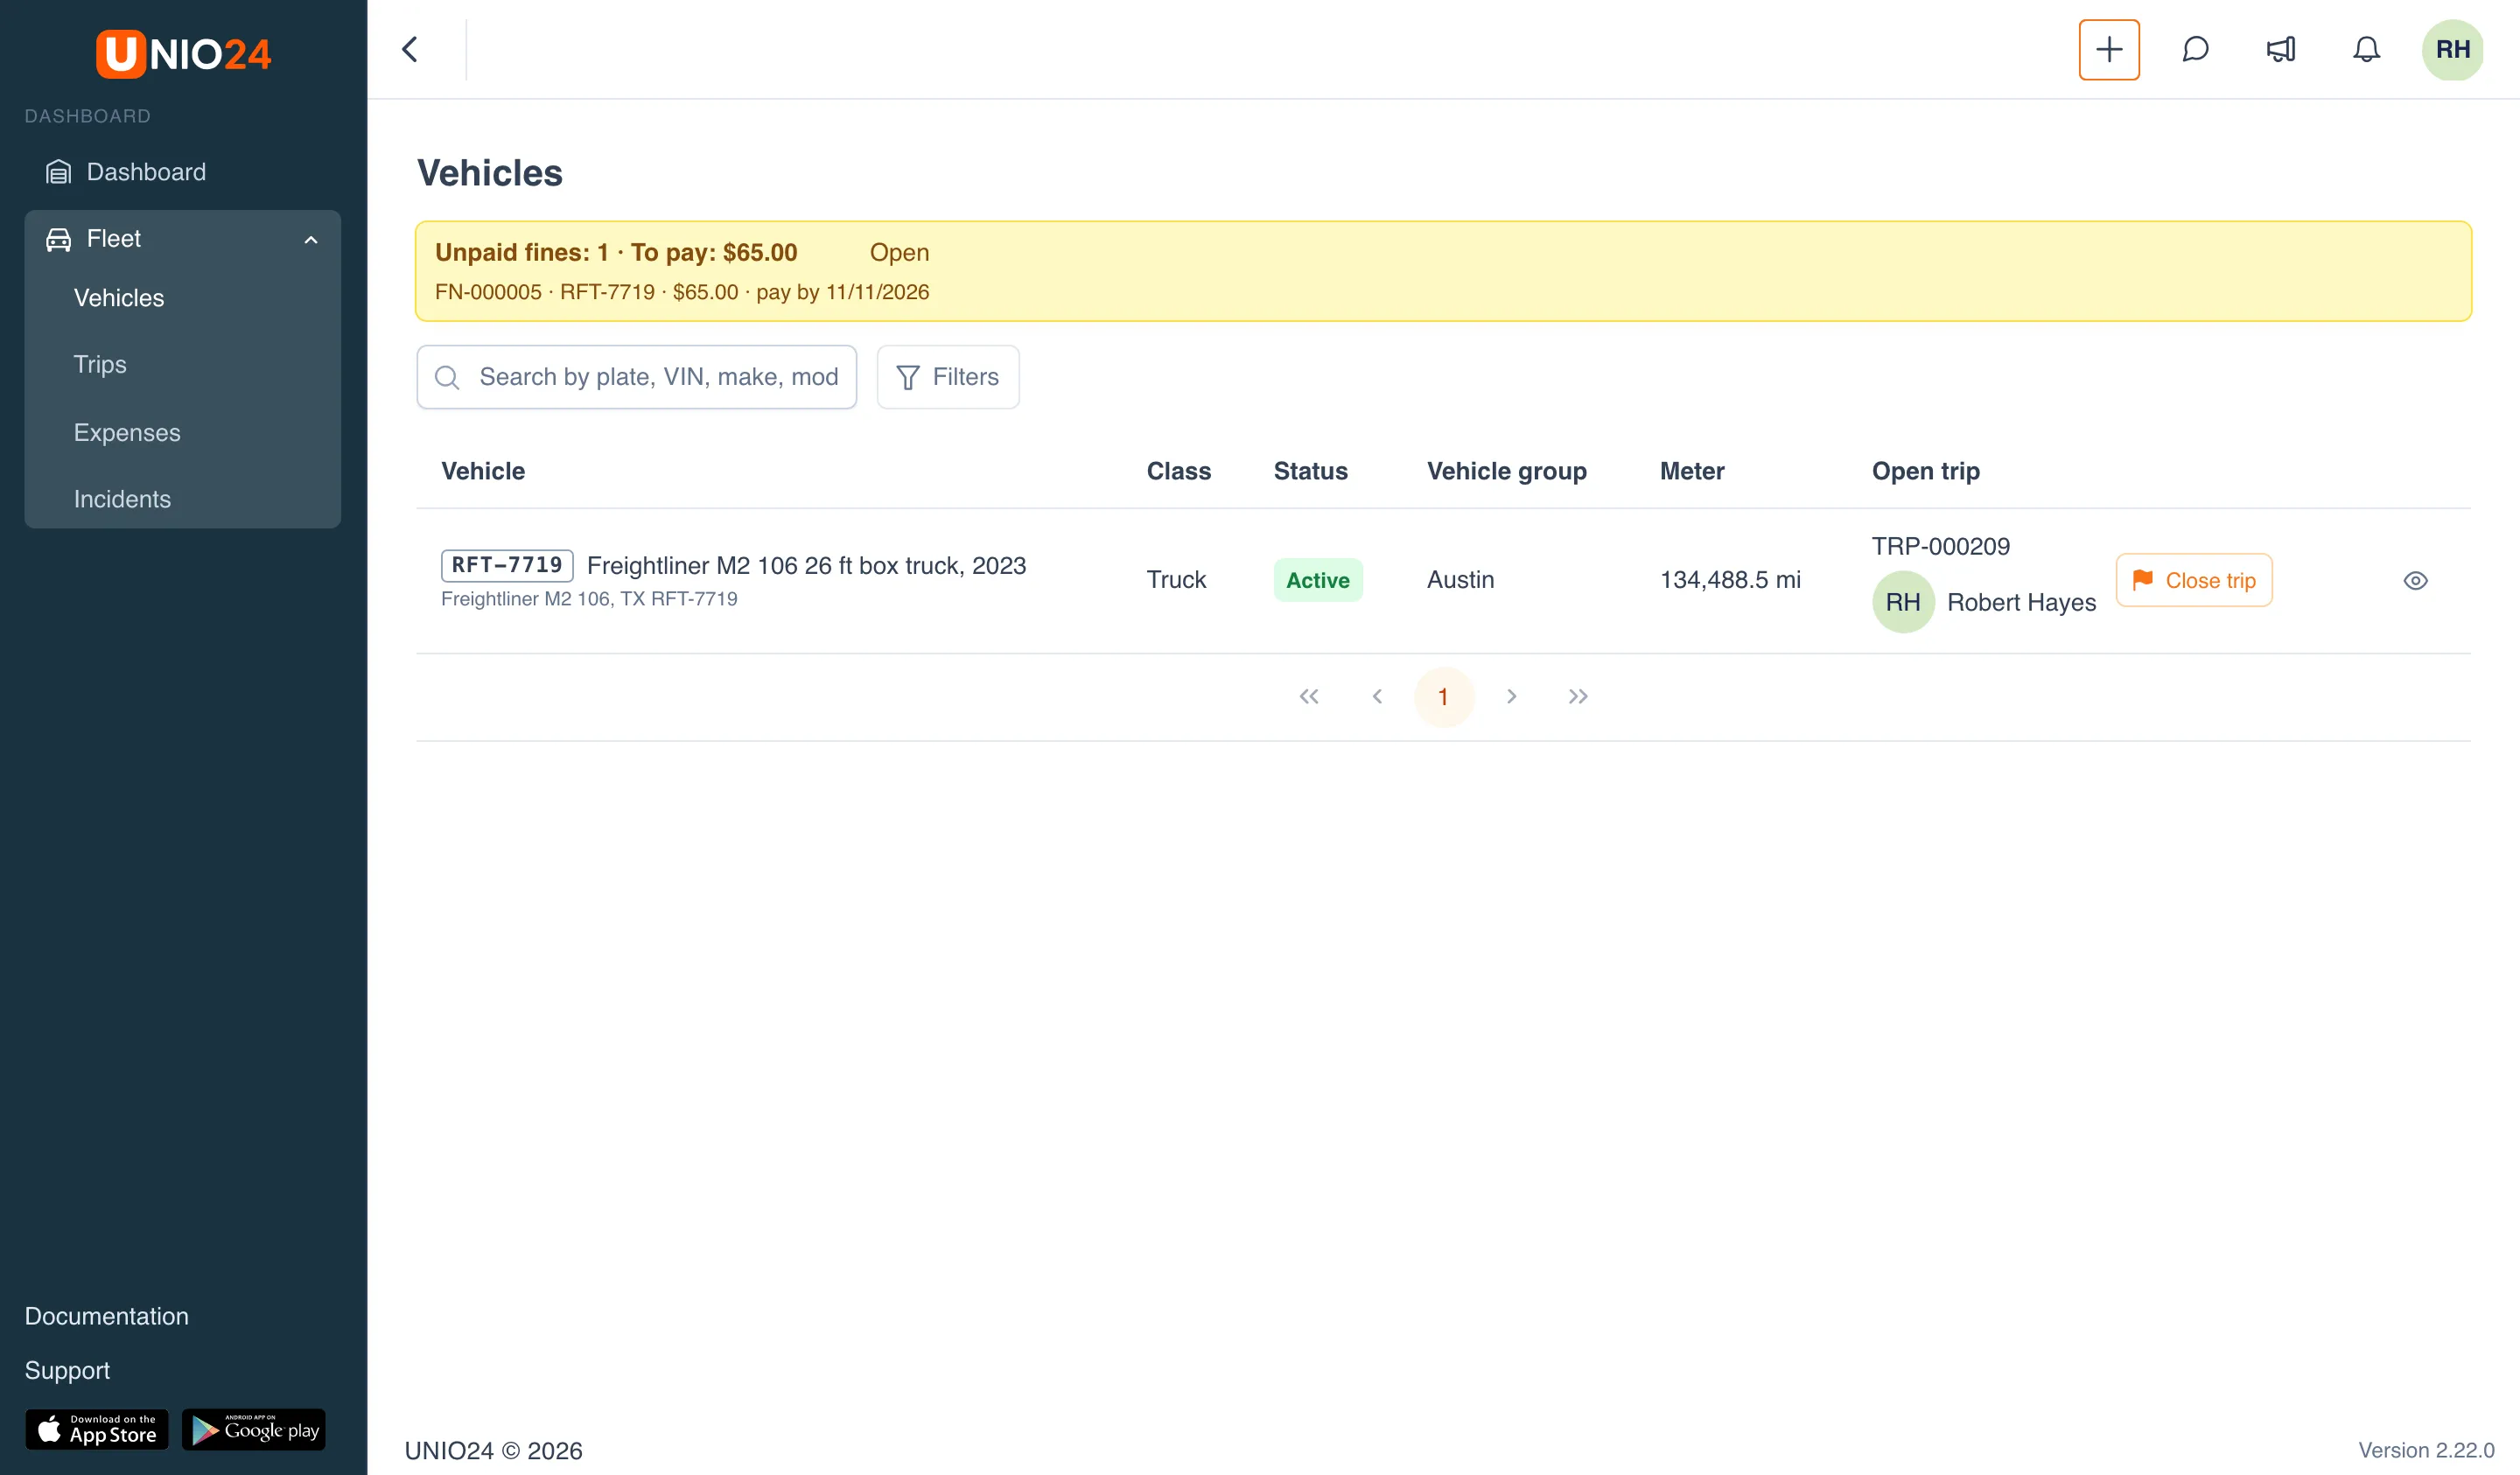
UNIO24 reminds about an unpaid fine 7 days and 1 day before the nearest deadline: the last day of the discount or the payment deadline. Who gets fine notifications is listed in the Fleet reference.
Import fine notices from a file
Section titled “Import fine notices from a file”If fine notices arrive as a list, you can import them from a file instead of entering them one by one.
- On the Fines tab, click Fine notice import. The Fine notice import page opens.
- Drag the file into the Notices file field or click choose it on the computer. .xlsx and .csv files work.
- Check the Country of the notices: it sets the order of day and month in dates and the decimal separator.
- Click Preview.
There are no ready-made templates for fine notices: in the Columns section, choose by hand which column holds which field. Violation date, Plate number, and Amount are required; the rest (Notice number, Currency, With discount, Discount until, Pay by, Notice received, Violation, Issued by, Article, Place, Description) are optional. The vehicle is found by plate number only.
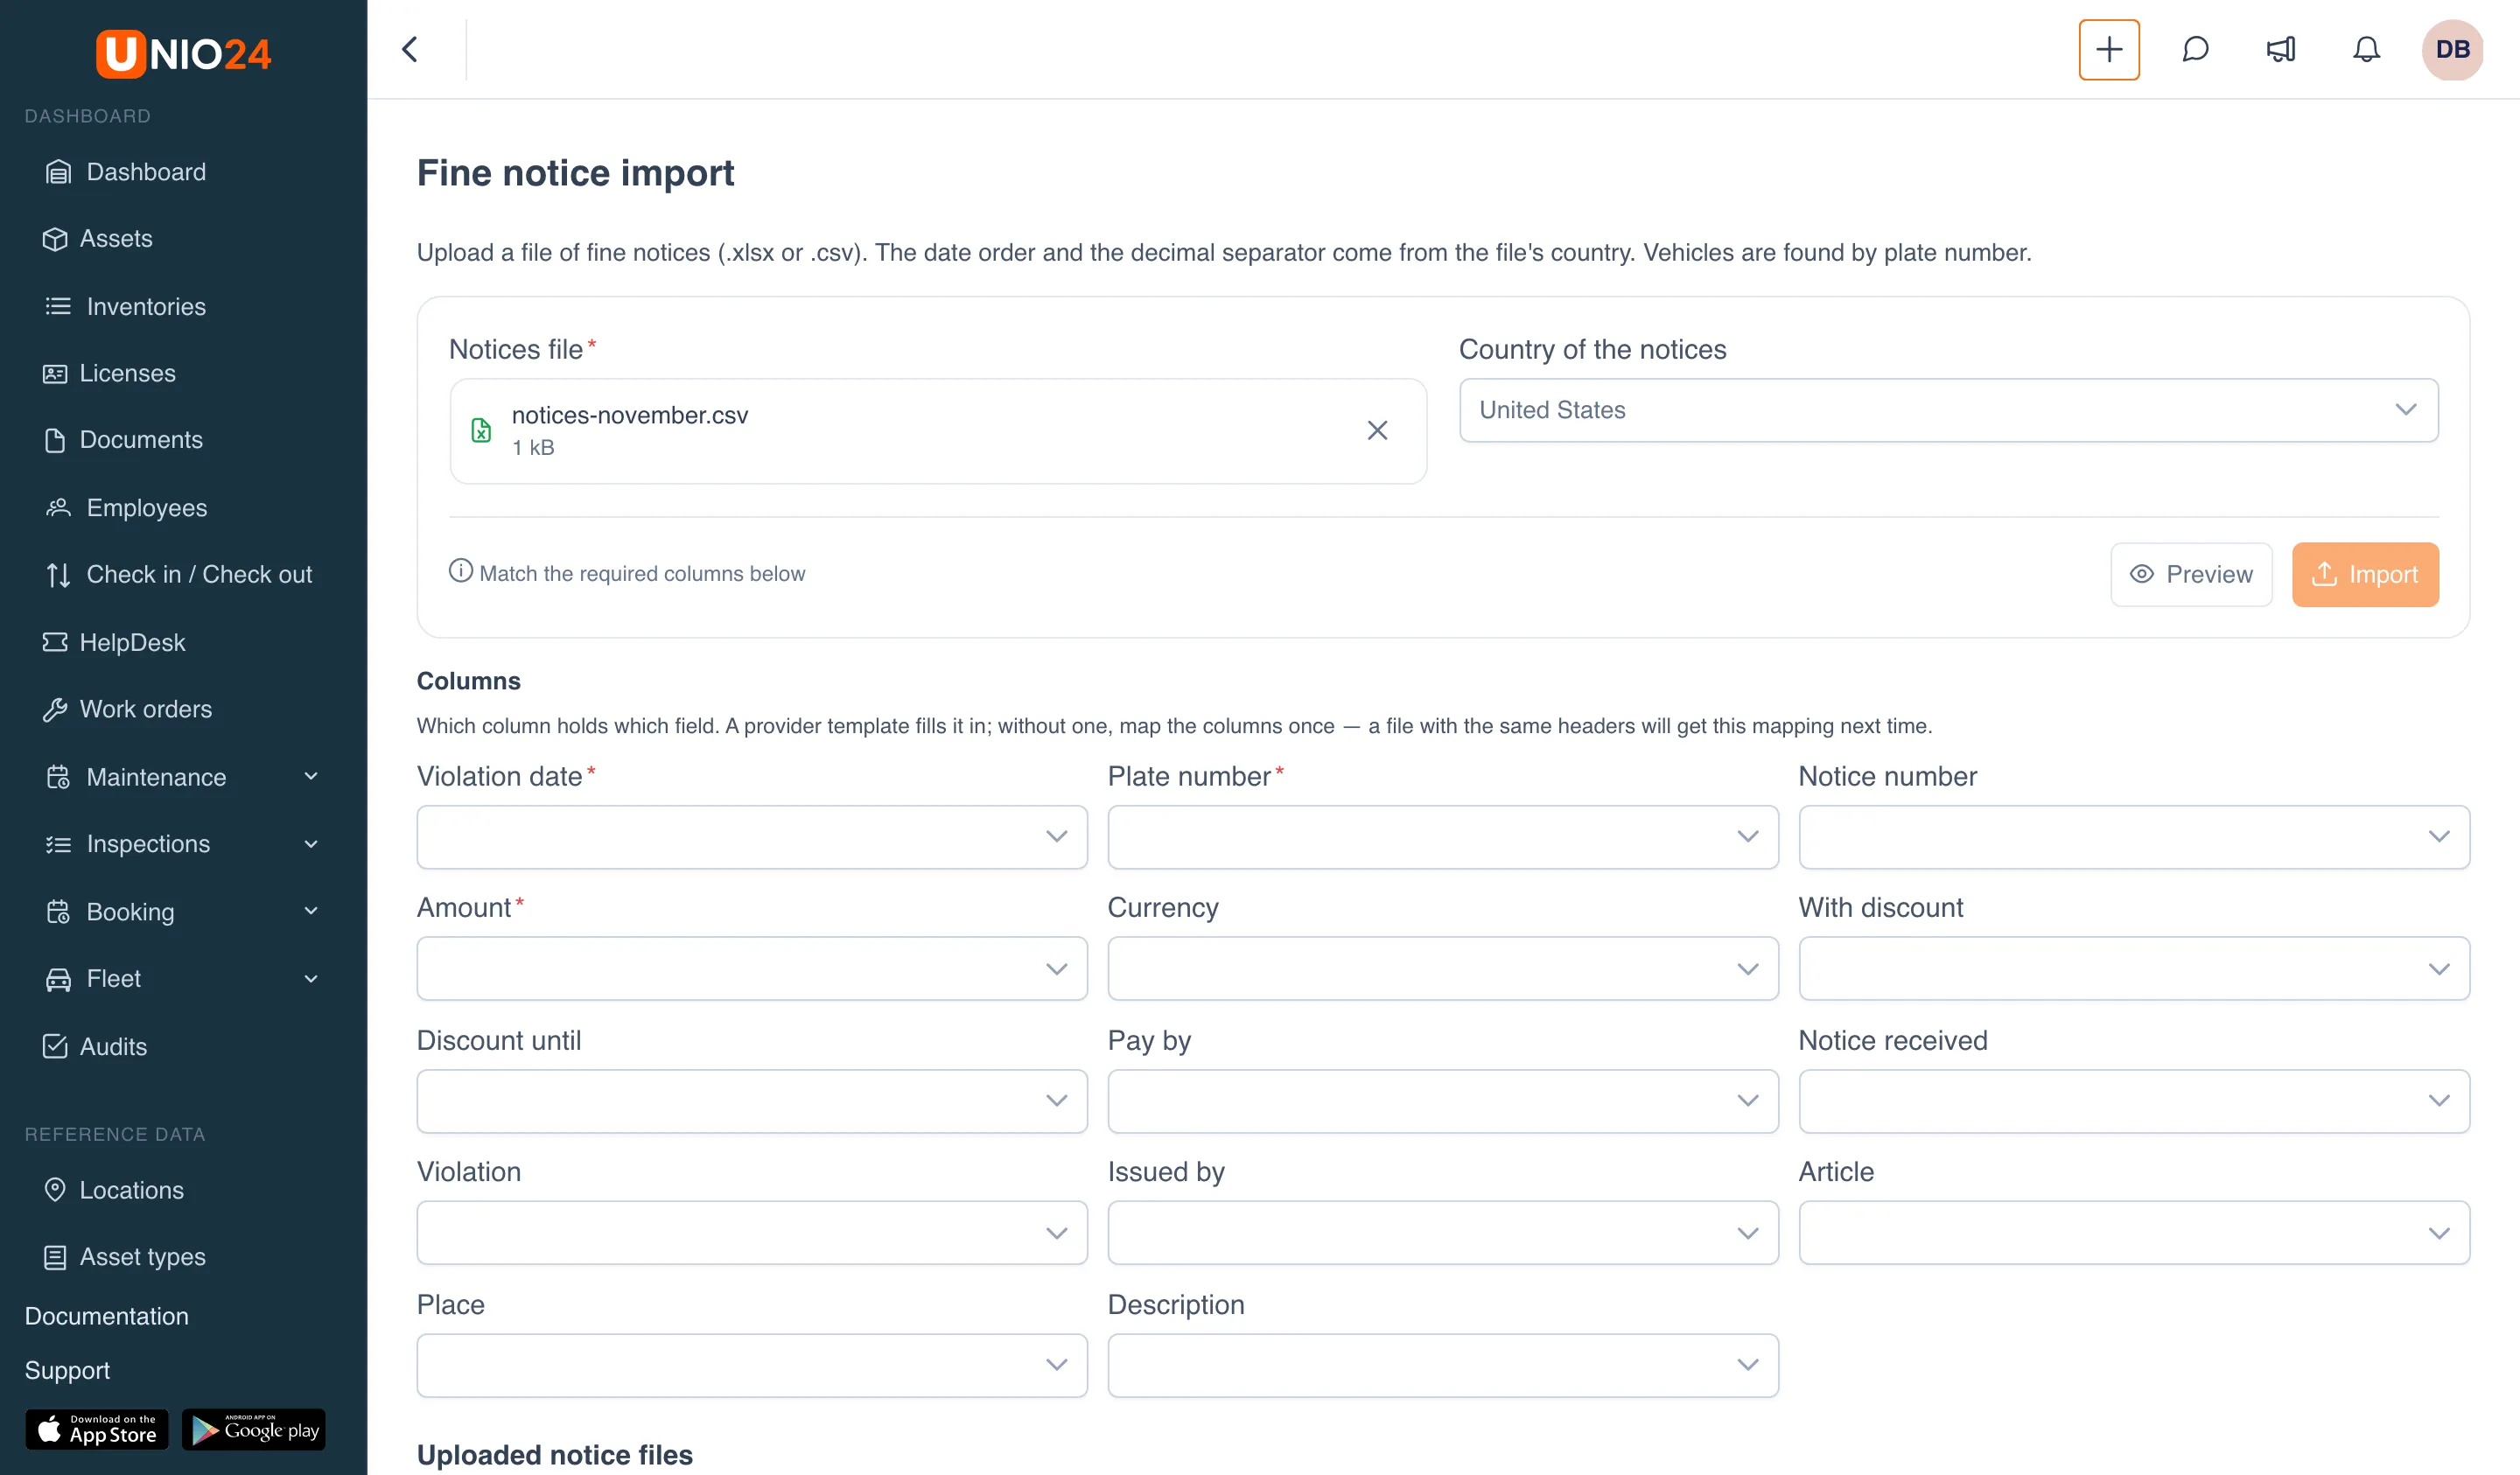
- After mapping the columns, click Preview again. Each row shows the vehicle found, the suggested driver, and any problems. A notice number that is already in UNIO24, or appears earlier in the same file, is a row error, and no second fine is created.
- Click Import.
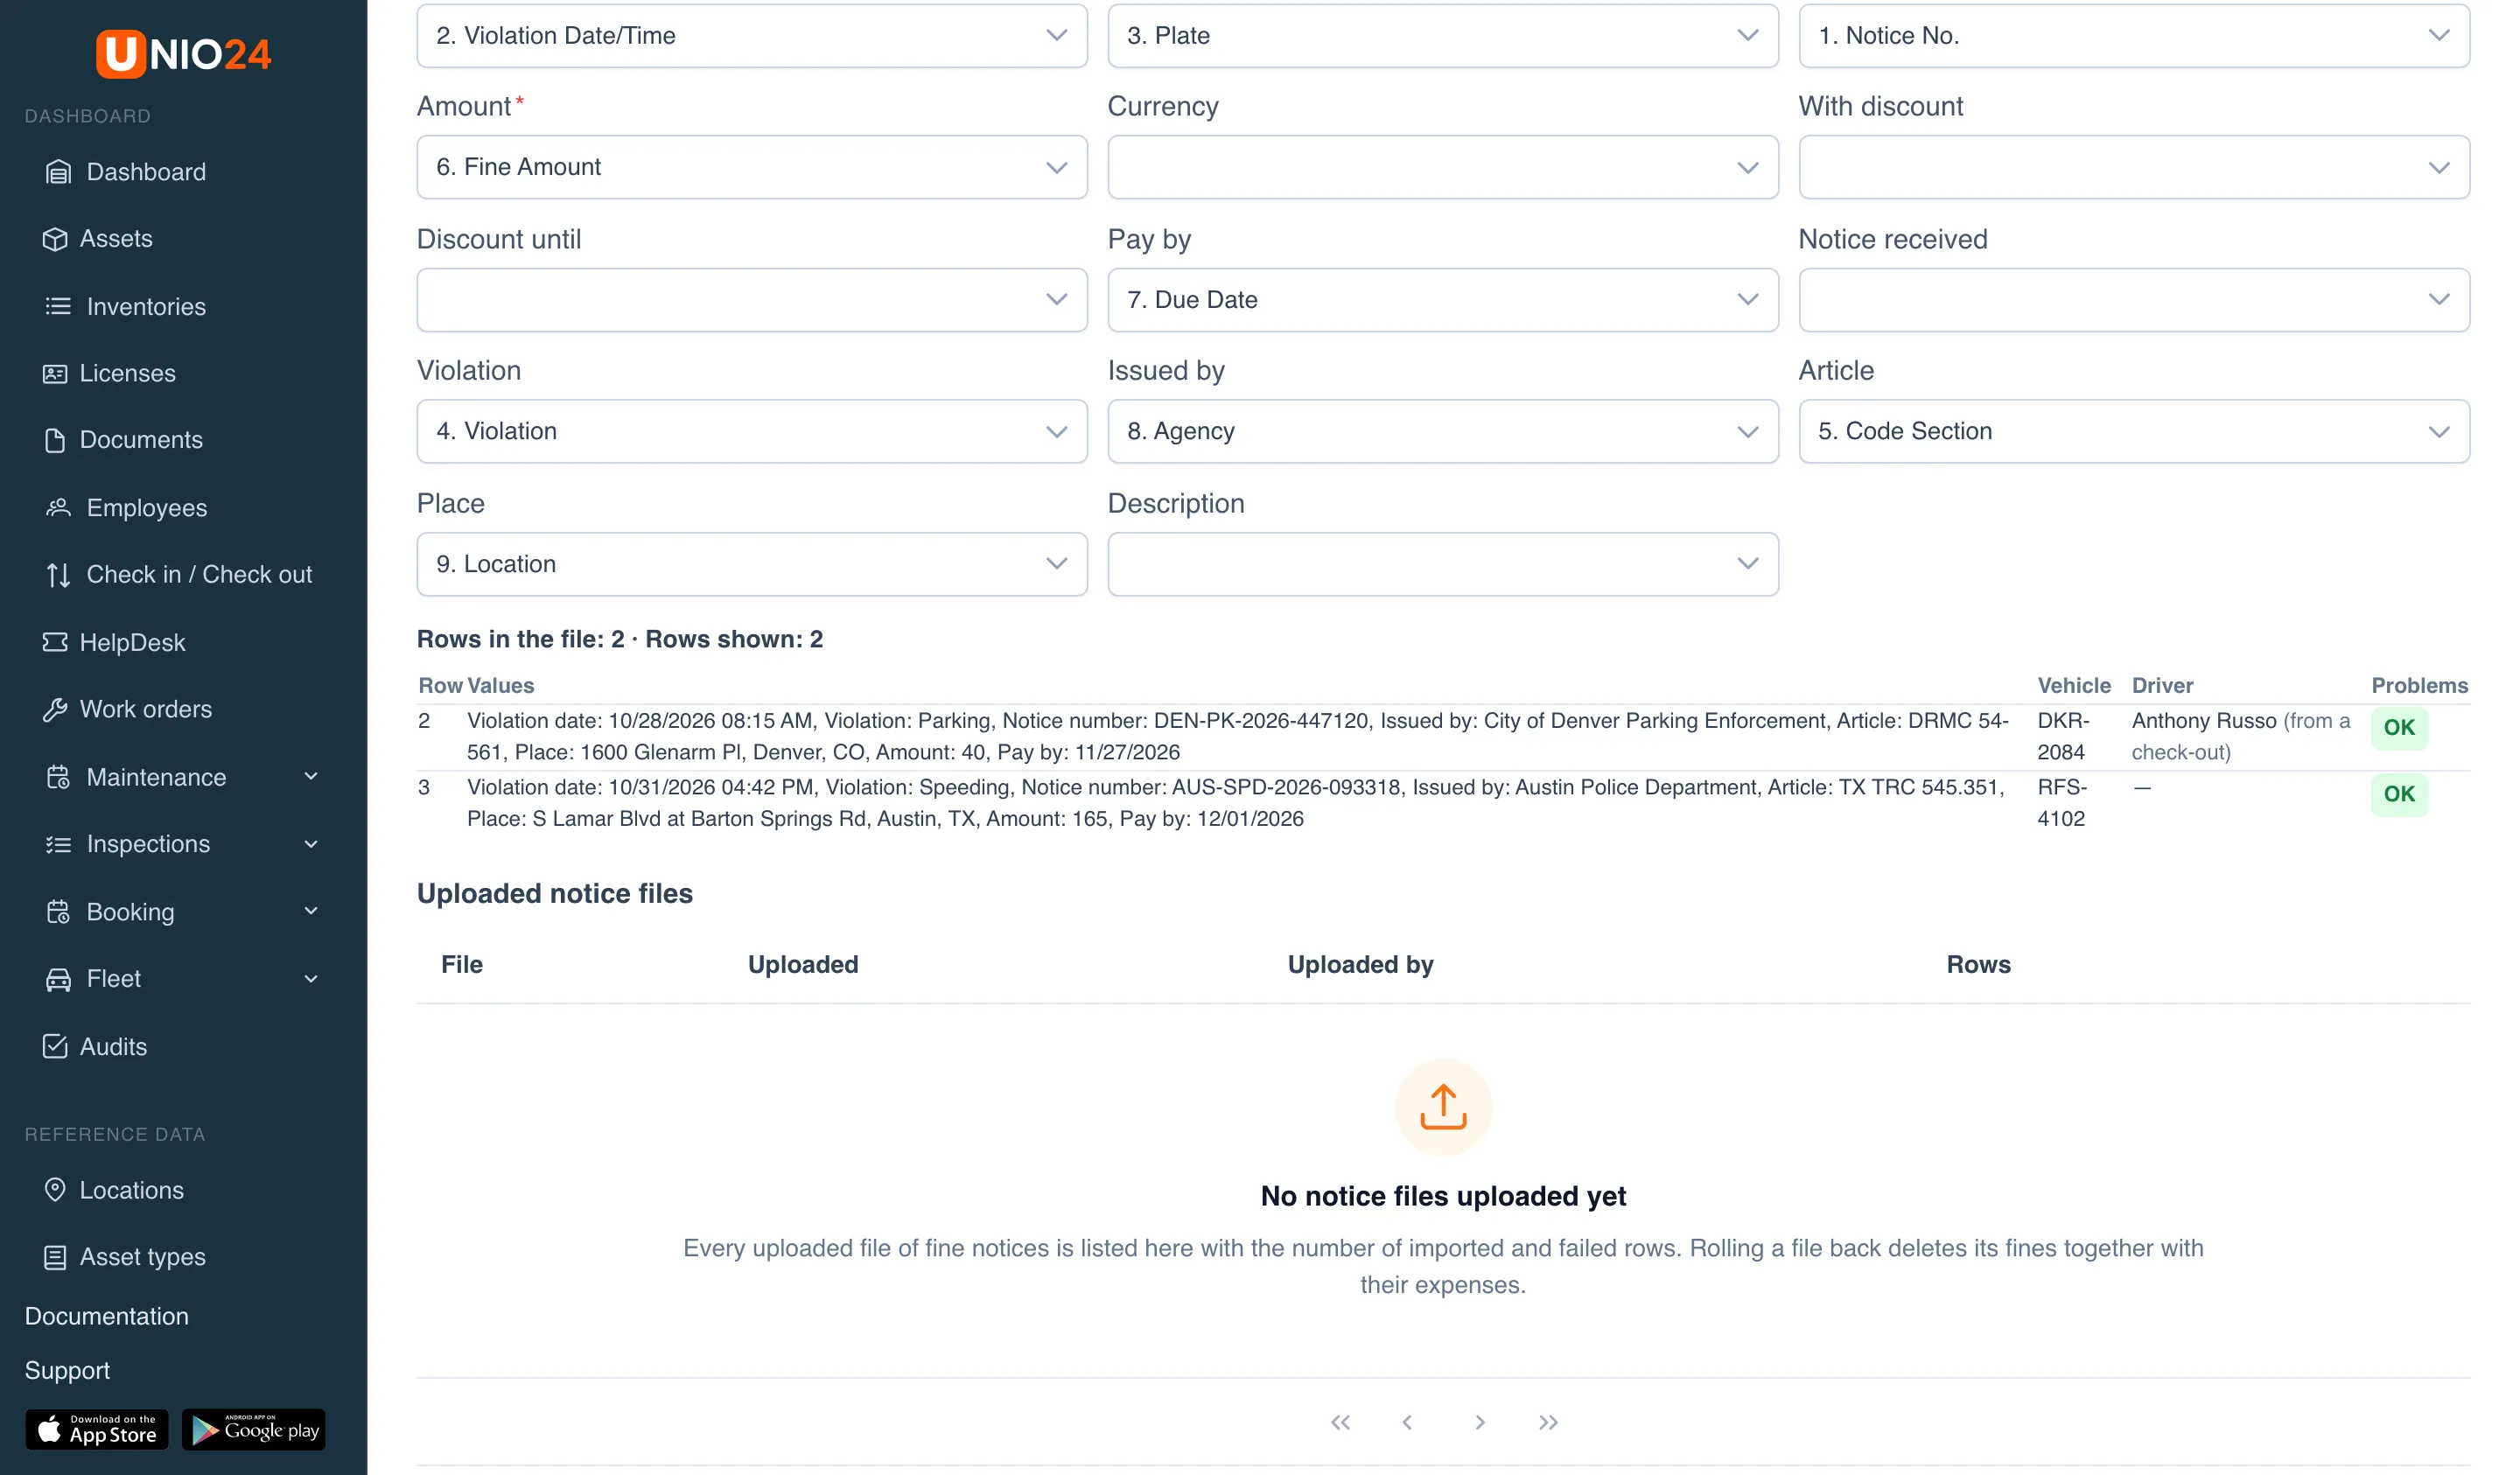
The mapping is remembered: the next file with the same headers gets it automatically. Imported fines get the Received status and the suggested driver.
The Uploaded notice files table at the bottom of the page shows who uploaded each file and when. The Roll back button deletes all the fines of that file together with their expenses. If any fine of the file has already been assigned, disputed, or paid, the import can’t be rolled back, and UNIO24 shows those fines.
Useful links
Section titled “Useful links”- Fleet — what the module does and how it works
- Vehicles and drivers — vehicle status, reasons a vehicle is out of use, drivers
- Fuel, trips and expenses — the trips used to find the driver, and the expenses from fines and incidents
- Fleet deadlines and analytics — fine payment deadlines and incident and fine analytics by driver
- Fleet reference — incident and fine statuses, permissions, and notifications
- Create and handle work orders — working with a work order opened from an incident